Razer Cortex installer failing to work on Windows 11 is a common issue often caused by permission conflicts, software incompatibilities, or corrupted system files. This problem prevents users from installing or launching the optimization tool, disrupting gameplay enhancement features. In this post, we are going to see what you can do if the Razer Cortex installer is not working on Windows 11/10.

The installer may fail to work properly due to restrictions on administrative permissions, as Razer Cortex requires elevated access to modify system settings. Outdated or corrupted graphics drivers can also cause issues since the installer depends on stable driver operations. Additionally, conflicts with Windows 11 components, such as the WebView2 runtime, or antivirus software that blocks the installation process, are known problems. In some cases, existing corrupted Razer files from previous installations may prevent successful new setups.
Razer Cortex Installer not working on Windows 11/10
If the Razer Cortex Installer is not working on your Windows computer, you can follow the solutions mentioned below.
- Run installer as administrator
- Replace WebView2 Runtime
- Clean reinstallation with File Removal
- Update your graphics drivers
- Troubleshoot in Clean Boot
Let us talk about them in detail.
1] Run installer as administrator

If the installer is not working, one of the first things you can do is to run it as an admin. Doing so grants the installer full system access to modify files and registry entries, overcoming permission-related barriers. Usually, installation occurs with admin rights. However, if you don’t see the UAC prompt when trying to install Razor, right-click on the installer and select Run as administrator. When you get the UAC prompt, click Yes and proceed with the installation.
2] Replace WebView2 Runtime

Razer Cortex installer relies on a specific version of the Microsoft Edge WebView2 runtime to render its user interface. If a newer or corrupted version of WebView2 is present, it can cause a conflict that makes the installer window fail to appear or function properly. By replacing it with an older, known-compatible version (like 105.0.1343.53), you restore the necessary components for the installer’s interface to load correctly, allowing the installation process to proceed visibly.
- Download an older WebView2 version (e.g., 105.0.1343.53.x64) from Microsoft’s official site.
- Now, you need to extract the downloaded ZIP file.
- Replace contents in C:\Program Files (x86)\Microsoft\EdgeWebView\Application\[Version] with extracted files (ensure folder names remain unchanged).
Finally, run the Razor Cortex installer and see if it works.
3] Clean reinstallation with File Removal
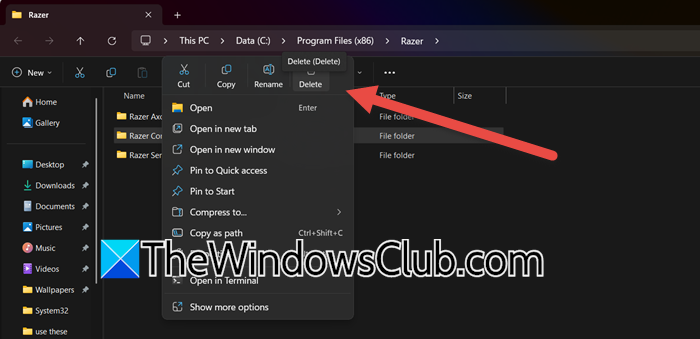
Standard uninstallation process often leaves behind configuration files, registry entries, and cached data from previous Razer Cortex installations. These residual files can contain corrupted settings or conflicts that cause the new installer to fail, as it detects the old, broken setup and tries to interact with it. By manually deleting these leftover folders, you perform a clean slate removal, eliminating the source of the corruption and allowing the new installer to run without any conflicts or errors.
- First of all, you need to uninstall Razor Cortex (if you were trying to upgrade and not perform a clean installation).
- Delete leftover folders:
- C:\Program Files (x86)\Razer
- C:\ProgramData\Razer
- Restart your PC and download the latest installer from Razer’s official site.
Finally, check if the issue is resolved.
4] Update your graphics drivers
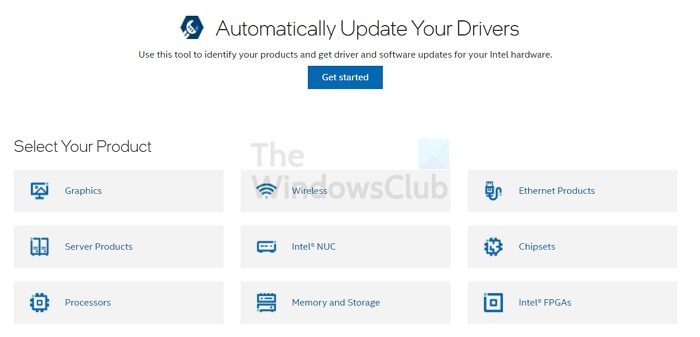
Razer Cortex installer often use GPU-accelerated frameworks for their user interface. An outdated or corrupted graphics driver can fail to properly render these graphical elements, causing the installer to freeze, display a blank window, or crash entirely. Updating the driver ensures compatibility with Windows 11 and provides the necessary stability for the installer’s graphical components to function correctly, allowing the process to complete. Go ahead and update your Graphics drivers to check if the issue is resolved.
5] Troubleshoot in Clean Boot
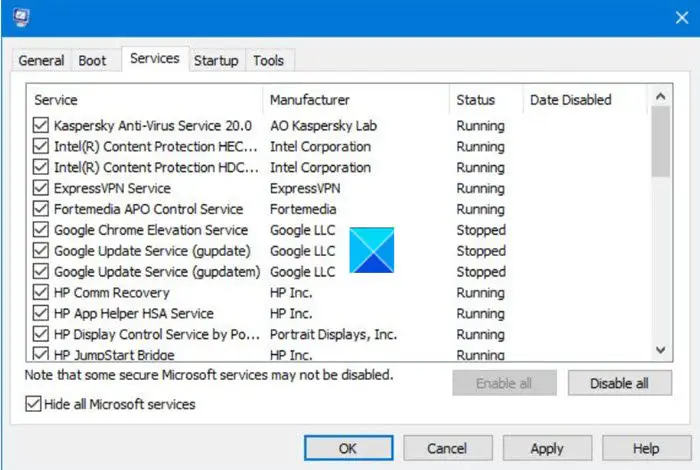
Next up, we recommend you perform a Clean Boot to run the Razor Cortex installer as that could be one of the reasons why you are encountering this issue. This way you get a clean slate upon which you can try running Razor Cortex installer. If the issue is due to a third-party service interfering with Razor Cortex, this will do the job for you.
Hopefully, with the help of these solutions, your issue will be resolved.
Read: Razer Cortex Game Booster helps boost Gaming performance
Why is my Razer Cortex not opening?
Your Razer Cortex may not be opening due to software corruption, missing dependencies, or system conflicts. Try uninstalling and reinstalling the latest version, ensuring you also install Microsoft Visual C++ and Microsoft WebView2, which are essential components for Cortex to function. If the problem persists, running the program as an administrator or modifying the appsettings.json file by removing specific modules may help resolve the issue. We recommend you go through our guide to know what to do if Razer Cortex is not opening.
Read: Fix Razer Synapse does not recognize or detect my Razer device
Is Razer Synapse not compatible with Windows 11?
Razer Synapse 4 is officially compatible with Windows 11 64-bit, as stated in its system requirements. However, some users have reported experiencing bugs, crashes, and performance issues on Windows 11, which may require troubleshooting or software updates to resolve. Additionally, Razer Synapse does not currently support Windows 11 devices using ARM architecture, such as those with Snapdragon X Elite processors.
Also Read: Razer Cortex crashing games on PC.