In this post, we will help you with how to print an email from the new Outlook app in Windows 11/10. Outlook comes with a lot of interesting features or options. You can backup emails or export emails, add a signature, set automatic replies, and more. Sometimes, we also need to take print of emails. And like any other best free email client, Outlook has a built-in option to print an email.
You can choose if you want to generate a hard copy of your email, print email as a PDF file using the Print to PDF feature of Windows 11/10, save email as an XPS format file using Microsoft XPS Document Writer, etc.
Print an email from the Outlook (new) app in Windows 11/10
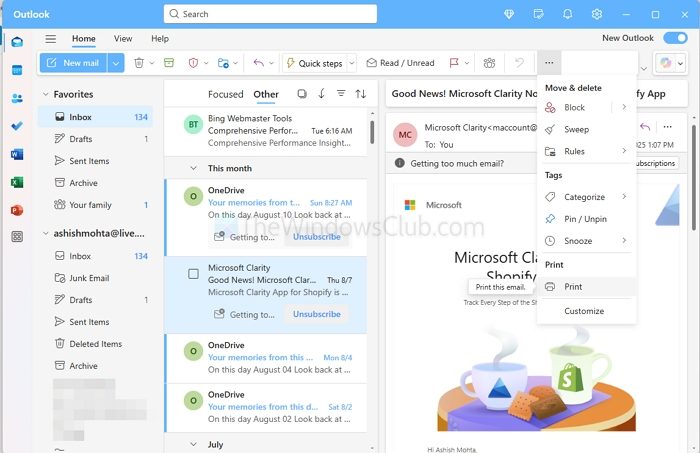
- Open the Outlook (new) app, and select the email you want to print.
- Then press on the three dots on the extreme left, and look for the print option.
- Click on Print, and it will open the native Windows print screen where you can select the printer and configure other options.
Print an email from MS Outlook in Windows 11/10

You can use Outlook to save email as PDF or generate and print its hard copy. Just follow some simple steps:
- Open Outlook desktop client from Start menu or Search box
- Add an email account (if not already). If multiple accounts are added, then select an account using the left sidebar
- Select an email that you want to print. You can also select multiple emails for printing
- Click on the File menu
- Click on the Print option to open the print panel. Or else, use the global hotkey Ctrl+P
- In the Print panel, select a printer using the drop-down menu. You can also add a printer if your printer is not on the list
- Set Print options like page range, number of copies, print style, and more
- Click on the Print button.
It will print the email(s) and you can use the output as you want.
Print an email from Mail app in Windows 11/10

Here are the steps to print an email from the Windows Mail app:
- Open Mail app using the Search box, taskbar icon, or any other ways
- Add an email account from which you want to take a print. If the account is already added and there are multiple accounts in the Mail app, then select an account from the left sidebar
- Select or open an email
- Click on the Actions icon (three vertical dots) available on the top right corner
- Click on the Print option to open the Printer window. You can also simply use the global hotkey Ctrl+P to open that window
- Click on the drop-down menu available for the Printer section
- Select a printer. You can also use Add a printer option in that section if your printer is not added already
- Set options like page orientation, number of pages (all, current page, or custom range), paper size, and more. Or else, you can continue with the default options
- Click on the Print button available on the bottom left side.
This will print the selected email.
I hope this is helpful.