
Reactions in Outlook is a simple and easy way to send a quick reaction to an email. When you receive an email, you can use the smiley icon or the Reactions button (just before the Reply option) to send a reaction, such as a heart, party, thumbs up, laughing face, or sad face. The sender and others can see the sent reaction in that conversation. However, some users have reported that Outlook reactions are not showing or working on their account. Reactions button is greyed out, disabled, or not showing. If you also face this problem, the working solutions covered in this post will be helpful.
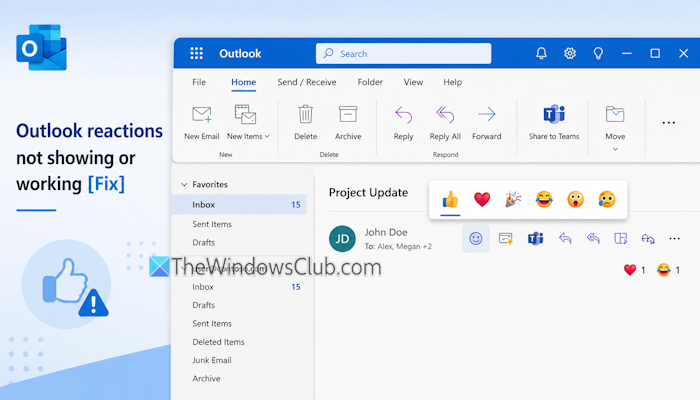
Why is my Outlook not showing Reactions?
Reactions are not available in a personal Outlook account or Office. You must be using a school or work account with a qualifying Microsoft 365 subscription. Also, Outlook may not show reactions if your organization has disallowed reactions or there’s a conflict with OneDrive Personal and OneDrive work connection.
Outlook Reactions not showing or working
If Outlook Reactions are not showing or working, use these solutions:
- Check your account type
- Cc (carbon copy) and Bcc (blind carbon copy) field conditions
- Turn off Disallow reactions while composing an email
- Remove OneDrive (Personal) connection from your Outlook account
- Update Microsoft 365 or Office
- Enable Outlook reactions using Exchange admin center
- Enable reactions in Outlook using Exchange Online PowerShell
- Manually insert Emoji reactions in Outlook email.
Let’s check these solutions.
1] Check your account type
First, you should check your Outlook account type. Reactions in Outlook are supported in a school or work account (including Outlook LTSC 2024) with a qualifying Microsoft 365 subscription. It is not available on a personal plan.
Also, this feature works fully when the sender and the reactor (or recipient) have Exchange Online mailboxes (in the same or different organizations).
2] Cc (carbon copy) and Bcc (blind carbon copy) field conditions
You should also know about the Cc (carbon copy) and Bcc (blind carbon copy) email field conditions or restrictions for using reactions in Outlook. Reactions sent by a person added to the Bcc field can be seen only by that person and the sender. No other person (whether in the To field, Cc, or Bcc fields in Outlook) can see those reactions.
Also, recipients in the Cc and To fields can see each other’s reactions in the email. If Outlook reactions are not visible to you, it may be due to one of these conditions.
3] Turn off Disallow reactions while composing an email
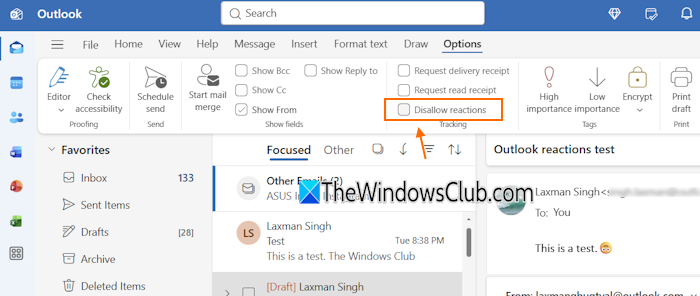
If your organization has enabled reactions in Outlook, make sure to turn off Disallow reactions while composing an email. Otherwise, Outlook reactions will be disabled, greyed out, or won’t be visible. For this:
- Open the Outlook app or Outlook on the web
- In the Home tab, click New to compose an email
- Switch to the Options tab
- Uncheck Disallow reactions.
Now send the email, and others can react to it using Emojis and change their reaction later.
Read: Recall This Message is missing or greyed out in Outlook [Fix]
4] Remove OneDrive (Personal) connection from your Outlook account
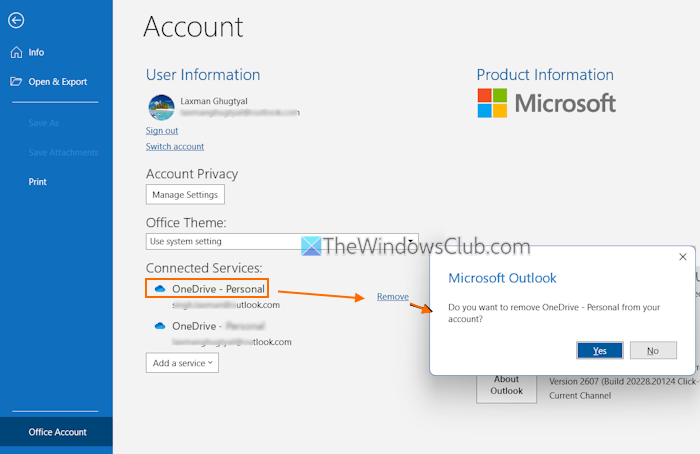
This is one of the best solutions to fix this problem in MS Outlook (or Classic Outlook). Some users found that their personal OneDrive account was connected alongside their work/school OneDrive account in the Connected Services list. Because of that, the Reactions button was missing or not showing in Outlook. Once they removed the OneDrive (Personal) connection from their Outlook account, the problem was gone. For this:
- Launch MS Office on your PC
- Select File menu > Office Account
- In the Connected Services, look for OneDrive – Personal
- Click on the Remove option
- In the confirmation, press the Yes button
- Restart MS Outlook.
5] Update Microsoft 365 or Office
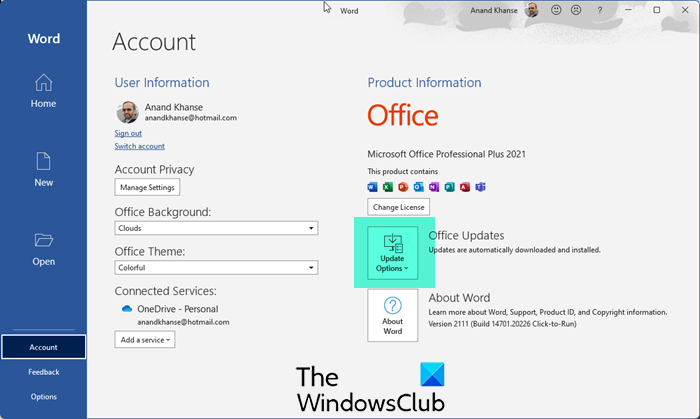
This fix also helped some users. So, you should update Microsoft 365 or Office, and restart your PC. The steps are:
- Open a Microsoft 365 app (Word or Excel)
- Select File > Account. If you have opened MS Outlook, select the Office Account option
- Click on the Update Options drop-down menu in the Product Information section
- Select Update Now.
6] Enable Outlook reactions using the Exchange admin center
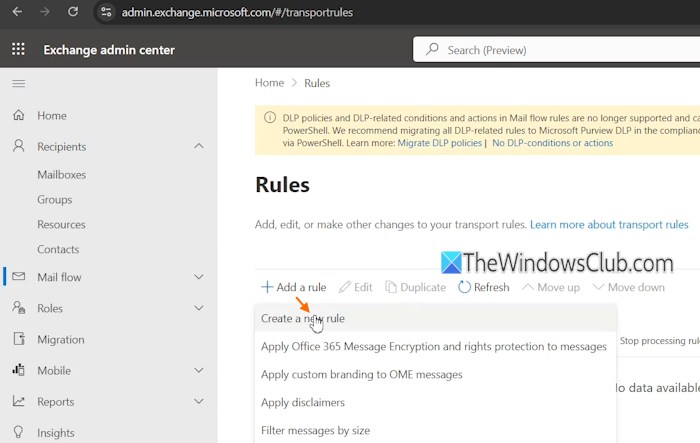
Administrators can create a mail flow rule to enable/disable Outlook reactions using the Exchange admin center. Here are the steps:
- Access the Exchange admin center (EAC) homepage
- Sign in with your work account to access the dashboard
- In the navigation pane, access Mail flow > Rules
- In the right section, select Add a rule > Create a new rule
- A New transparent rule window will open
- There, give a name to your email (say Enable Outlook reactions), and set Apply this rule to all messages
- In the Do the following section, you need to set rule conditions. For this, use the drop-down menus, select the Modify the message properties option, and set a message header. Set the message header to x-ms-reactions to the value ‘allow’. Both the Outlook clients and Exchange Online recognize x-ms-reactions as an SMTP message header. It indicates whether reactions in Outlook are allowed for messages. If yes, we need to enable this condition with the Allow condition
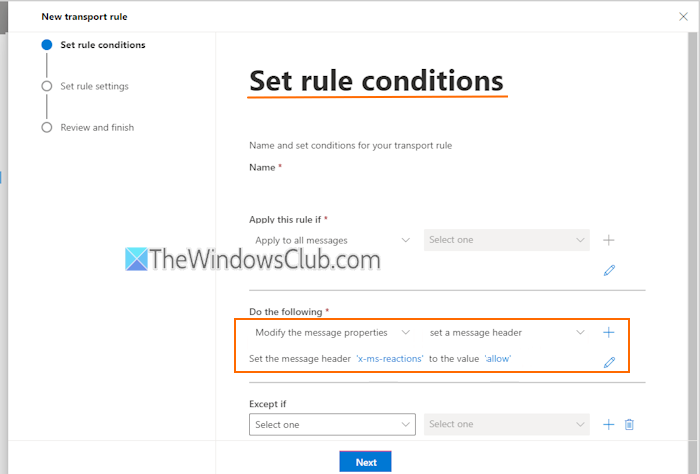
- Press the Next button
- In the next step, set rule settings such as Rule mode to Enforce, Severity to Not specified, add a comment, etc
- Press the Next button
- Press the Finish and Done buttons
- Now that the rule is created to allow Outlook reactions, we need to enable it
- In the Rules section, select the rule
- Use the toggle to set this rule as Enabled.
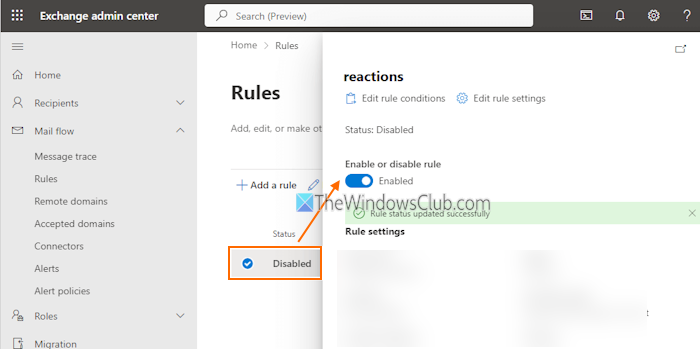
Now users can open the Outlook app and use reactions.
Note: If a mail flow rule to disallow reactions is already added, you can either delete that rule or set it to disabled mode to allow Outlook reactions.
Also read: Emoji reactions not working on Teams
7] Enable reactions in Outlook using Exchange Online PowerShell
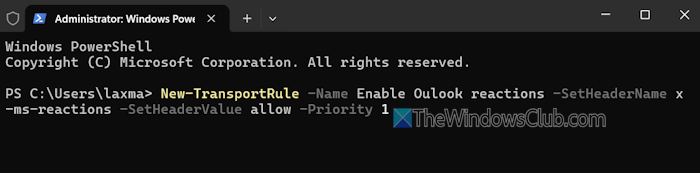
You can also enable reactions in Outlook using the Exchange Online PowerShell. Once you have installed the Exchange Online PowerShell module, you can connect with PowerShell (Connect-ExchangeOnline) and execute the x-ms-reactions command with the allow condition. Here is the command:
New-TransportRule -Name Enable Outlook reactions -SetHeaderName x-ms-reactions -SetHeaderValue allow -Priority 1
8] Manually insert Emoji reactions in Outlook email
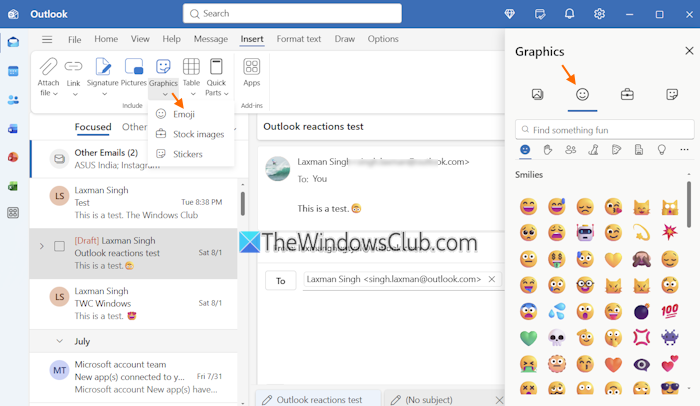
This option doesn’t help you react to an email message via reactions, but lets you manually insert Emoji reactions in Outlook email. You can add Emojis in a new email or when replying to an email. For this:
- Open the Outlook app
- Compose a new email or reply to an email
- Click on the email body field
- Switch to the Insert tab
- Click on the Graphics drop-down menu
- Select the Emoji option, and the Emoji panel will open on the right side
- Switch to the Emoji tab and select emojis. You can also use stickers and stock images.
TIP: You can also use the Emoji panel (Win+. or Win+;) in Windows 11 to insert an emoji or symbol in the email subject line or body.
That’s all.
How to fix unresponsive Outlook?
If Outlook is not responding, keeps crashing, freezes or hangs, use the Inbox Repair Tool, disable hardware graphics acceleration, and check the Outlook data folder and free up space. If this doesn’t work, open Outlook in safe mode. If it’s working fine, add-ins may be causing the issue.
Read next: New Outlook app not working or opening.
