If Word, Excel, PowerPoint, or OneDrive are automatically overwriting files with older versions, here is how to troubleshoot the issue. As it could happen for various reasons, we have consolidated all possible reasons and solutions here.

Why is OneDrive overwriting files with older versions?
If OneDrive is overwriting files with older versions, one of these could be the reason:
- You have uploaded the same file with the same name from a different device with a different timestamp.
- If you use OneDrive on multiple devices and they were offline for a long time, bringing them online suddenly could cause OneDrive to synchronize files accordingly.
- Your older version was not uploaded completely, and you have uploaded a newer version of the same file.
OneDrive overwriting files with older versions
If OneDrive is overwriting files with older versions automatically, follow these solutions:
- Pause uploading temporarily
- Set the date and time correctly
- Disable Files On-Demand
- Remove the device temporarily
- Reset OneDrive
- Disable Always keep on this device feature
- Check version history to restore original files
To learn more about these solutions, continue reading.
1] Pause uploading temporarily
It is the very first thing you must do when you encounter the aforementioned problem with your OneDrive account. If there are any issues with uploading or synchronizing, you might encounter this error. That is why it is suggested to pause the upload and restart it after a few minutes.
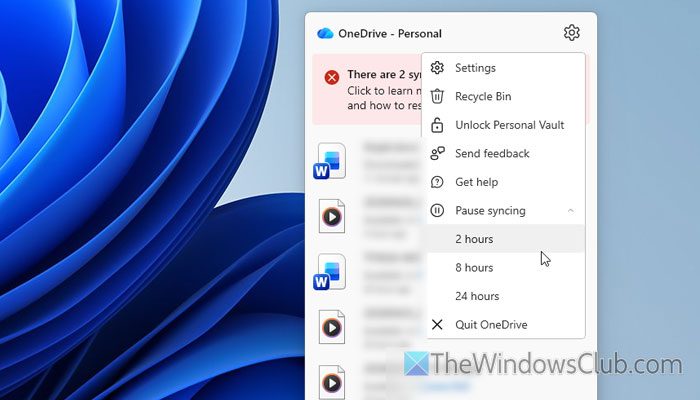
To stop uploading or synchronizing, right-click on the OneDrive icon visible in the system tray and select the Pause syncing option. Then, choose the 2 hour option.
After 2 hours, synchronization will start automatically.
Read: How to Stop, Resume or Pause OneDrive Syncing in Windows 11
2] Set the date and time correctly
No matter how many devices you use to access your OneDrive account, make sure that they use the correct time zone or date-time settings. Otherwise, it will cause a conflict like mentioned above.
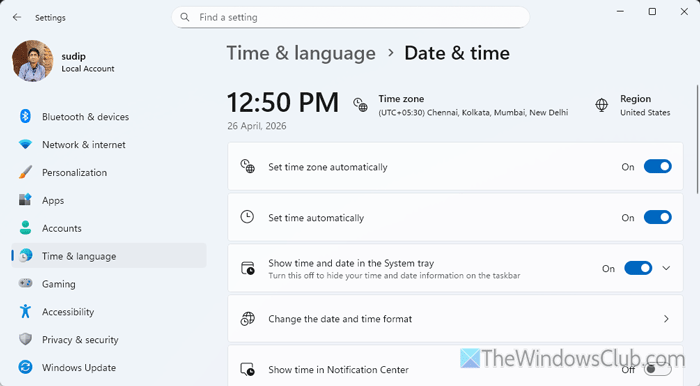
To set the date and time in Windows 11, open the Windows Settings and go to Time & language > Date & time. Then, toggle the Set time zone automatically button to turn it ON. Next, toggle the Set time automatically button to turn it ON.
Read: How to change Date, Time, Region, Locale, Language settings in Windows
3] Disable Files On-Demand
Files On-Demand helps you use the file whenever you need it. You do not need to download files in order to use them on your computer. However, the same feature may create problems. That is why it is suggested to turn off the Files On-Demand facility.
As Microsoft has removed the option to enable or disable Files On-Demand, you can simply pause the synchronization or unlink the PC to get the job done.
4] Remove the device temporarily
If your device has issues with OneDrive, there is a high chance you will encounter this problem while using it. That is why it is suggested that you temporarily remove your device and check whether it resolves the issue.
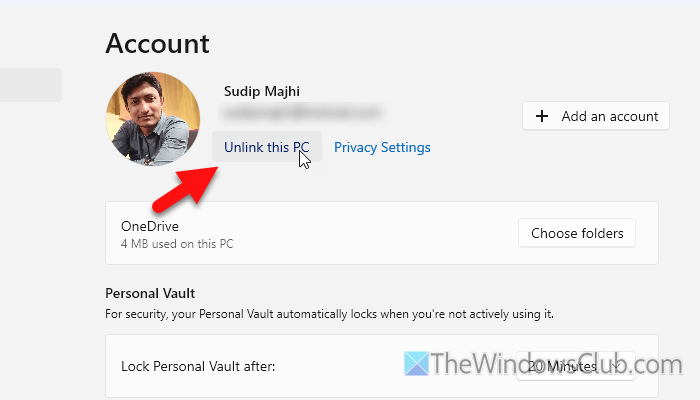
If you use OneDrive on Windows 11, open the OneDrive Settings wizard and go to the Account tab. Then, select the Unlink this PC option.
If you use an Android mobile, open the settings panel and go to the Storage section. Then, tap on Clear cache and Clear data options respectively.
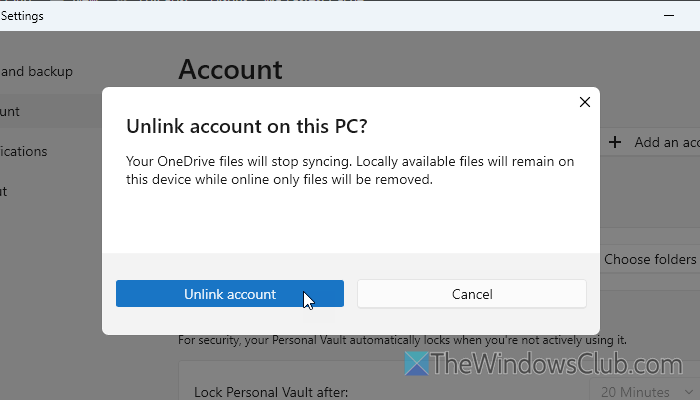
Once you are done with these steps, wait for a few minutes and use OneDrive Web only. If the problem persists, try the other solutions. However, if it fixes the problem, sign in to one device at a time to find the problematic device.
Read: How to unlink, exclude or remove a folder from OneDrive
5] Reset OneDrive
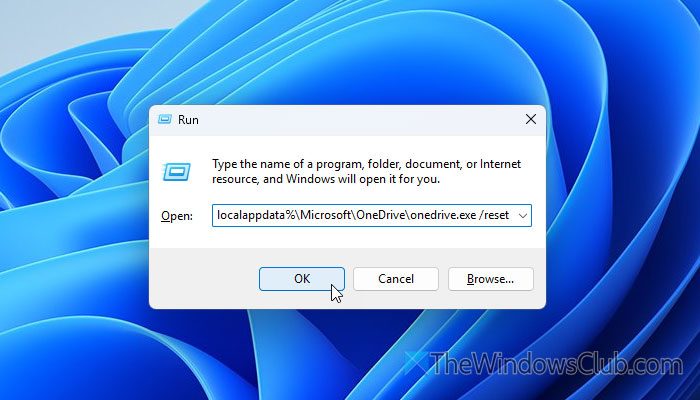
To reset OneDrive, open the Run prompt by pressing Win+R and enter this command: wsreset.exe. However, if you have any problem while executing this command, use this command:
%localappdata%\Microsoft\OneDrive\onedrive.exe /reset
At times, you may come across an error while using this command. If so, you can open the Run prompt and enter this command:
C:\Program Files\Microsoft OneDrive\onedrive.exe /reset
In case you use a different version of Windows, use this command:
C:\Program Files (x86)\Microsoft OneDrive\onedrive.exe /reset
If you use an Android mobile, you must use the Clear data and Clear cache options.
Once done, open OneDrive and check whether the problem persists.
Read: How to reset OneDrive on Windows, Mac or Android
6] Disable Always keep on this device feature
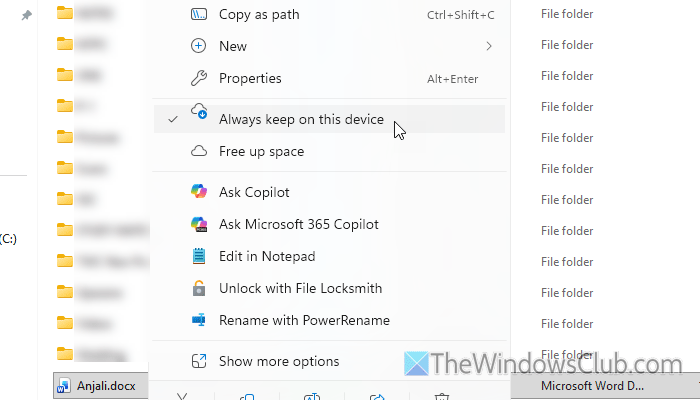
“Always keep on this device” feature helps you keep a file on your computer and use it without downloading. If this feature is enabled and you have changed many things without an internet connection, you will encounter the aforementioned error when you connect to the internet.
That is why it is suggested to disable this functionality. To do that, open the OneDrive folder in File Explorer and right-click the file/folder. Select Always keep on this device to turn it OFF.
Read: How to access OneDrive backup files or folders
7] Check version history to restore original files
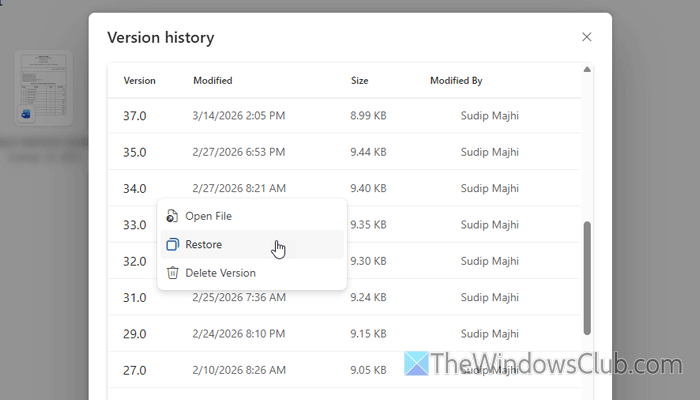
If you want to restore the original file without trying anything, you can simply check the file’s version history and restore a specific version you want.
For example, if you want to restore a document, right-click the current version of the document, click the three-dot icon, and select the Version history option.
Here you can find all the versions of that file. Click the three-dot icon for the specific version and select the Restore option.
If you want to check the version before restoring, select the Open File option.
Read: How to use Version History on OneDrive for all File Types to recover files
Can I recover overwritten files on OneDrive?
Yes, you can recover overwritten files on OneDrive. For that, you must use the Version history section. It stores all versions of a single file saved on OneDrive.
How to recover overwritten files with older versions in OneDrive?
To recover overwritten files with older versions in OneDrive, take these steps:
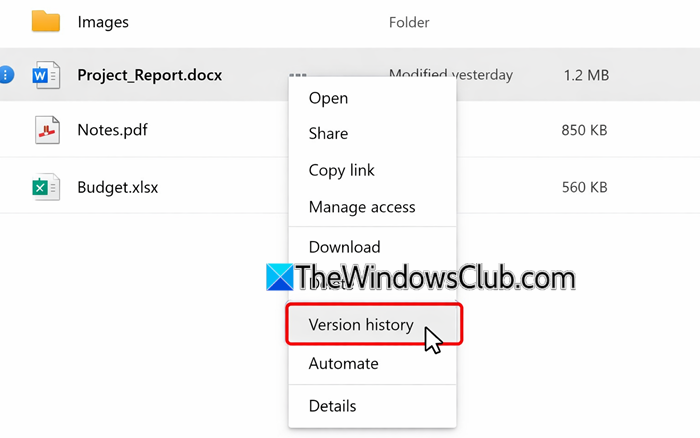
Sign in at onedrive.live.com with your Microsoft account, navigate to the folder where the file is stored, and open Version History by right‑clicking the file and choosing Version History.
A list of earlier versions will appear with timestamps and the name of the person who modified it. Select the version you want, then click Restore to replace the current file with it. You can also download to save that version separately without overwriting the current one.
Does OneDrive keep older versions of files?
Yes, OneDrive keeps older versions of files. You can check the Version history section to find older versions of any file. You can find this option on the web version of OneDrive.
Read: Stop OneDrive from taking over the Print Screen key.