If we encounter audio issues or glitches, we can reset the sound settings to resolve the problem. The various reset options for your audio devices in Windows 11 are described here. Resetting the sound setting is especially helpful when you made some misconfiguration and the sound coming out of the speaker is not pleasing. In this tutorial, we will learn how to reset Audio or Sound Settings in Windows 11. There is no single button that lets you do so; you will have to take a few related steps.

How to reset Sound Settings in Windows 11
Your Audio or Sound may not work if its settings are misconfigured. Usually, we don’t manually change the audio settings and mess it up, a third-party app that we install tends to tweak the audio settings of your Windows 11 computer due to which we will face Sound related issues and sometimes no sound at all. Also, it can be challenging to get the sound to function properly on any type of computer. Even though Windows 11 gives us many options for adjusting our sound levels, keeping it simple can get us a long way. We tend to mess with the sound and don’t know what to adjust to make things the way they were, in that case, you need to reset Sound Settings to default settings. We have various methods to reset the sound settings in Windows 11.
- Reset sound and volume settings for apps
- Reset your audio driver
- Roll back the driver
- Restart Windows audio services
- Reset System sounds to default sounds
- Restore your Speaker to default.
Let’s get started.
1] Reset sound and volume settings for apps
We will explain to you some different ways to reset sound settings in Windows 11, depending on the problem you’re currently experiencing. Let’s begin with the first solution: Reset the sound and volume settings for apps. Follow the prescribed steps to do the same.
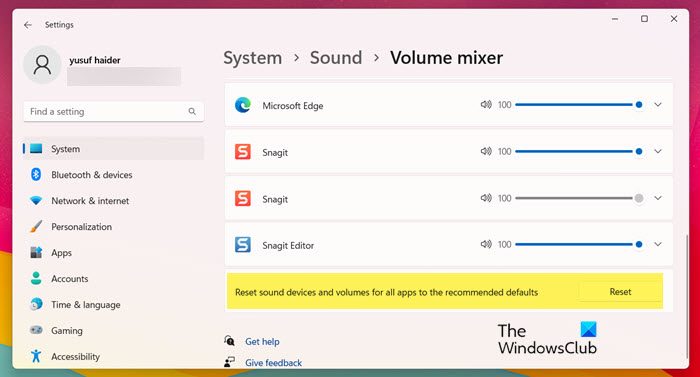
- Press Windows + I key to open the Settings app.
- Click on System.
- On the right hand of the screen Sound option.
- Scroll down the screen and click on Volume mixer.
- As we click on the Reset button it will restore the default settings for all installed programs and third-party apps.
Hopefully, your problem will be resolved by using this solution.
2] Reinstall Audio Driver
The Microsoft Windows Device Manager has a feature that helps us to reinstall the audio driver. By doing this, potential conflicts or problems with the installed driver on the computer can be resolved. All you have to do is follow the prescribed steps and you will be good to go.
- Press Windows key type Device Manager from the search results and press Enter button.
- Expand Sound, video, and game controllers.
- Right-click on the sound driver and select Uninstall device.
- Tick the box associated with the Attempt to remove the driver for this device.
- Click on Uninstall again.
Finally, reboot your system and your OEM driver will be installed again. Hopefully, this will work in your case.
Read: How to use Realtek HD Audio Manager to boost PC Sound
3] Restart Windows audio services
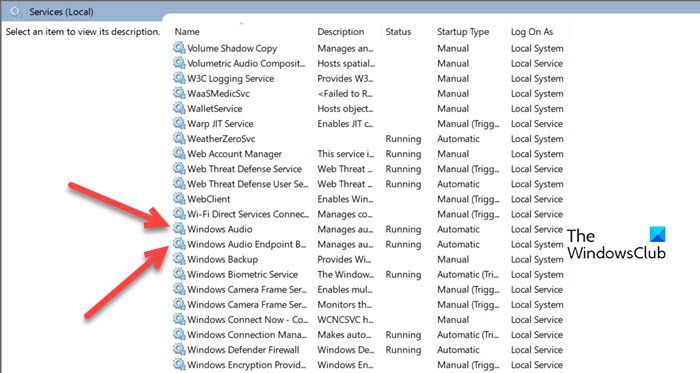
Windows utilizes several different services to manage sound. Windows Audio and Windows Audio Endpoint Builder are two services in Windows 11 that deal with your computer’s audio. If you are having problems with the sound quality of your computer, you can restart these services. Follow the prescribed steps to do the same.

- Press Windows key and type Services and press Enter button.
- Find out the Windows Audio and Windows Audio Endpoint Builder service.
- Right-click one by one on both the service and select Restart.
After restarting both the service, your sound problem in the computer will be solved.
4] Reset System sounds to default sounds
Windows uses system sounds for basic actions, such as critical stops, notifications, device connections, or when it needs to notify about battery status. This sound indicates that there is a problem with your system. The system sounds’ default settings can be changed on Windows 11 computer and we can create a custom sound scheme. However, if an issue arises with the sound and you wish to revert to the default sound setting, simply follow the instructions below.
- Press the Windows key to open the Search option of the Start Menu.
- Type Change system sounds and press Enter button.
- In the drop-down menu of Sound Scheme, select the Windows Default option.
- Click on Apply button to save the changes.
- Finally, click on OK to exit the Sound window.
This would do the trick for you.
5] Reset your Speaker to default
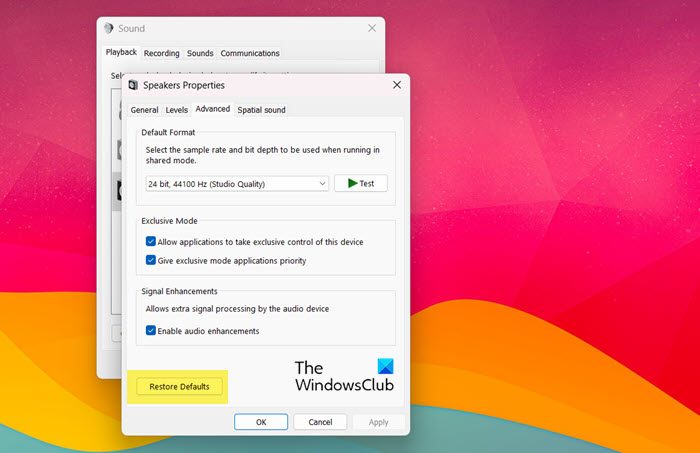
If you want to restore changes made to a particular output device, then you can pretty easily configure its properties from the Control Panel. Follow the prescribed steps to do the same.
- Open Control Panel.
- Change View by to Large icons.
- Click on Sound.
- Right-click on the Speaker you want to reset and select Properties.
- Go to Advanced and then click on Restore Defaults.
Hopefully, this will do the job for you.
The last option you have is to use the Reset This PC button. This will reset Windows to its default factory state – It will reset all settings, including the sound settings of your Windows 11 computer. This will eliminate all alterations and tweaks made to Windows’ sound settings.
Audio settings reset after restart in Windows 11
If your audio settings keep resetting after reboot in Windows 11/10, disable Fast Startup, update your Audio drivers, restart audio services and if nothing helps, uninstall and reinstall the latest audio driver from the manufacturer’s website.
Why is my Sound not working on Windows 11?
If you are unable to hear any sound from your system, first check if the sound is on mute, next, check if you are connected to any Bluetooth device as that will redirect the system’s sound to the connected device. Apart from this, we need to ensure that our device drivers are not corrupted and other essential services are working as they should have. If you are facing such issues, follow our guide to know what to do when Sound is not working on a Windows 11 computer.
Read: How to change Sound Settings on Windows 11 to get better Audio.