Device Drivers in Windows 11/10 make sure all the connected hardware works fine when used by the operating system. While Windows offers Device Manager to locate and list all the device driver details, it’s too cumbersome and time-consuming. In this post, we have listed some free software to list installed Drivers on Windows 11/10.
How to view installed Drivers on Windows 11/10
These methods will help you view the installed Drivers in Windows 11/10 along with details like driver name, version and so on. I would suggest reading about each of them and using what works best for you.
- PowerShell method
- DevCon command-line tool
- Driverquery command
- Driver Store Explorer
- ServiWin
- DriverView
- NirSoft InstalledDriversList
If you need to do it often, make sure to save the list of drivers. In the future, if you need to find out which driver has been updated or recently installed, it will be easy to identify, especially by its version number.
1] Get installed Driver List using PowerShell
To get the complete description of installed drivers, we can use Windows PowerShell cmdlets. Get-WindowsDriver is such a PowerShell cmdlet that outputs the basic root information of drivers; for both third-party drivers and default installed drivers; in different scenarios.
In this article, we’ll discuss how you can use this cmdlet to extract information about drivers on your Windows 11/10.
1. Search for Windows PowerShell. From the results, right-click on Windows PowerShell and select Run as administrator. If you’re prompted for the user account password, provide that.
2. Next, in the Windows PowerShell window, you can type this cmdlet, after making choice about parameters, and hit Enter key. The general cmdlet goes like this:
Get-WindowsDriver -Online [-All] [-Driver <String> ] [-LogLevel <LogLevel> {Errors | Warnings | WarningsInfo} ] [-LogPath <String> ] [-ScratchDirectory <String> ] [-SystemDrive <String> ] [-WindowsDirectory <String> ] [ <CommonParameters>]

Here is how you can vary the parameters (shown in [ ]) as per your requirement:
-Online : Specifies that the action is to be taken on the operating system that is currently running on the local computer.

-All : Include it to display information about default drivers. If you do not specify this parameter, only third-party drivers and listed.
For example-
PS C:\> Get-WindowsDriver –Online -All
-Driver <string> : Specifies the .inf file or folder containing the .inf files of the drivers you want detailed information about. When you specify a folder, .inf files that are not valid driver packages are ignored.
For example-
PS C:\> Get-WindowsDriver –Path "c:\offline" –Driver "OEM1.inf"
-LogLevel<LogLevel> : Specifies the maximum output level shown in the logs. The default log level is 3. The accepted values are as follows:
1 = Errors only
2 = Errors and warnings
3 = Errors, warnings, and information
4 = All of the information listed previously, plus debug output
For example-
PS C:\> Get-WindowsDriver –Path "c:\offline" –LogLevel "1"
-LogPath<String> : Specifies the full path and file name to log to. If not set, the default is %WINDIR%\Logs\Dism\dism.log.
For example-
PS C:\> Get-WindowsDriver –Path "c:\offline" –LogPath "C:\DriversInfo"
-Path<String> : You can alter this parameter to specify the full path to the root directory of the offline Windows image on which drivers are loaded.
For example, To get gets detailed information about the Usb.inf driver in a mounted Windows image, use this command:
PS C:\> Get-WindowsDriver –Path "c:\offline" –Driver "c:\drivers\Usb\Usb.inf"
-ScratchDirectory<String> : This parameter states a temporary directory that will be used when extracting files for use during servicing. The directory must exist locally. If not specified, the Windows\%Temp% directory will be used, with a subdirectory name of a randomly generated hexadecimal value for each run of DISM. Items in the scratch directory are deleted after each operation.
For example-
PS C:\> Get-WindowsDriver –Online -All -ScratchDirectory "C:\Temp"
-SystemDrive<String> : This is a necessary parameter to locate BootMgr files when these files are located on a partition other than the one that you are running the command from.
For example, to locate BootMgr files on C: Drive, when you’re running PowerShell command on D: drive use this cmdlet:
PS C:\> Get-WindowsDriver –Online -All -SystemDrive "C:"
In this way, you can get detailed information about the drivers of your system in various scenarios. I hope you find the guide useful!
TIP: This post will show you how to Export and Backup Device Drivers in Windows using PowerShell
2] DevCon command-line tool
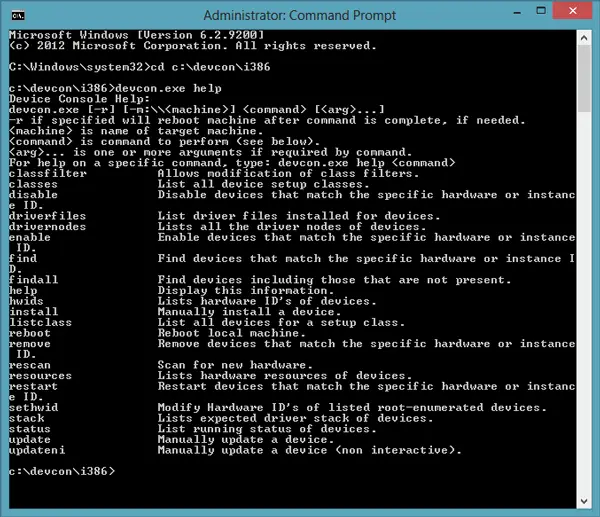
DevCon is a free command-line utility that not only can list drivers but also lets you manage them. You can get a brief list of all names, search for any hardware changes, find devices even if they are not currently online, and so on.
3] Generate a list of Drivers using driverquery command
Launch the Command Prompt. To do this, users may open the WinX menu in Windows 11 or Windows 10 and click on Command Prompt. Another way is to press the Windows Key along with R, and then type ‘CMD’ in the text box. Hit Enter and watch as the Command Prompt launches.

In the Command Prompt, enter the command driverquery. This should bring up a list of drivers installed on the system. Depending on the number of drivers installed, it may take a while for the screen to fully populate. A relatively fast computer should perform these tasks within just a few seconds after the user hits the Enter button.
Using the driverquery command will show the module name of the driver, along with the display name, driver type, and link date. However, that is not all, because it is possible to generate more information about these drivers just by using a different parameter.

Type driverquery /v to generate a detailed list similar to the one below:

To generate an even more detailed list, use driverquery /FO list /v.
It shows a lot more, including information on whether or not a driver is running. We understand that this one should be more adequate for advanced users, so we would recommend starting things off with driverquery /FO list /v instead of driverquery. Here, the output will be formatted in a list style rather than a table or CSV format.

While using the Command Prompt eliminates the need for installing another app, some users may not feel comfortable, so we suggest using an app called DriverView. It does almost everything driverquery does and more. It is a powerful app, and as such, we recommend it to novices since it is more straightforward than using the Command Prompt.
4] Driver Store Explorer

This one tops our list of software due to its well-designed user interface. Not only does it list the drivers on Windows 11/10, but it can also load drives from a folder that contains drivers. The latter is also known as an offline driver store, which comes in handy for analyzing drivers before they are installed.
Using this can add drivers to your offline store, and you can use it elsewhere. When it comes to exporting, it can export the list in CSV with grouping and sorting. While in the software, you can rearrange columns, so post exporting, you can view the columns you require first. You can download it from Github.
5] ServiWin

If you are looking for software that can not only make a list of all the drivers, but also quickly stop, start, restart, pause, and more, then ServiWin is what you need. The list of drivers can be saved as an HTML report of installed services/drivers in your default browser.
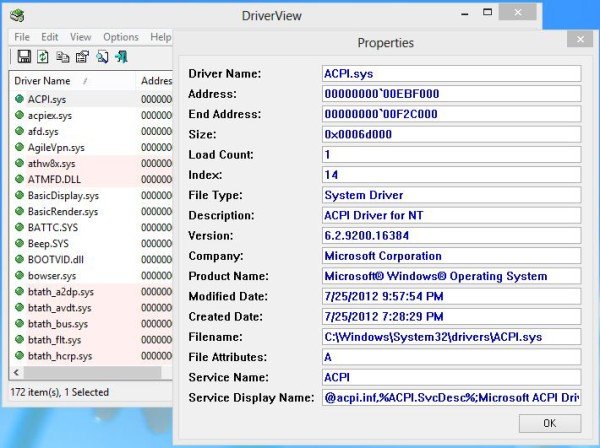
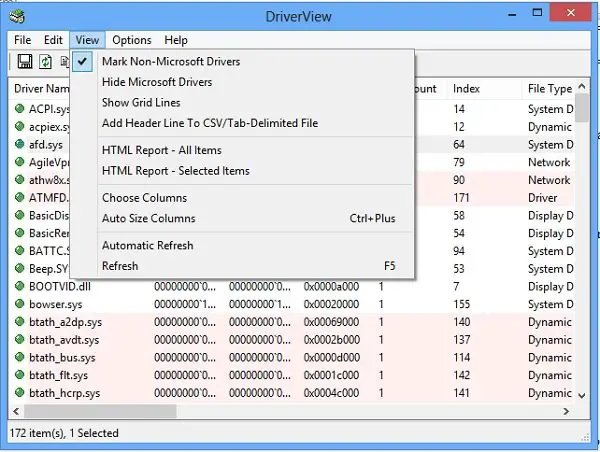
6] DriverView will display list of device drivers

DriverView is a freeware utility from Nirsoft, and as the name suggests, it displays the entire list of drivers loaded on your Windows operating system. The list also includes other useful details about the drivers, like their version, company, product name and much more. It even shows you the file name of the driver, memory locations, the creation date and the date when driver was ever modified. This is not all; simply double-clicking on any driver will provide a detailed view in a separate window.
Another notable feature of DriverView is that you can store a permanent record of your driver list by generating an HTML report. You can also take a printout of this report.
With a download file of just 35KB, DriverView takes very little time to download on your system even with a slow internet connection. This is a portable utility, and you can store it on a USB drive or CD-ROM. You just need to download the zipped file of DriverView, extract it and run as DriverVew Exe. The freeware will be up then and start running without asking for any installation.
DriverView works under almost all recent versions of Windows. If you are running a 64-bit version of Windows on your system, you can download DriverView 64-bit version and manage your device drivers. DriverView is available in other languages also. You can download this tool from nirsoft.net.
7] NirSoft InstalledDriversList
NirSoft has a variety of software for drivers, but this one comes with significantly better features for exporting the list of drivers. You can export Driver Name, Display Name, Description, Startup Type, Driver type, Driver Group, Filename, Version, and more.

The icons next to the driver names tell you the status; you can open registry entries directly from here, and sort the list using secondary sorting support as well. You can download it from NirSoft.
We hope this list offered you a lot of options to export a list of drivers installed on Windows PC. Make sure to export the drivers in a place where you don’t lose them.
Read: How to create a list of installed Programs with PowerShell
How do I see what drivers I have installed in Windows 11?
To see what drivers you have installed in Windows 11, you can use any of the seven methods mentioned above. However, the PowerShell method is the easiest way to accomplish this. To use this method, you need to open the PowerShell with administrator privileges and enter this command: Get-WindowsDriver.
Read: Location of Drivers in Windows 11
How do I find recently installed drivers in Windows 11?
To find the recently installed drivers in Windows 11/10 PC, you can use the NirSoft InstalledDriversList app. This is a portable application that helps you open up a list of all the drivers in one place. From there, you can sort lists as per your requirements. That being said, you can sort the installed drivers’ list by the installation date.
How do I see all device drivers?
You may see all device drivers installed on your Windows 11/10 PC using Device Manager, System Information, and Command Prompt. Press Win + X and select Device Manager. You will see a list of all hardware categories in the Device Manager window. Expand each category to see the devices. Right-click on a device and select Properties. Go to the Driver tab to see driver details for the selected device. Alternatively, open Command Prompt and execute the driverquery command to see a list of all installed drivers.
Read: List Hard Drives using Command Prompt & PowerShell.
How to get list of devices using CMD?
To get a list of devices using Command Prompt, you may use the ‘wmic’ or ‘pnputil’ command line utility. wmic allows you to retrieve system information by querying Windows Management Instrumentation while pnputil lets you add, delete, or list driver packages that are currently in the driver store. Open Command Prompt as an administrator and run wmic path Win32_PnPEntity get /format:list command to list all Plug and Play (PnP) devices with their properties. Alternatively, run pnputil /enum-devices command to enumerate and list all devices and their associated driver packages currently installed on the system.