If you frequently work with the Command Prompt or PowerShell, you may need to copy files to or from an external drive, and you may also need to display the drives in the console window. In this post, we will show you how you can list hard drives using Command Prompt or PowerShell in Windows 11/10.

WMIC or Windows Management Instrumentation Command-line is deprecated from Windows 10 and is no longer in active development for Windows 11, you can use it on your computer. This post shows how to install WMIC in Windows 11 using Settings, PowerShell, or CMD.
List Hard Drives using Command Prompt
First, let’s see how to list hard drives using the Command Prompt on Windows 11/10.
If you need to simply list the drives, you may use WMIC. Windows Management Instrumentation (WMI) is the infrastructure for management data and operations on Windows-based operating systems.
Open a command prompt, and type the following command:
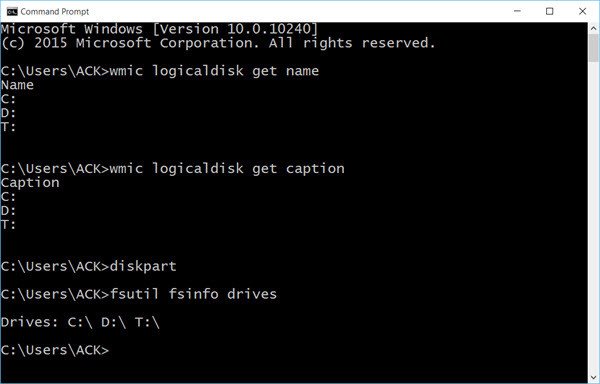
wmic logicaldisk get name
Press Enter and you will see the list of Drives.
You can also use the following parameter:
wmic logicaldisk get caption
Using the following will display Device ID and volume name as well:
wmic logicaldisk get deviceid, volumename, description
Windows also includes an additional command-line tool for file, system, and disk management, called Fsutil. This utility helps you list files, change the short name of a file, find files by SID’s (Security Identifier), and perform other complex tasks. You can also use fsutil to display drives. Use the following command:

fsutil fsinfo drives
It will show mapped drives too.
You can also use diskpart to get a list of drives and more details. The Diskpart utility can do everything the Disk Management console can do, and more! It’s invaluable for scriptwriters or anyone who prefers working at a command prompt.
Open CMD and type diskpart. Next, use the following command:
list volume
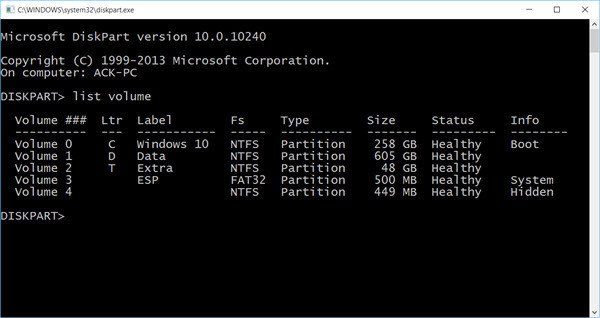
You will see that the console displays the Volume number and letter, label, formatting type, partition type, size, status, and other information.
List Hard Drives using PowerShell
You can also list hard drives using the Windows PowerShell on your Windows 11/10 computer. Let’s see how to do that.
To display drives using PowerShell, type powershell in the same CMD windows and hit Enter. This will open a PowerShell window.
To get the list of all hard drives installed on and connected to your computer via Windows PowerShell, use the following command:
Get-Disk

The above command will show the following information of the hard disks and removable storage drives:
- Disk Number
- Friendly name
- Serial number
- Health status
- Operational status
- Total size
- Partition style
If you want to get information on a particular hard disk, you can type its disk number. In this case, the command will be:
Get-Disk -Number 0

In the above command, 0 is the disk number.

If you want to get information about the removable storage devices connected to your computer through a USB cable, use the following command in Windows PowerShell:
Get-Disk | Where-Object -FilterScript {$_.Bustype -Eq "USB"}
If you want to get information on hard drives regarding the used space and free space, use the following command in Windows PowerShell:
get-psdrive -psprovider filesystem

The above command shows the used and free space of all hard drives installed on and connected to your computer.
I hope this helps.
Now see how you can get a list of all Device Drivers using Command Prompt and how to use PowerShell to get physical Disk information.
How to run DiskPart in PowerShell?
DiskPart is a separate command line utility in Windows 11/10 that is used to manage your computer’s hard drives. You can execute various commands in DiskPart to list all your hard drives, format your hard drive(s), create partitions on a hard drive, etc. You cannot run it in PowerShell. However, you can launch it through PowerShell. Open PowerShell, type diskpart, and hit Enter. You will receive a UAC prompt. Click Yes to launch the DiskPart utility.
How do I see all drives?
You can see all drives on your Windows 11/10 computer in different ways. You can use the DiskPart utility to list all hard drives and hard drive partitions. If you are not familiar with the command line tool, you can use Disk Management to view all your hard drives. Press the Win + X keys and select Disk Management. When Disk Management opens up, you can view all the hard drives installed on and connected to your computer.