In this post, we are going to see what you can do to resolve Event ID 1801, Secure Boot CA/keys need to be updated. Event ID 1801 is a warning logged by Windows to indicate that the Secure Boot Forbidden Signature Database (DBX) or its underlying certificates (CA/keys) are out of date.

Secure Boot is a critical security feature that ensures only trusted software, verified by digital signatures, can boot the operating system. This event is typically triggered to prepare your system for upcoming changes, such as revoking compromised bootloaders or updating to new, more secure certificates before the old ones expire.
Fix Event ID 1801, Secure Boot CA/keys need to be updated
Event ID 1801 occurs because the security certificates underpinning Secure Boot have a finite lifespan and require periodic updates before they expire. This event is primarily a proactive measure to transition to new certificates and update the revocation list that blocks vulnerable bootloaders. The error can be logged if the update process, delivered via Windows Update, has not been finalized by a required system reboot, or due to compatibility issues with the system’s UEFI firmware.
If you encounter Event ID 1801, which says Secure Boot CA/keys need to be updated, follow the solutions mentioned below.
- Install Pending Updates and Reboot
- Manually trigger the Secure Boot Update Task
- Verify and update your Motherboard BIOS/UEFI
- Check and Enable Secure Boot in UEFI Firmware
- Check the Update Status and wait
Let us talk about them in detail.
1] Install Pending Updates and Reboot
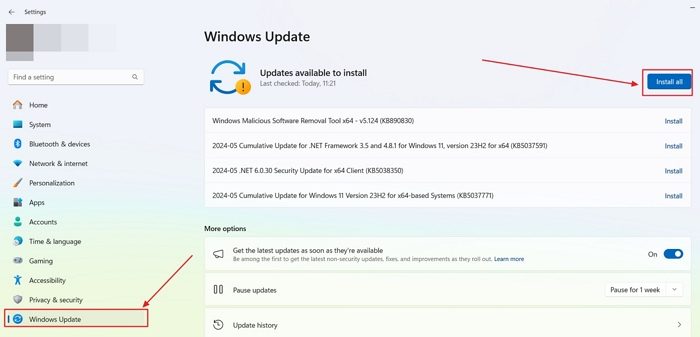
You can get the new Secure Boot certificates and revocation lists mainly through Windows Update. The update happens in several steps and is only finished after you restart your system. To install Pending Updates, open Settings (Win + I), go to Windows Updates, click Check for updates, and install any available updates, especially those labeled “Security Update” or “KB5016061” and similar. After updating, reboot your computer, and check if the issue is resolved.
2] Manually trigger the Secure Boot Update Task
Windows uses a scheduled task to manage the Secure Boot update process. You can manually trigger this task and the corresponding registry flag to force the system to check for and apply any pending updates immediately.
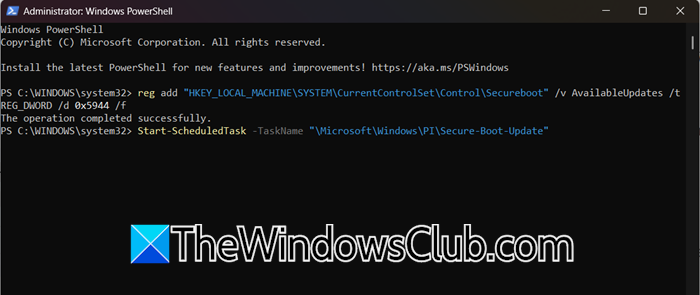
To do so, type PowerShell in the Windows search bar, right-click on Windows PowerShell, and select Run as administrator.
Copy and paste the following command to set the necessary registry flag, then press Enter.

reg add "HKEY_LOCAL_MACHINE\SYSTEM\CurrentControlSet\Control\Secureboot" /v AvailableUpdates /t REG_DWORD /d 0x5944 /f
Next, copy and paste the following command to start the scheduled task, then press Enter.
Start-ScheduledTask -TaskName "\Microsoft\Windows\PI\Secure-Boot-Update"
Close PowerShell and restart your computer. A second restart may be required for the changes to be fully applied.
3] Verify and update your Motherboard BIOS/UEFI
An outdated system BIOS/UEFI firmware may have bugs that prevent it from correctly processing the new Secure Boot updates from Windows. Flashing the latest BIOS version from your motherboard manufacturer ensures compatibility and proper handling of the certificate update process. Go ahead and update your BIOS and check if the issue is resolved.
4] Check and Enable Secure Boot in UEFI Firmware
Inconsistent states may occur if Secure Boot is disabled temporarily, such as during the installation of another operating system, and not re-enabled correctly. Ensuring that it is actively enabled from the source can help resolve the issue. To enable Secure Boot, you need to follow the steps mentioned below.
- Click on the Start Menu, and then click on the Power button.
- Hold down the Shift key and click Restart. Continue holding the Shift key until you see the Windows Recovery Environment (a blue screen with options).
- Go to Troubleshoot > Advanced options > UEFI Firmware Settings.
- Click Restart. Your computer will reboot into the BIOS/UEFI setup menu.
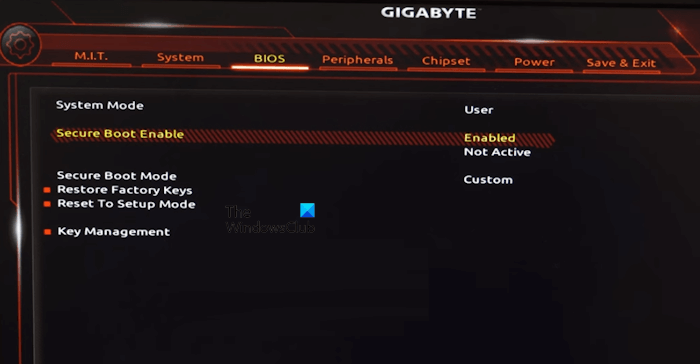
- Navigate the UEFI menus (often under “Boot” or “Security” tabs) and look for the Secure Boot option. Ensure it is set to Enabled.
- If your BIOS has an option for Secure Boot Mode or Secure Boot Enabled, set it to Standard.
- Finally, save the changes and check if the issue is resolved.
5] Check the Update Status and wait
In many cases, the update has already been applied successfully, but the event log continues to show the message. This is often a false report. You can check the actual status to confirm if action is needed or if you can safely ignore the event.
Open PowerShell as an administrator and then run the following script.
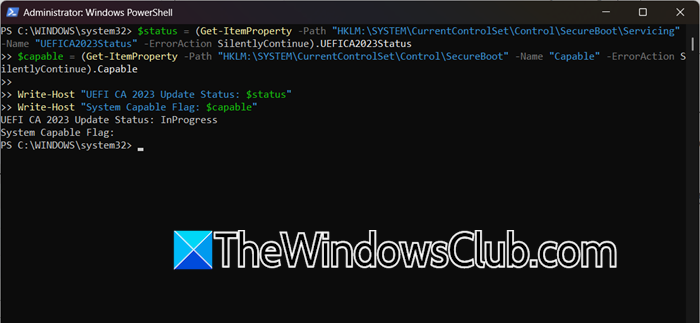
$status = (Get-ItemProperty -Path "HKLM:\SYSTEM\CurrentControlSet\Control\SecureBoot\Servicing" -Name "UEFICA2023Status" -ErrorAction SilentlyContinue).UEFICA2023Status
$capable = (Get-ItemProperty -Path "HKLM:\SYSTEM\CurrentControlSet\Control\SecureBoot" -Name "Capable" -ErrorAction SilentlyContinue).Capable

Write-Host "UEFI CA 2023 Update Status: $status"
Write-Host "System Capable Flag: $capable"
If the UEFICA2023Status shows a value like Updated (or 2), the update is complete. If the Capable flag is 2, your system is already using the new 2023-signed boot manager. In these cases, you can safely ignore Event ID 1801.
If you get an In Progress status, it indicates the system is processing the new certificates and boot manager. The update task runs every 12 hours, so progress may happen in stages.
That’s it!
Read: Secure Boot can be enabled when System in User Mode
How to enable Secure Boot key management?
To enable Secure Boot key management, you must access your computer’s UEFI firmware settings. Navigate to the “Security” or “Boot” tab, locate the “Secure Boot” option, and set it to “Custom” or “User Mode.” This mode unlocks the key management features, allowing you to enroll, delete, or modify the Platform Key (PK), Key-Exchange Keys (KEK), and signature databases (db/dbx).
Read: How to Secure the Windows Boot Process
What is a Secure Boot update?
A Secure Boot update is a process that refreshes the cryptographic keys and revoked signature list (dbx) used by your computer’s firmware. It ensures the system can recognize and trust the latest authorized boot components while blocking newly discovered vulnerable ones. This maintains the security chain that prevents malicious software from loading during startup.