
This post will show you how to defer, delay, or schedule the delivery or sending of email messages in Microsoft Outlook, new Outlook app and Outlook.com.
Microsoft Outlook doesn’t need any introduction as people already know about this awesome email client that comes with the Microsoft Office package. If you are already using Outlook, you know how good it is. Most people use Outlook for its features and support. You can get official support from Microsoft, and almost all types of email accounts are supported by Outlook.
Anyway, suppose you often make mistakes while writing an email. Or, imagine you often send a wrong reply as you have multiple similar email addresses. There may be a reason, but if you want to correct it after clicking the SEND button, here is a solution.
Generally, Outlook delivers email right after clicking the “Send” option. It does what it says. But as mentioned before, if you often make mistakes and want to check your email even after sending it, follow this guide.
This tutorial teaches you how to schedule or delay the delivery of all messages in Outlook. This is the only solution you have in this case. If you have time, you can edit the email again, even after pressing the Send button.
Schedule or Delay sending an email in MS Outlook
To delay or schedule the sending of email messages in MS Outlook, you do not have to install any other software or add-in. You can create a rule that will run automatically in the background and delay the sending.
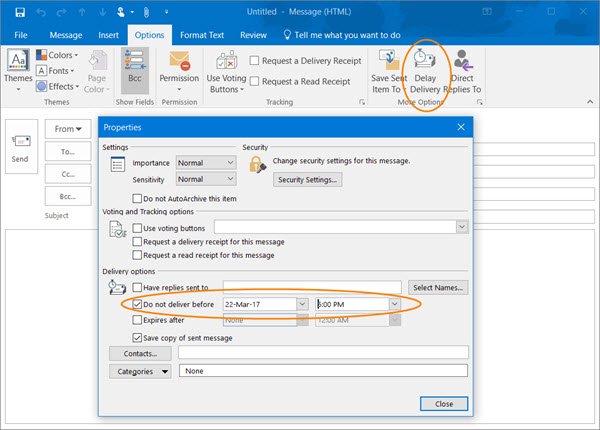
To delay a single email message, in the new email box, click the Options link, then click the Delay Delivery button. In the box that opens, you can set your Delivery options, date, and time.
TIP: You can also schedule your email in Outlook.com.
Defer sending of All email in MS Outlook
You can use Outlook’s Rules Wizard to delay the sending of all your emails in Outlook. Let’s learn how to create such a rule or filter in Outlook that can delay the delivery.
To create a rule in Outlook, at first, open Outlook and click on Files > Manage Rules & Alerts. There is yet another method to open the rules settings pane. You can click on Rules in Home tab and select Manage Rules & Alerts. Here you find all your rules. Just click on New Rule to create a new one.
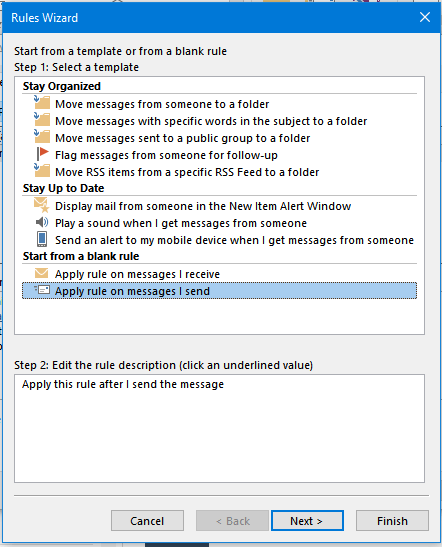
On the following screen, select Apply Rule on messages I send in Start from a blank rule section and hit the Next button.
On the next screen, you can find different options and checkboxes. You do not have to select anything. Just click on Next button. It will ask whether you want to apply the rule to every message you send. Just select Yes.
Here, youwill see the same options again. Just select Defer delivery by a number of minutes and click on the ‘a number of’ link in the info box.
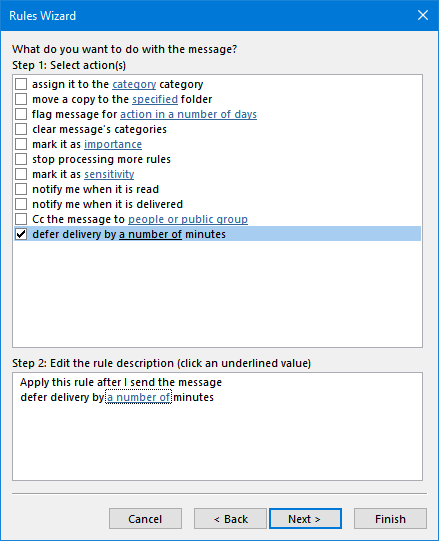
Now, select the number of minutes and hit the Next button. Give it a name and save your rule.
Now, whenever you send an email, Outlook will wait for that selected minute(s) before actually sending it to the recipient.
Read:
How to Schedule Send in new Outlook app
Microsoft has also introduced the Schedule Send feature in the new Outlook app. The feature lets you write and prepare emails in advance and schedule them with a click, ensuring they are delivered exactly when you want them. This new feature significantly enhances the legacy Outlook experience, making managing communications on your Windows 11/10 PC easier than ever.
To Schedule Send an email in the new Outlook app, follow these steps:
Type ‘Outlook’ in the Windows Search bar and click on Outlook (new) in the search results. Outlook desktop client will appear. Click the New mail button in the top-left corner.
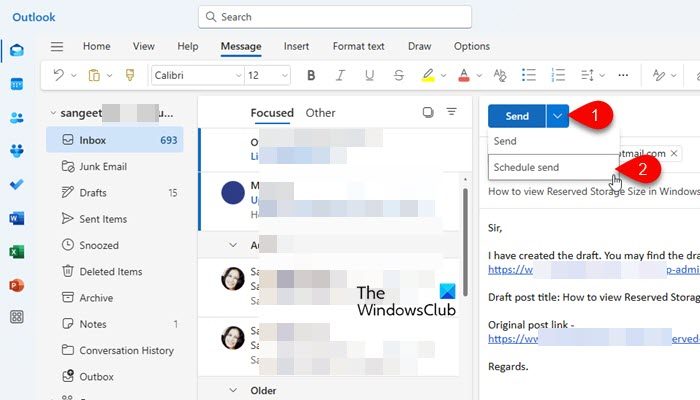
Next, draft your mail as usual. Enter the recipients’ addresses, add the subject line, and compose the message. Once you’re done, click the down arrow next to the Send button on top and select Schedule send.
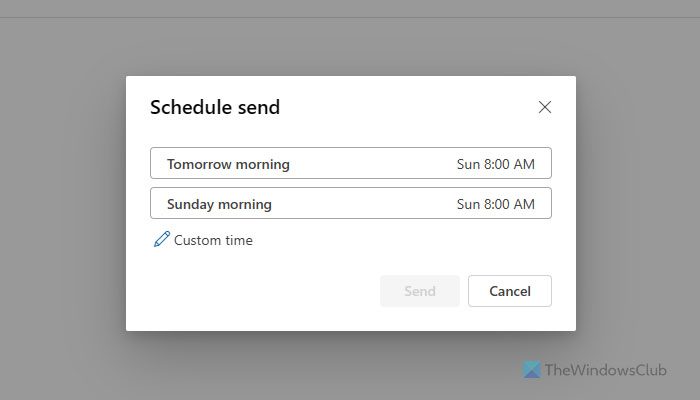
A Schedule send dialogue will appear. Choose a predefined time or click the Custom time link to set a preferred date and time. After that, click the Send button.

The email will be stored in the Drafts folder and sent automatically at the chosen time.
Managing Scheduled Emails
The new Outlook app allows you to modify or cancel a scheduled email if needed. Scheduled emails remain in the Drafts folder (or Outbox folder, depending on your setup) until the scheduled sending time arrives. This allows you to review the email and make any necessary adjustments or corrections before it is sent to the recipients.
View/Edit Scheduled Emails
Navigate to the Drafts folder. There, you’ll find your scheduled emails listed. Click on the email you want to review, and it will open in the editor.
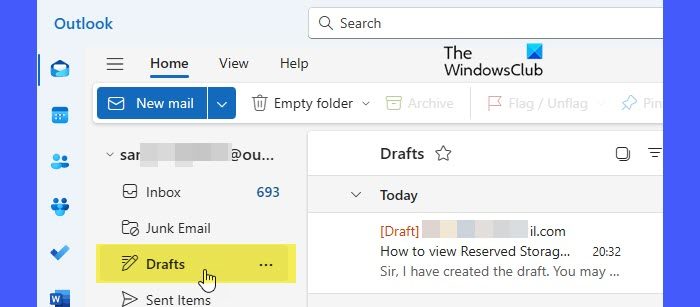
You can make any necessary changes to the content, recipients, or scheduled time. Once you’ve made your edits, you can either reschedule the email by selecting a new time or send it immediately.
Click Schedule Send Options (the pencil icon in the top-right corner of the editor) and select Modify Now to re-schedule the email or change the message content. Click Send Now to immediately send the email if you no longer want to delay sending.
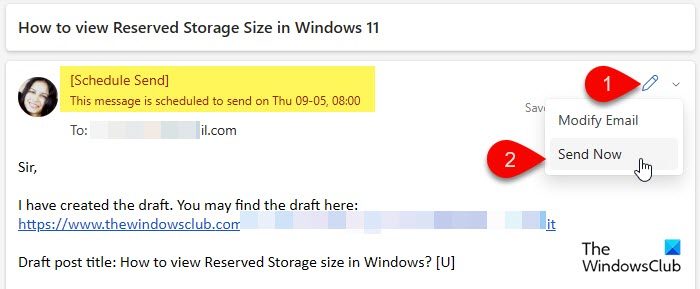
To delete an email, hover over it in the list of drafts (on the left side of the editor window) and click the Delete icon.
Read: How to edit sent email in Outlook
Schedule an email in Outlook.com
You can schedule your email to be sent later at any date or time using Outlook.com or Outlook On the Web.
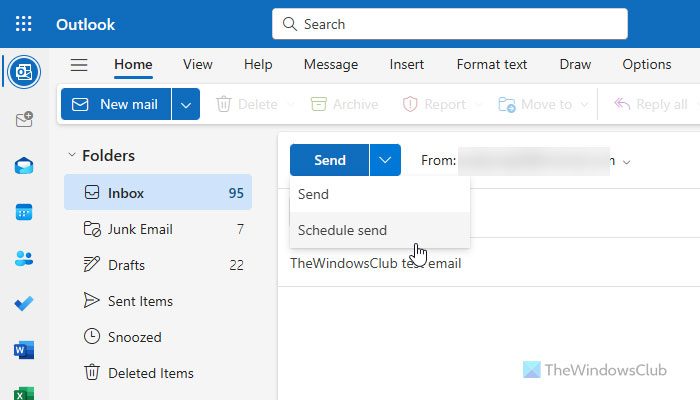
To delay sending an email or to schedule an email in Outlook On the Web, do the following:
- Open Outlook.com and sign in to your account.
- Compose an email and go to the Send button.
- Click on the small arrow and select Schedule send from the dropdown.
- Schedule your email for the preferred date and time and click on Send.
Cancel or Reschedule the Scheduled Outlook Email
If you scheduled your email for the wrong date or time, you can easily change or cancel it.
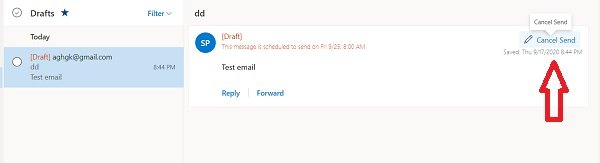
Go to the Drafts, open your wrongly scheduled email, and click on Cancel Send.
Schedule it again at the preferred date and time and click on Send. If you want to cancel the email, click on the Discard button.
Outlook.com is known for its great features and support. It usually sends your emails in a flash, but if you don’t know, Microsoft Outlook also lets you delay or recall emails. You don’t need to install an add-in or extension for this feature; you just need to create a rule that runs automatically in the background and delays sending your email. This feature is useful if you often make mistakes and want to check your email even after sending it.
We hope you find the post useful.
Related: How to cancel Scheduled Email in Outlook
Can you schedule an email in Outlook to send later?
Yes, you can schedule an email in Outlook to send later. To do so, choose the Schedule Send option, which appears when you click the arrow icon in the Send menu. After that, you can choose any date and time as per your requirements.
Read: The linked image cannot be displayed in Outlook
Why is my Schedule Send not working in Outlook?
If it happens with the Desktop app, you must terminate and repair it. Open the Windows Settings panel and go to Apps > Installed apps. Click the three-dotted icon of Outlook (new) and choose the Advanced options. Next, click the Repair button.
Read: How to edit a Received email in Outlook.
