In this post, we will show you how to use Color Categories in Outlook on a Windows 11/10 PC with a new setting that uses Labels. Color categories are customizable tags that can be assigned to your email messages, notes, contacts, and other items in Microsoft Outlook and the new Outlook app. They help you group interrelated items or organize them based on their nature or importance.
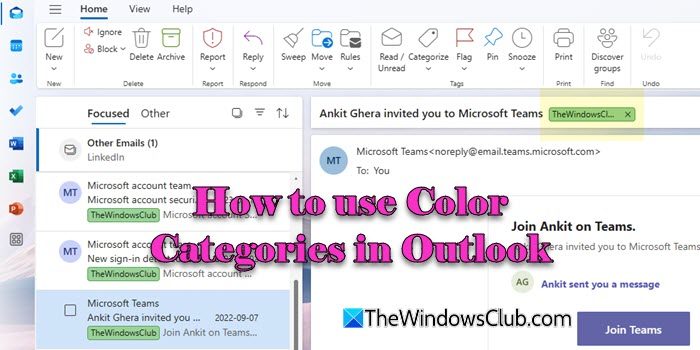
Both MS Outlook and the new Outlook app provide several different color categories. In this post, we will take a detailed look at how to access and use these categories to prioritize information as per your needs.
How to use Color Categories in Outlook
Color Categories can be accessed via the context menu, ribbon menu, or the Outlook Settings panel. You can customize the default categories or create new ones and assign them names and colors. Once you have them ready, you can use Color Categories in Outlook the way you want.
Use Color Categories in classic Outlook
In MS Outlook, you can assign single or multiple categories to different items, rename default categories, create new categories, set quick categories, or assign shortcuts to categories for quick access.
A] Assign Color Categories
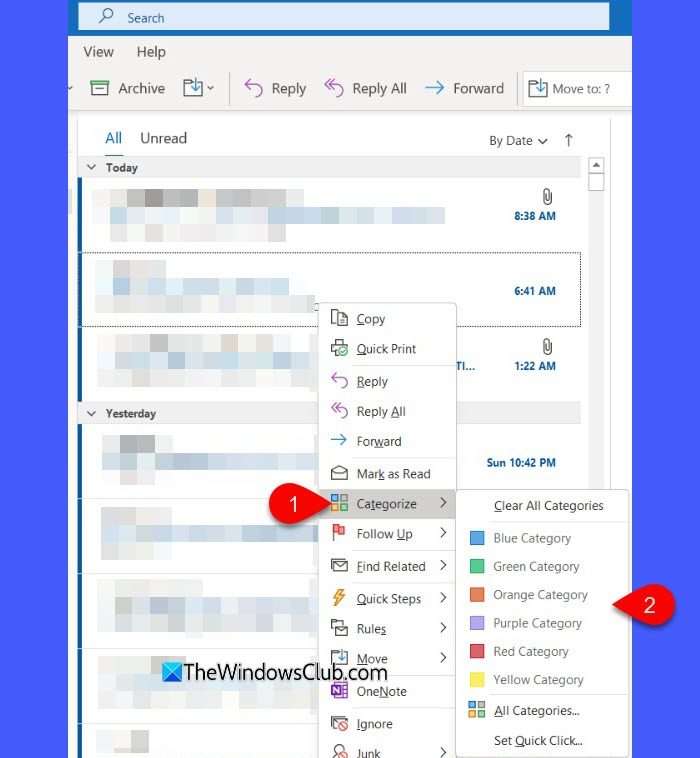
To assign a category to an email message, right-click the message (without opening it), select Categorize, and then select the desired category name. If you only get options to flag the message, right-click in the blank space to the right of the sender’s name. Repeat the same steps to assign a second or third color category to the same message.
If the message is opened, click the Categorize dropdown on the top ribbon and select a category from the list. The drop-down displays the ten most recently used categories. To get the rest of the list, select the All Categories option.
To remove the category assignment, click the Categorize dropdown and once again click on the selected category.
B] Rename Color Categories
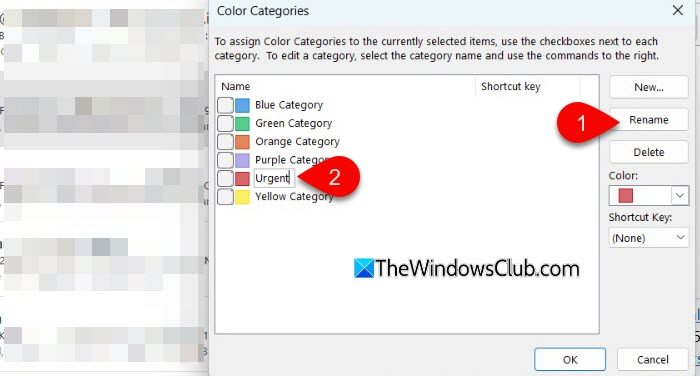
Default categories in Outlook have generic names, such as Blue Category, Green Category, etc. If you do not find these names meaningful, you can rename these categories.
Go to Categorize > All Categories. In the Color Categories dialogue, select the name of the category and click Rename. The category label will become editable. Type the new name and press Enter. Click OK to save changes.
To automatically apply this category to all the items you’ve selected in the main Outlook window, tick the box before the category name and click OK.
Note:
- You’ll automatically be prompted to rename a category when you assign it to an item for the first time.
- If you rename an already assigned color category, all of the items that have that category assigned are updated to the new name.
C] Assign Shortcuts to Color Categories
Keyboard shortcuts allow you to quickly assign a colored category to the desired item. Once you assign a shortcut to a color category, you can use it to assign the category to one or more items, without having to navigate through the menus.
Go to Categorize > All Categories. In the Color Categories dialogue, select the name of the category or the checkbox for it. Select the desired keyboard shortcut using the Shortcut Key dropdown and click OK.
D] Create Color Categories
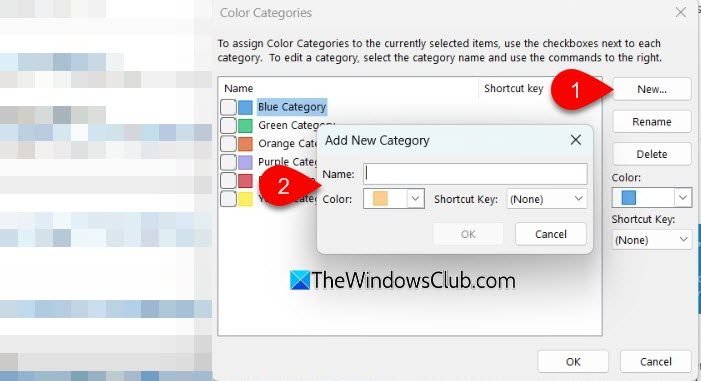
To create a new category, click New in the Color Categories dialogue box. The Add New Category pop-up will appear. Give a suitable name to the category, select a color for the category, select a hotkey (if required), and click OK.
Note: For calendar items, the Categorize option appears on the Appointment or Meeting tab. For an open contact or task, the Categorize option appears on the Home tab.
E] Delete a Category or change its Color
If you wish to delete a specific category or change the color associated with the category, use the options present in the Color Categories dialogue box.
To delete a category, select the category and click Delete. To change the category color, select the category, then select a different color from the Color dropdown.
F] Set Quick Click
Quick Click is a feature that lets you assign a color category to items with a click of a button. It only works in certain table views. You select a category in advance and then click the mouse button to assign that category to the desired item. Let me explain this to you.
Suppose you have moved the reading pane under your message list. You’ll see additional columns in your Inbox, including Received, Category, and Mention. The Quick Click feature will work when you click under the Category column next to a message in the list of emails. But before that, you need to configure Quick Click.
In the top ribbon, select Categorize > Set Quick Click. Select a category from the Color Category dropdown and click OK.
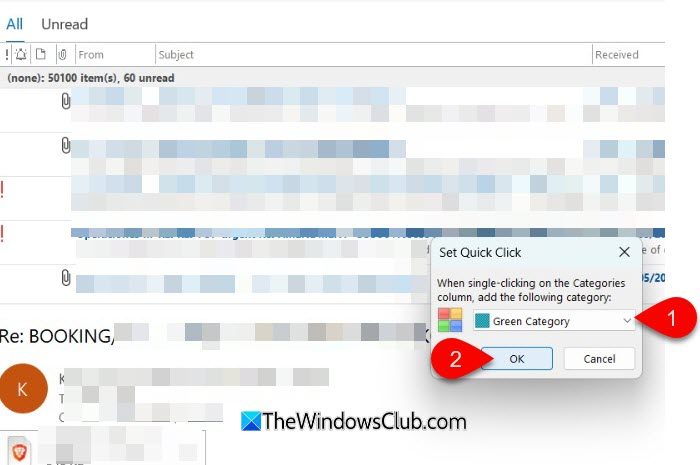
Now, take your cursor under the Category column next to the desired email and click. The category will be assigned to the selected email and will appear as a flag in the message preview window.
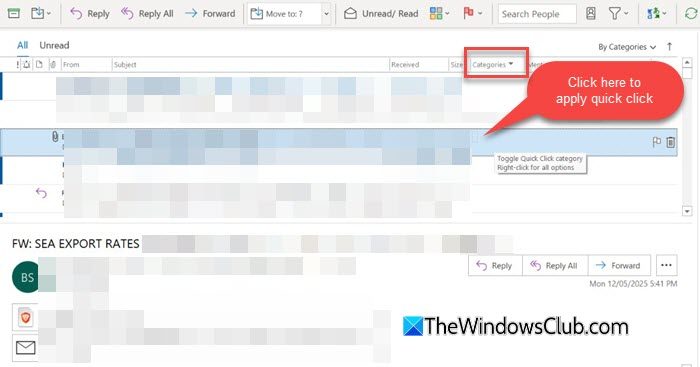
To undo changes, click again under the Category column next to the message in the main email list.
Use Color Categories in the new Outlook app
In the new Outlook app for Windows, Color Categories are available but with limited functionality compared to MS Outlook desktop. In the new Outlook, you can assign color categories to email messages, manage categories, or create new categories. Let us see how.
A] Assign Color Categories
Right-click the email in the main message list, select Categorize, then select a category from the available options. Repeat the same steps to assign more categories to the same message.
Alternatively, open the message, click the Categorize dropdown on the top ribbon, then select a category from the list (to view the complete list of color categories, select the Manage categories option).
To remove the category assignment, click the Categorize dropdown and then click again on the selected category.
B] Manage Color Categories
Just like MS Outlook, color categories have generic names in the new Outlook app. The Manage Categories option helps you rename these categories to something more meaningful, making it easier to organize and identify your items.
Click the Settings icon in the top-right corner of the Outlook window. Go to Accounts > Categories. Alternatively, click Categorize in the top ribbon and select Manage categories.
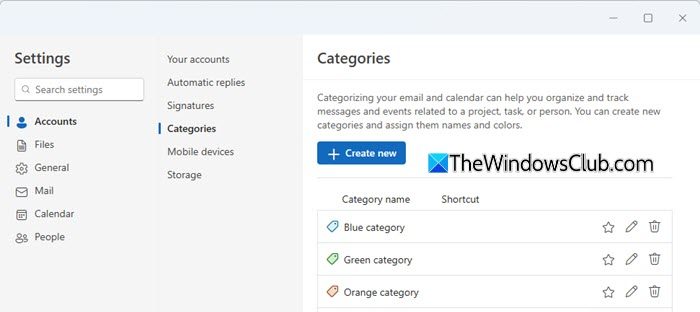
In the Categories pane, select the Edit (pencil) button next to the category you want to rename. Rename the category or select a different color, then select Save. If required, you may assign a Shortcut to the category.
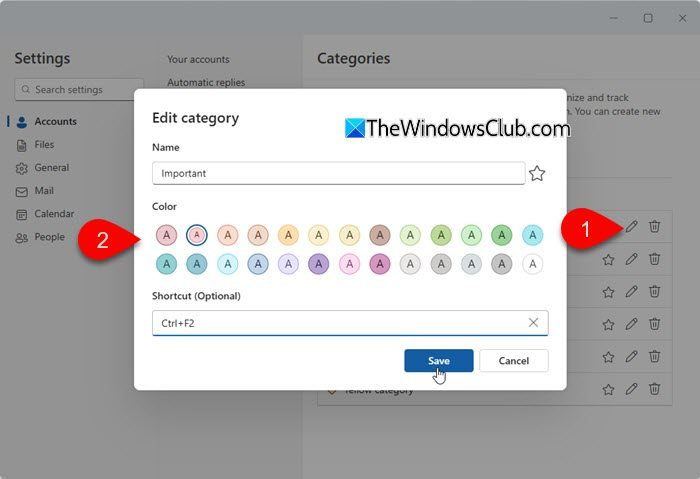
To delete a category, click the Trash icon next to the category name.
C] Create Color Categories
On the ribbon, select Categorize > New category. Name your category, select a color, then select Save.
I hope you find this useful.
Related post: How to Color Code emails by Sender in Outlook using Conditional Formatting to color-code emails from specific senders in MS Outlook.
How do color categories work in Outlook?
Color categories in Microsoft Outlook help you group related items such as emails, calendar events, contacts, and tasks. These color-coded labels allow you to visually organize and prioritize items as needed. Categorized items are easy to search and sort, and you can apply one or multiple categories to an item for better organization.
Can you color folders in Outlook?
You cannot color folders in Outlook directly. Outlook allows you to assign color categories to individual emails, calendar events, tasks, and contacts, but not to entire folders. However, you can use Conditional Formatting in MS Outlook to color-code emails within a folder based on certain rules, giving a similar visual effect.
Read Next: How to color code Outlook Calendar.
Leave a Reply