Microsoft has added the Protected Print Mode feature to Windows 11. This post explains what Windows Protected Print Mode is and how to enable it.

What is Windows Protected Print Mode?
The Windows-protected print mode (WPP) allows your PC to print using the Windows modern print stack, i.e., driverless printing. It works only with Mopria-certified printers, meaning you no longer need to use third-party software installers to get additional security benefits. This feature allows printing devices to print safely and streamlines the installation and printing.
Designed by the MORSE security and Windows print teams, WPP is a modern approach to the Windows Print System. The feature offers a more modern and secure print system with wider compatibility. With this, Windows ends the servicing for third-party drivers, thus improving the print stack and giving more importance to security.
Is your Printer compatible with Windows Protected Print Mode?
Most printer brands, like HP, Canon, Epson, etc., support WPP, but some older models may not. To check if your device is Mopria certified, you can visit the official Mopris page.
How to enable Protected Print Mode in Windows 11?
To enable the Windows Protected Print Mode feature, currently, you need to have the Windows 11 24H2 or higher installed. For now, only Windows 11 Pro users can access this feature. So, if you are not on Insider Build, you won’t have access to this feature.
To check your current build version and the build number, open the Run console (Win + R), type Winver, and hit Enter.
You have two ways to enable Protected Print Mode or WPP in Windows 11:
- Turn on Windows Protected Print Mode via Settings
- Enable WPP via the Group Policy Editor
- Use the Registry Editor to enable WPP
1] Turn on Windows Protected Print Mode via Settings
To set up Windows Protected Print Mode (WPP) using the Settings app on your Windows 11 PC, update your system to Windows 11 version 24H2 or later. Microsoft is rolling out this feature update to Copilot+ PCs and other existing devices along with other features like test Microphone Audio Processing Modes, Windows Recall, adding a Color Profile using the Settings app, etc. If you don’t get this feature after installing the update, you must wait for some time.
Before proceeding further, note that setting up WPP mode on Windows 11 will remove all those printers from your device that are incompatible with Windows Protected Print Mode. So, it would be best if you had a compatible printer (Mopria printers) to use this feature. Here are the steps:
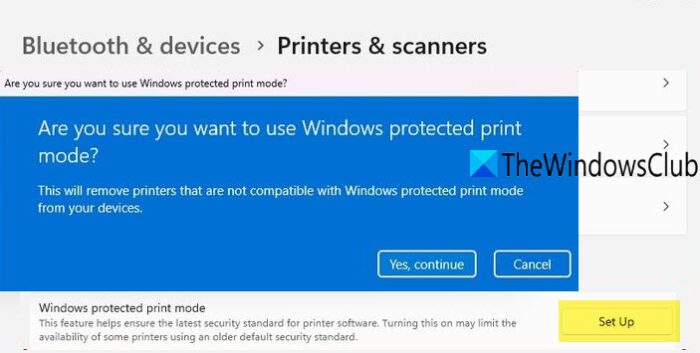
- Use the Win+I shortcut key to open Windows 11 Settings app
- Click on the Bluetooth & devices category from the left section
- Access the Printers & scanners page
- Under the Printer preferences section, you will see a new Windows protected print mode option
- Press the Set Up button for this option
- A confirmation box (Are you sure you want to use Windows protected printer mode?) will be visible be you
- Press the Yes, continue button in that box
- Now, the feature will automatically detect the compatible printers (if available) within the same box. Select a printer
- Click on the Yes, continue button again.
That’s it. Now your printer will be prepared automatically and ready for Windows-protected print mode.
2] Enable WPP via the Group Policy Editor

To enable the Windows Protected Print Mode via the Group Policy Editor, press the Win + R shortcut keys to open the Run console. In the search bar, type in gpedit.msc and hit Enter.
In the Local Group Policy Editor, navigate to the below path:
Computer Configuration > Administrative Templates > Printers
Next, go to the right and double-click on Configure Windows protected print to open the configuration window.
Now, set it to Enabled to enable Windows Protected Print Mode.
*Note – Select Disabled to turn off the Windows Protected Print Mode feature.
Read: How to enable or disable Print Spooler Service
3] Use the Registry Editor to enable WPP

Before you make any changes to the registry, make sure you backup the registry settings to restore any lost data.
Press the Win + R keys together to launch the Run console, type in regedit, and hit Enter.
Now, in the registry editor, navigate to the below path:
HKEY_LOCAL_MACHINE\SOFTWARE\Policies\Microsoft\Windows NT\Printers\WPP
Now, check if the below DWORD keys show on the right side of the pane. Double-click on each of them to check if the Value data is set to the below values to ensure that WPP is enabled.
-
EnabledBy with Value data 2
-
WindowsProtectedPrintGroupPolicyState with Value data 1
-
WindowsProtectedPrintMode with Value data 1
-
WindowsProtectedPrintOobeConfigComplete with Value data 1
If you want to disable Windows Protected Mode at any time, make sure you change the Value data for each of the keys to 0.
Turn off Windows Protected Print Mode using Windows 11 Settings app

If you don’t want to use the WPP mode for the time being, you can easily turn off Windows Protected Print Mode using the Settings app of Windows 11. The steps are:
- Right-click on the Windows Start button and select the Settings option
- Select the Bluetooth & devices category
- Open the Printers & scanners page
- In the Printer preferences section, click on the Turn Off button available for Windows protected print mode option
- In the confirmation box, press the Yes button.
I hope this is helpful.
Read: How to enable or disable Print from Application Guard for Edge
How do I set up a locked printer in Windows?
To set up a locked print job in Windows, open the Run console (Win +R), type in Control Printers, and hit Enter. This will open the Devices and Printers window. Here, right-click the printer, and select Printing Preferences. Next, click Job Type and select Locked Print. Now, input a User ID, and create a secure numeric password. This will ensure that only you can release and print the document on the machine.
Read: Printer not working in Windows PC.
How do I enable secure print in Windows?
To enable secure printing in Windows, open the desired document, select Print, right-click on your printer, and select Printer Properties. Now, look for the Security or Job Storage tab. Here, go to Secure Print or PIN Printing, set a PIN, and press OK. Once the PIN is entered at the printer, your document will now print