
Confidentiality and integrity of data are the major concerns in cyberspace. With the increase in cyber attacks, it is important to regulate and test data processing systems to verify security measures for secure web browsing. The browsers are built with specialized security architectures and offer specific resources, such as add-ons and plugins, to enhance web security. In this article, we discuss DNS leaks which happen to be the major problem with the network configuration and find ways to fix and prevent the DNS leaks problem in Windows 11/10.

Before we begin, let’s have a quick abstract about the role of DNS.
What is DNS
As we all know, Domain Name is used in browsers to find web pages on the internet. In simple words, a Domain name is a collection of strings that can be easily read and remembered by humans. While humans access web pages by domain name, machines access them using an IP address. So basically, to access any website, you need to convert the human-readable domain name into a machine-readable IP address.
The DNS server stores all the domain names and the corresponding IP addresses. Whenever you browse to a URL, you will first be directed to the DNS server to match the domain name to the respective IP address and then forward the request to the required computer. For example, if you type the URL, say www.gmail.com, your system sends the request to the DNS server. The server then matches the corresponding IP address for the domain name and routes the browser to the remote website. Generally, these DNS servers are provided by your Internet Service Provider(ISP).
In summary, DNS Server is the repository of the domain names and the corresponding Internet Protocol address.
Read: What is a DNS Hijacking.
What is DNS Leak?
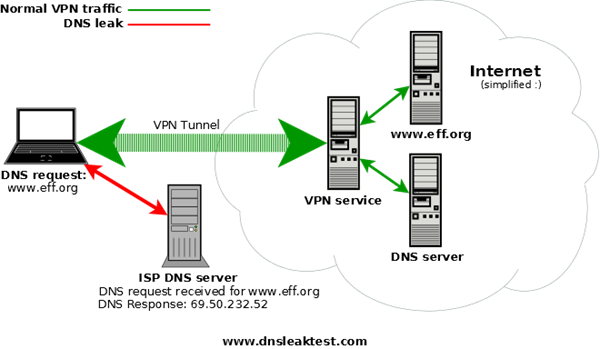
On the Internet, there are numerous protocols for encrypting data transferred between your system and the remote website. Well, Encrypting content alone is not enough. As with content encryption, there is no way to encrypt both the sender’s address and the remote website’s address. For strange reasons, DNS traffic cannot be encrypted, which can eventually expose all your online activity to anyone with access to the DNS server.
That is, every website visited by the user will be known by simply gaining access to the DNS logs.This way, the user loses all privacy over browsing on the internet, and there is a high probability of leaking the DNS data to their Internet Service Provider. In a nutshell, as with the ISP, anyone who has access to DNS servers, legally or illegally, can track all your online activity.
In order to mitigate this problem and protect the privacy of the user, Virtual Private Network (VPN) technology is employed, which creates a safe and secure virtual connection over a network. Adding and connecting your system to a VPN means that all your DNS requests and data are passed to a secure VPN tunnel. If DNS requests leak out of the secure tunnel, the DNS query that contains information such as the recipient and sender addresses is sent over an unsecured path. This will result in serious consequences, as all your information is routed through your Internet service provider, eventually revealing the addresses of all the websites you access.
Read: What is DNS Cache Poisoning?
What causes DNS Leaks in Windows 11?
The most common cause of DNS leaks is improper network configuration. Your system should first connect to a local network, then establish a connection to a VPN tunnel. For those who often switch between internet connections via hotspots, WiFi, and routers, your system is most vulnerable to DNS leaks. The reason is that when you connect to the new network, Windows OS prefers a DNS server hosted by the LAN gateway rather than the one hosted by the VPN service. Eventually, the DNS server hosted by the LAN gateway will send all the addresses to the Internet service providers, disclosing your online activity.
Another major cause of DNS leaks is the lack of IPv6 address support in VPNs. As you are aware, IPv4 addresses are gradually being replaced with IPv6, and the World Wide Web is still in the changeover phase from IPv4 to IPv6. If your VPN doesn’t support IPv6 addresses, any request for an IPv6 address is initially sent to the channel to convert it from IPv4 to IPv6. This address conversion will eventually bypass the VPN secure tunnel, exposing all online activity and leading to DNS leaks.
How to check if you are affected by DNS Leaks?
Checking for DNS leaks is quite simple. The following steps will guide you through a simple DNS leak test using a free online service.
To begin with, connect your computer to the VPN.
Next, visit the dnsleaktest.com website.
Click on Standard test and wait for the result.
Your system is leaking DNS if you see server information associated with your ISP. Also, your system is affected by DNS leaks if you see any lists that are not directed through the VPN service.
Some other sites to check DNS leak are browserleaks.com/dns and dnsleak.com.
How to fix the DNS Leak
Windows systems are vulnerable to DNS leaks, and whenever you connect to the internet, the DHCP settings automatically consider the DNS servers that may belong to the Internet Service Provider.
To fix this problem, instead of using DHCP settings, try to use static DNS server or public DNS services or anything recommended by the Open NIC Project. Third-party DNS servers like Comodo Secure DNS, OpenDNS, Cloudflare DNS, etc, are recommended if your VPN software doesn’t have any proprietary servers.
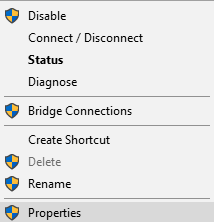
To change DNS settings open Control panel and go to Network and Sharing Center. Navigate to Change Adapter Settings on the left-hand panel and locate your network and right-click on the network icon. Select Properties from the drop-down menu.
Locate and search Internet Protocol Version 4 in the window and then click on it and then go to Properties.
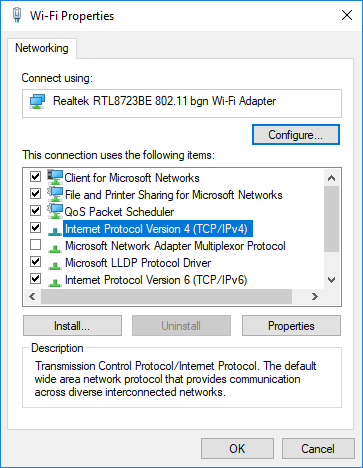
Click on the radio button Use the following DNS server addresses.
Enter the Preferred and Alternate address for DNS servers you wish to use.
If you want to use Google Public DNS server, follow these steps
- Locate the preferred DNS server and type 8.8.8.8
- Locate an alternate DNS server and type 8.8.4.4.
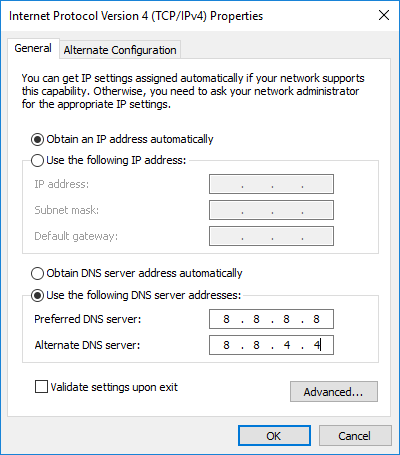
Click on OK to save the changes.
On a related note, it is advisable to use VPN monitoring software; although it may increase your expenses, it would certainly improve user privacy. Also, it is worth noting that performing regular DNS leak tests would serve as a precautionary measure.
