
The Unable to install all modules error appears only on Linux. On Windows, the equivalent error is Setup failed to install the hcmon driver automatically or similar failures for vmci, vmnet, or vsock. This driver error prevents VMware Workstation from creating virtual networks or running virtual machines. Without a fix, the installation rolls back, and you cannot use the software. In this post, we will see what we can do if VMware Workstation is unable to install all modules or the HCOM driver.
Failed to install the hcmon driver.
Unable to install all modules. See log /tmp/vmware-ckadm/vmware.log for details. (Exit code 1)
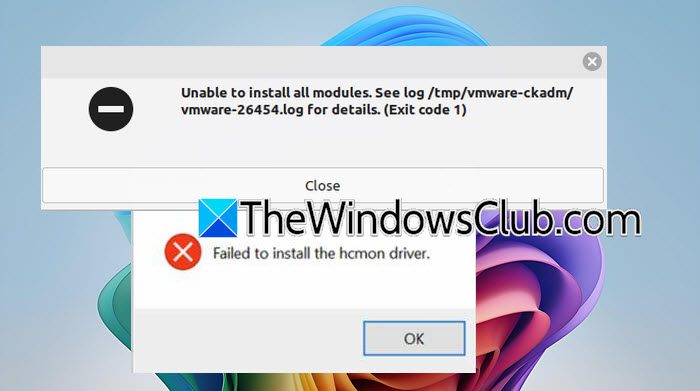
Windows throws this driver error when leftover files from a previous VMware installation block the new installer. The standard uninstaller leaves behind hcmon.sys in C:\Windows\System32\drivers and orphaned registry keys under HKLM\SYSTEM\CurrentControlSet\Services.
On Windows 11, Core Isolation with Memory Integrity prevents VMware drivers from loading entirely. Antivirus software can also quarantine the driver mid-installation. On Linux, the “unable to install all modules” error happens due to missing kernel headers, missing build tools, or Secure Boot blocking unsigned modules.
VMware Workstation is unable to install all modules or the HCOM driver
If VMware Workstation is unable to install all modules or the HCOM driver, follow the solutions mentioned below.
- Remove leftover components from previous installation
- Disable blocking security features
- Install missing dependencies
- Extend service startup timeout (Windows) or use an older kernel (Linux)
Let us talk about them in detail.
1] Remove leftover components from previous installations
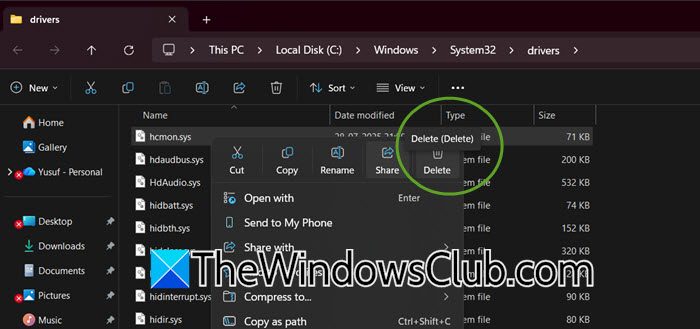
Leftover driver files (Windows) or old compiled modules (Linux) confuse the new installer. Therefore, our first solution is removing them, which forces a clean installation. To do the same, follow the steps mentioned below.
Windows
- First, open File Explorer and go to C:\Windows\System32\drivers.
- Now, delete hcom.sys, vmnet.sys, vmx86.sys, vmci.sys if they exist.
- Now, open Registry Editor and go to HKEY_LOCAL_MACHINE\SYSTEM\CurrentControlSet\Services.
- Delete any keys named hcmon, vmci, vmx86, vmnet, or vmware.
- If a key won’t delete, restart in Safe Mode and try.
Linux
- Run
sudo modprobe -r vmmon vmnetto remove loaded modules. - Run
sudo rm -rf /lib/modules/$(uname -r)/misc/vm*to delete old module files. - Run
sudo rm -rf /etc/vmware(back up configs first if needed).
Reboot the system.
2] Disable blocking security features
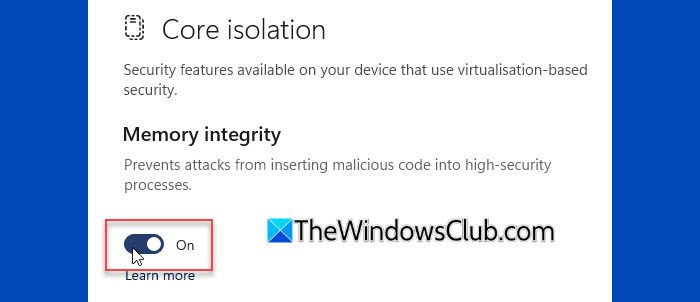
Security features tend to block unsigned drivers. Windows 11’s Memory Integrity prevents hcmon from loading, whereas Linux’s Secure Boot blocks unsigned vmmon and vmnet. Therefore, disabling them allows installation. You need to do the same using the steps mentioned below.
Windows
- Open Windows Security > Device Security > Core Isolation details.
- Now, turn off Memory Integrity
- Restart your computer.
- Re-enable Memory Integrity after installation.
Linux
- Restart and enter UEFI firmware setup (press F2, Del, or Esc during boot).
- Find Secure Boot under Security or Boot tab.
- Set it to Disabled, save, and exit.
- Boot normally and run
sudo vmware-modconfig --console --install-all.
Finally, check if the issue is resolved.
3] Install missing dependencies
On Linux, VMware requires kernel headers and build tools, whereas on Windows, administrator rights and a disabled antivirus are required for driver installation.
On Windows, disable Real-time protection, then right-click on the VMware installer .exe file and select Run as administrator. Complete the installation, then re-enable antivirus.
If you are using Linux, we need to install kernel headers and build tools using the following command.
Debian/Ubuntu
sudo apt install build-essential linux-headers-$(uname -r)

Fedora/RHEL
sudo dnf install kernel-devel kernel-headers gcc make

openSUSE
sudo zypper install kernel-devel gcc make
Manually compile modules using the following command.
sudo vmware-modconfig --console --install-all
Check the log at /tmp/vmware-*/vmware-*.log if compilation fails
4] Extend service startup timeout (Windows) or use an older kernel (Linux)
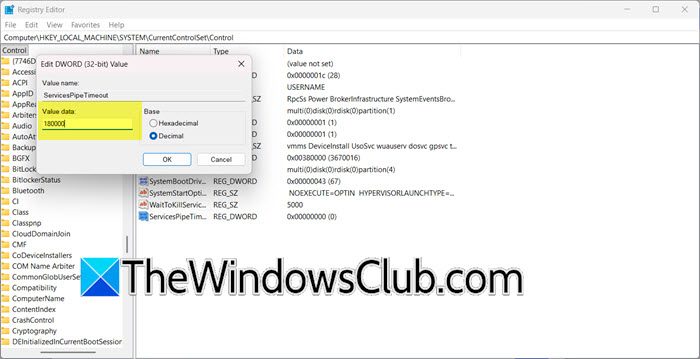
Windows services time out after 30 seconds; extending gives hcmon more time. On Linux, very new kernels may break compilation; booting an older kernel works around it. You need to follow the steps mentioned below to do the same.
Windows
- Press Win + R, type regedit, and go to HKLM\SYSTEM\CurrentControlSet\Control.
- Create a new DWORD (32-bit) named ServicesPipeTimeout.
- Set its value to 180000 (decimal) for 180 seconds.
- Restart the server and retry VMware installation
Linux
- Reboot and hold Shift to show the GRUB menu.
- Select Advanced options and boot an older kernel version (e.g., 5.15 instead of 6.8)
- After booting, run
sudo vmware-modconfig --console --install-all. - Alternatively, apply community patches from GitHub for vmware-host-modules that match your VMware version.
Finally, check if the issue persists.
That’s it!
How to fix VMware kernel module updater
The Kernel Module Updater error usually appears after a Linux kernel update breaks compatibility with VMware’s vmmon and vmnet modules. To fix it, first install the necessary build tools and kernel headers (e.g., sudo apt install build-essential linux-headers-$(uname -r) on Debian/Ubuntu). Then, manually trigger the compilation by running sudo vmware-modconfig --console --install-all. If the issue persists, you can use a community script like vmware-module-installer from GitHub, which patches the modules to improve kernel compatibility.
Read: VMware Workstation failed to power off virtual machine
How to install CISCO router in VMware Workstation?
You cannot run a Cisco router image directly on VMware Workstation. Instead, use GNS3 as the emulation layer, with VMware running the GNS3 VM (an .ova file you import). The GNS3 VM acts as a Linux backend that executes Cisco IOS (or IOU/IOL) images via the Dynamips emulator, all managed from the GNS3 GUI. After configuring VMware to host the GNS3 VM, you can import Cisco router images directly through the GNS3 interface, which handles the hardware emulation.
Also Read: VMware Workstation Insufficient permission to access the file.
