You click the “Push” button in Visual Studio, and a red error pops up: Failed to push to the remote repository. See the Output window for more details. But the Output window often shows nothing useful, leaving you stuck. This frustrating issue occurs across Visual Studio editions and can stop your team’s workflow dead in its tracks. So, if Visual Studio failed to push to the remote repository, follow the solutions mentioned in this guide.

You might not be able to push to a remote repository for several reasons. First, the branch you want to push to, like develop or main, may be protected and only allow Pull Requests. Second, your Git credentials saved in Windows Credential Manager might be outdated or incorrect if you’ve switched accounts. Third, if your commit includes a large file, such as a ZIP archive, it might exceed the remote repository’s size limit. Additionally, your company’s firewall, VPN, or proxy could block Git traffic, or you might face SSL certificate issues. Lastly, the remote repository may have naming rules that require your branch to follow specific patterns, like needing a feature/ prefix.
Visual Studio failed to push to the remote repository
If Virtual Studio failed to push to the remote repository, follow the steps mentioned below.
- Read the Detailed Error from the Output Window
- Update or Delete Stored Git Credentials in Windows Credentials Manager
- Check Branch Policies
Let us talk about them in detail.
1] Read the Detailed Error from the Output Window
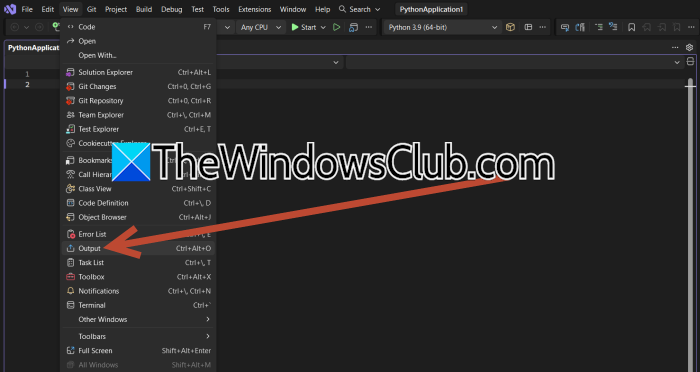
The Output window in Visual Studio shows the raw Git command output, which almost always contains the specific error message (e.g., “protected branch hook declined”, “RPC failed”, or “authentication failed”). Reading that message is the fastest way to know which solution to apply.
In Visual Studio, go to View > Output or press Ctrl + Alt + O. In the Show output from dropdown at the top of the Output pane, select Source Control – Git. Now, scroll through the log and look for the line that starts with error: or fatal:. That line tells you exactly what went wrong.
You can also use the Git command line for clearer error messages. The command line gives you the full, unfiltered Git error output, which often includes details that Visual Studio’s UI hides. It also lets you try alternative push options (like --force with caution) to isolate the problem.
Open Git Bash or Command Prompt, navigate to your project folder using cd path/to/your/repo. Now, run git push origin <your-branch-name>, for example, git push origin develop. Then, read the error message printed in the terminal. It will guide you to the next step.
2] Update or Delete Stored Git Credentials in Windows Credential Manager
Visual Studio relies on the Windows Credential Manager to store your Git credentials (personal access tokens or passwords). If those credentials are expired, incorrect, or belong to a different account, the push authentication fails. Deleting them forces Visual Studio to prompt you for fresh credentials. Follow the steps mentioned below to do the same.

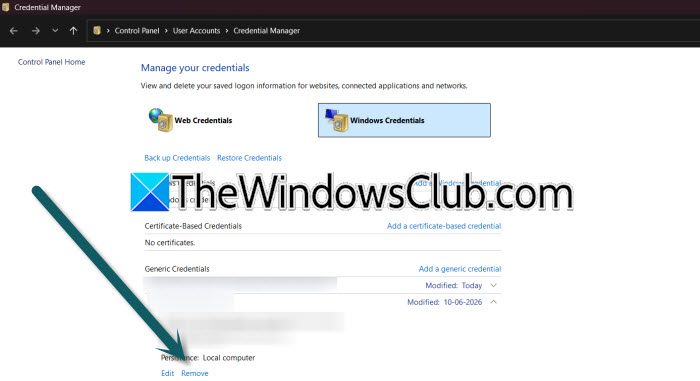
- Open Control Panel.
- Go to User Accounts > Credential Manager.
- Now, go to Windows Credentials.
- Under Generic Credentials, look for any entries that contain git: or github.com (or your remote host, e.g., dev.azure.com).
- Select each such entry and click Remove.
- Go back to Visual Studio and try to Push again. A login window (or browser-based OAuth flow) will appear; complete it with your current credentials.
Finally, check if the issue persists.
3] Check Branch Policies
Many teams enable branch policies on develop, main, or release branches to prevent direct pushes and require Pull Requests for code review and CI checks. Pushing directly to such a branch will always fail. Knowing this, you can either create a PR or (if you have admin rights) temporarily disable the policy. Follow the steps mentioned below.
- If you use Azure DevOps, go to your project > Repos > Branched.
- Find your target branch (e.g., develop) and check if it has a branch policy icon (a shield or lock).
- If a policy exists that requires a Pull Request, do not push directly. instead, create a Pull Request from your local branch to develop and complete it.
- If you absolutely must push directly and you have admin permissions, you can temporarily disable the policy (but remember to re-enable it afterwards).
Now, check if the issue persists.
Why do stored credentials fail after reset?
When you reset your Windows password, the operating system updates your login token but does not automatically refresh the encrypted credentials stored inside Windows Credential Manager for Git. Visual Studio continues using the old, stale password or token, causing authentication to fail during the push. Even if you enter your new password interactively, the cached old entries can interfere. To fix this, you must manually delete the old Git credentials from Credential Manager, which will prompt Visual Studio to request new credentials on your next push attempt.
Read: Object reference not set to an instance of an object in Visual Studio
Git push RPC failed HTTP 400 in VS?
This specific error occurs when the push payload exceeds the remote server’s HTTP buffer limit or when a proxy or firewall interrupts the transfer. It commonly appears with large commits containing binaries or oversized ZIP files. To resolve, open Git Bash in your project folder and increase the HTTP buffer size by running git config http.postBuffer 524288000 (sets it to 500 MB). Additionally, temporarily disable SSL verification for testing with git config http.sslVerify false. If the issue persists, split your commit into smaller batches and push incrementally.
Also Read: Visual Studio crashing on startup in Windows 11.