Connecting GitHub to Visual Studio Code simplifies your development process by integrating version control directly into your editor. This guide provides a step-by-step walkthrough to link GitHub to Visual Studio Code.
How to link GitHub to Visual Studio Code
To link GitHub to Visual Studio Code, follow the steps mentioned below.
- Download and set up Git
- Set up a repository clone
- Configure and commit
Let us talk about them in detail.
1] Download and set up Git
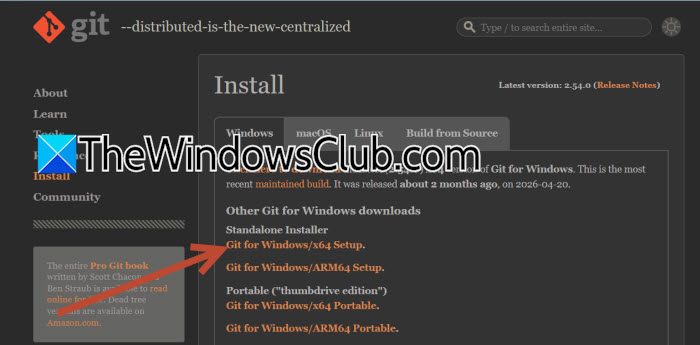
We need to start by downloading the Git installer (e.g., 64-bit for Windows) from the official website (git-scm.com).
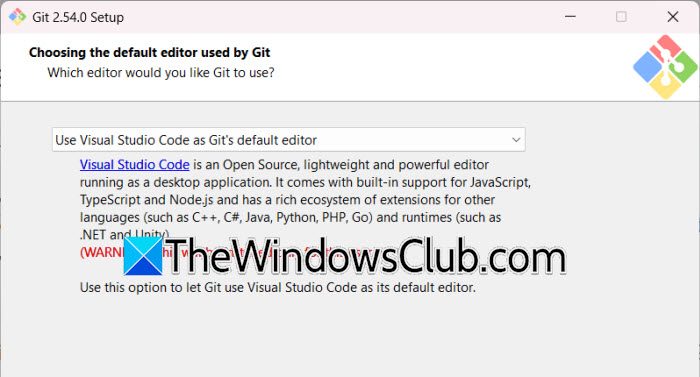
Now, initiate the installation by clicking through the setup wizard. During the Git installation process, ensure you select the option to Use Visual Studio Code as Git’s default editor before proceeding.
2] Set up a repository clone

We need to initiate a repository clone first. For that, open VS Code, press Ctrl + Shift + P to open the command palette, and type Git: Clone.
To authenticate the GitHub Account, select Clone from GitHub and follow the prompts to allow VS Code to authenticate and sign into your account via your web browser.
Once signed in, a list of repositories will appear; select the one you wish to clone to your local machine. Choose a specific folder on your local system where you want the repository files to be saved.
3] Configure and commit
Open the Terminal in VS Code and use the git config command to set your global username and email address to match your GitHub profile.

Open a file from your cloned repository, make your desired edits (such as changing a column name), and save the file.
Navigate to the Source Control tab, enter a commit message, and select Commit and Push to sync your changes to the cloud.
Return to your GitHub repository in your browser to confirm that your recent commits and file changes are visible.
Read: How to merge two branches in Git?
How to link GitHub Copilot to Visual Studio Code?
If you want to add AI capabilities to your IDE, we recommend linking GitHub Copilot to Visual Studio Code. To link GitHub Copilot to Visual Studio Code, follow the steps mentioned below.
- In Visual Studio Code, go to the Extensions icon on the left sidebar or press Ctrl + Shift + X.
- Now, search for GitHub Copilot and install the extension.
- After the installation, you will be asked to log in to your GitHub account. Click on the Sign-in button when prompted.
- After connecting to your GitHub account, you need to authorize GitHub Copilot to access your account by clicking on Authorize GitHub Copilot.
Finally, your account would be linked to VS Code.
Read: GitHub Copilot not working in Visual Studio
Unable to connect to GitHub from Visual Studio
You may fail to connect to GitHub from Visual Studio for various reasons. Outdated or corrupted credentials stored in Windows Credential Manager often cause authentication failures, even after you sign out and back in. Two-factor authentication (2FA) on your GitHub account means you can no longer use your regular password; you must use a Personal Access Token (PAT) instead. Network restrictions, such as corporate proxies or firewalls, can intercept or block Visual Studio’s outgoing requests. Missing or broken components in Visual Studio itself, such as the GitHub extension or authentication handlers, can also prevent the login flow from completing. Finally, running Visual Studio under a different user account than your Windows login can cause permission mismatches that prevent the connection from working.
Let us go ahead and try fixing the issue.
Update Visual Studio and Verify GitHub Components
Missing or outdated GitHub-related components can break the authentication pipeline. Therefore, repairing or updating Visual Studio restores these components to a working state.
- Close all instances of Visual Studio.
- Open the Visual Studio Installer from your Start menu.
- Find your installed version of Visual Studio and click the Update button if an update is available.
- If you are already on the latest version, click More and then Repair, and wait for the process to complete (this may take 10 to 20 minutes).
Restart your computer and reopen Visual Studio.
2] Clear Stored Credentials from Windows Credential Manager
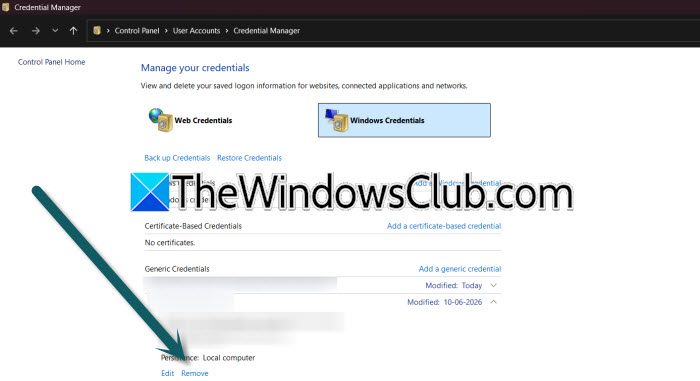
Windows caches GitHub credentials locally. If these become corrupted or outdated, Visual Studio keeps using them and fails to authenticate. Removing them forces Visual Studio to prompt you for fresh credentials.
- Close Visual Studio completely.
- Type Credential Manager in the Windows Start menu search and open it.
- Click on Windows Credentials.
- Look for any entries related to GitHub. Search for git:https://github.com, Microsoft_VS_GitHub, or anything with “github.com” in the name.
- Select each relevant entry and click Remove.
Restart Visual Studio and try signing in to GitHub again. Visual Studio will now prompt you for new credentials.
3] Use a Personal Access Token (PAT) Instead of a Password
GitHub no longer accepts passwords for Git operations, especially if you have two-factor authentication (2FA) enabled. A PAT acts as a secure, password-like token that bypasses this limitation.
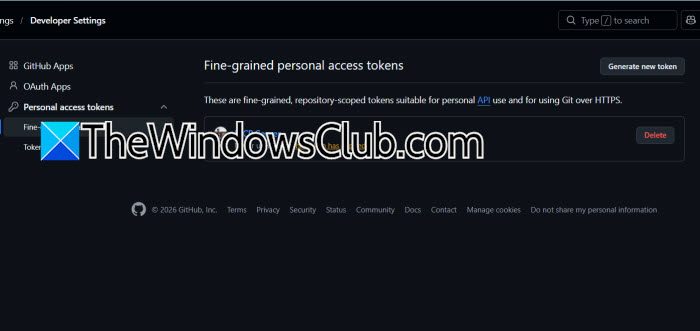
- Go to GitHub.com, click your profile picture, and select Settings.
- Navigate to Developer settings, then Personal access tokens, and then Tokens (classic).
- Click Generate new token and give it a descriptive name.
- Select the necessary scopes. At a minimum, check the repo scope for full repository access.
- Click Generate token and copy the token immediately because you will not see it again.
In Visual Studio, when prompted for credentials during a Git operation (push, clone, or sign-in), paste the PAT as your password.
Read: Best free AI Extensions for Visual Studio Code.