VirtualBox failing to boot from an ISO file is a common but easily resolved issue that typically occurs when the virtual machine cannot find a valid bootable medium. This usually prevents a new operating system installation from starting. In this post, we are going to see what you can do if VirtualBox is not booting from ISO.
VirtualBox not booting from ISO in Windows 11
The virtual machine may fail to boot from an ISO because the boot order prioritizes the virtual hard disk over the optical drive, resulting in a “No bootable medium” error. Another issue could be that the ISO file isn’t attached to the virtual optical drive. For Windows 11 users, UEFI Secure Boot may block ISOs such as GParted because they lack the required Microsoft signature, causing the firmware to revert to the Windows Boot Manager. Additionally, a corrupted ISO or glitches in the VM’s saved state can prevent the optical device from being recognized during boot-up.
If VirtualBox is not booting from the ISO, follow the solutions mentioned below.
- Correct the Boot Order in System Settings
- Verify the ISO Attachment in Storage Settings
- Disable EFI or Secure Boot
- Force a Manual Boot from the EFI Firmware Menu
Let us talk about them in detail.
1] Correct the Boot Order in System Settings

The VM firmware checks devices in a specific sequence. Moving the optical drive to the top ensures that the VM checks the ISO for boot files before attempting to boot from the hard disk. To change the Boot Order in System Settings, follow the solutions mentioned below.
- Power off the virtual machine completely (do not just “Save State”).
- Select the VM and click Settings > System > Motherboard.
- In the Boot Order list, ensure Optical is checked. Click and drag it (or use the arrow buttons) to the top position, above Hard Disk.
- Click OK and start the VM.
Finally, check whether you can boot from the ISO file.
2] Verify ISO Attachment in Storage Settings
![]()
An optical drive icon that says Empty indicates the ISO is not mounted. Even if the ISO is on your host desktop, VirtualBox requires it to be explicitly loaded into the virtual drive. Follow the solutions mentioned below to do the same.
- With the VM powered off, go to Settings > Storage.
- In the Storage Devices tree, click the Empty disc icon under the storage controller (SATA or IDE).
- In the Attributes panel on the right, click the small disc icon next to Optical Drive and select Choose a disk file….
- Navigate to your ISO, select it, and click Open.
- The disc icon should now display the ISO name. Click OK and boot the VM.
Finally, check if the issue persists.
3] Disable EFI or Secure Boot
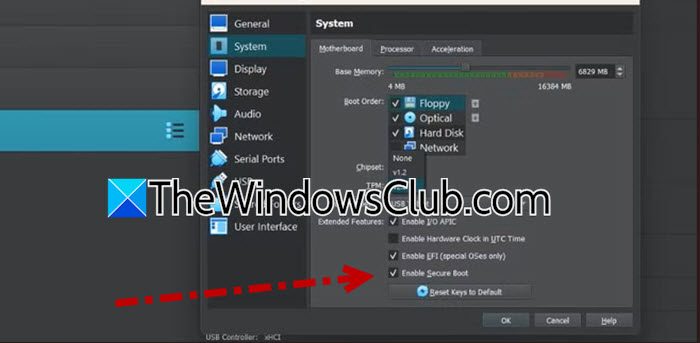
If you are booting an unsigned utility ISO (like GParted or Clonezilla) on a VM that has Secure Boot enabled for Windows 11, the firmware blocks the boot attempt. Temporarily disabling Secure Boot allows the ISO to run. Make sure to re-enable this setting after you are done resizing partitions, or Windows 11 will not boot correctly. To disable EFI or Secure Boot, follow the steps given below.
- Power off the VM.
- Go to Settings > System > Motherboard.
- Go to Extended Features and uncheck Enable Secure Boot or Features > Secure Boot. (Keep Enable EFI checked).
- Click OK, boot into the ISO to perform your work, then shut down the VM and re-check Enable Secure Boot before starting Windows 11 again.
Now, connect your ISO and see if your VM is booting using that.
4] Force a Manual Boot from the EFI Firmware Menu
Instead of relying on the automatic boot order (which can be overridden by saved firmware settings), this method interrupts the boot process to manually select the optical drive from the EFI shell, bypassing any Secure Boot restrictions for that single session. To do so, follow the steps below.
- Start the VM and immediately begin tapping the ESC key repeatedly (do not use F12; F12 is for network boot in EFI mode).
- When the menu appears, select Boot Manager.
- Look for an entry named UEFI VBOX CD-ROM or EFI Internal Shell.
- If you see the optical drive name, select it and press Enter. The ISO will boot immediately.
Hopefully, these solutions will resolve your issue.
Read: How to Install Windows 11 on Oracle VM VirtualBox
How do I force VirtualBox to boot from ISO?
You can force a one-time boot without changing settings. Start the VM and immediately press ESC (for EFI VMs) or F12 (for legacy BIOS VMs). Select the optical drive from the boot menu that appears. This overrides the saved boot order for that session only.
Read: How to install VMware ESXi on VirtualBox VM
Why is my ISO not showing in VirtualBox boot menu?
If the optical drive does not appear in the boot menu, the ISO is likely attached to a controller type that is not initializing properly. Go to Settings > Storage, and move the ISO from the SATA optical drive to the IDE optical drive. IDE often provides better compatibility for Linux-based tools like GParted.
Also Read: FATAL: No bootable medium found! System halted error in VirtualBox.