In this post, we will show you how to disable Secure Boot in Hyper-V and what to do if Hyper-V is not booting when Secure Boot is enabled.
If you’re running a Generation 2 virtual machine in Hyper-V and encountering boot issues, you may need to disable Secure Boot. This feature is enabled by default on newer VMs and can sometimes prevent certain operating systems from starting properly.

How to disable Secure Boot in Hyper-V
Secure Boot is a security standard in UEFI (Unified Extensible Firmware Interface) that ensures only trusted software runs when your computer starts. It verifies the digital signatures of firmware, operating system loaders, and drivers before they run. This helps prevent malware and unauthorized code from loading at startup.
In Hyper-V, Secure Boot is enabled by default for Generation 2 virtual machines. However, Generation 1 virtual machines use older BIOS firmware and do not support this feature. If you have installed an operating system that doesn’t support UEFI Secure Boot, or if you’re using certain custom images or older operating system versions, the virtual machine may not start. In these cases, you can resolve the issue by disabling Secure Boot without recreating the virtual machine.
To disable Secure Boot in Hyper-V, you need to follow either of the two methods mentioned below.
- Using Hyper-V Manager
- Using PowerShell
Let us talk about them in detail.
1] Using Hyper-V Manager
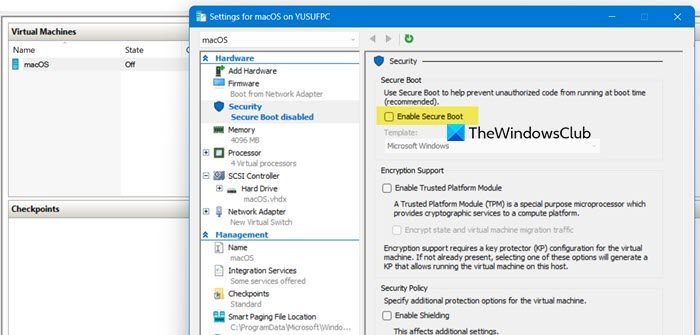
To disable Secure Boot in Hyper-V Manager, follow the steps below.
- Launch the Hyper-V Manager from the Start Menu.
- In the list of virtual machines, right-click the one you want to modify and choose Settings.
- In the left-hand menu, select Security. You’ll see the Secure Boot section on the right.
- Uncheck the box labeled Enable Secure Boot.
- Click OK to apply your settings.
The next time you start the VM, it will boot without Secure Boot enforcement.
2] Using PowerShell
For those who prefer the command line, you can disable Secure Boot via PowerShell with a single command.
Search for Windows PowerShell in the Start Menu, right-click it, and select Run as administrator.
Use the following command, replacing virtualmachine with the actual name of your VM:
Set-VMFirmware -VMName "virtualmachine" -DisableSecureBoot
Once executed, the VM will boot with Secure Boot disabled on its next start.
In some Hyper-V configurations, the PowerShell command may not work as expected due to system policies or version differences. If you encounter issues, use the Hyper-V Manager method instead.
Hyper-V not booting when Secure Boot Is Enabled
This usually happens because Secure Boot requires an operating system or bootloader with a valid, trusted digital signature. If you’re trying to boot a custom OS image, an older OS without UEFI support, or an OS that wasn’t properly configured for Secure Boot, the hypervisor will block the boot, resulting in a boot failure.
Now, let us look at some solutions to resolve this issue.
1] Disable Secure Boot in the VM Settings
This is the most direct fix, as it removes the signature-check requirement entirely, allowing the existing OS to boot normally. Open Hyper-V Manager, right-click the VM, and select Settings. Go to the Security tab, uncheck Enable Secure Boot, and click OK.
2] Change the VM Generation from 2 to 1
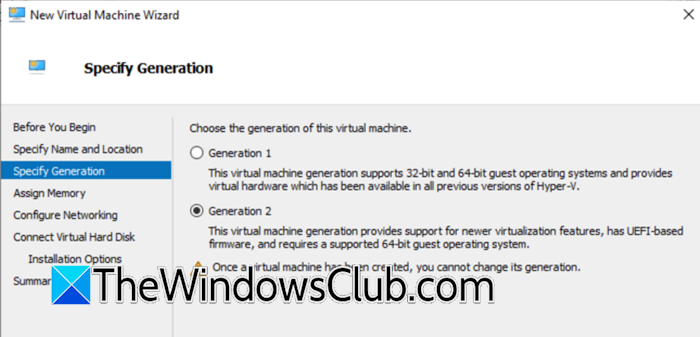
Generation 1 VMs use legacy BIOS firmware instead of UEFI, so Secure Boot is not applicable. This ensures compatibility with older or non-UEFI operating systems. You must create a new Generation 1 VM. Then, attach the existing virtual hard disk (VHD/VHDX) to it, and configure the same hardware settings (memory, processors, etc.).
Read: Hyper-V Virtual Machine stuck in Saved State
3] Use a Properly Signed OS or Template
Secure Boot only allows booting operating systems with trusted signatures. Using a Windows image from official media or a correctly prepared template ensures it meets this requirement. Obtain a standard, unmodified OS installation ISO (like from Microsoft). Create a new Gen 2 VM, mount the official ISO, and perform a clean install.
4] Add a Trusted Certificate for a Custom OS

If you’re running a Linux or BSD virtual machine that supports UEFI Secure Boot but uses a custom kernel or bootloader (like GRUB) that isn’t signed by Microsoft, you can enroll your own certificate in the VM’s virtual UEFI firmware.
- Obtain or create a Machine Owner Key (MOK) or a Secure Boot signing certificate.
- Sign your kernel or bootloader (e.g., shim.efi, grubx64.efi, vmlinuz) with this certificate using a tool like sbsign.
- Boot the VM into the UEFI Firmware Settings (from the Hyper-V connect window, select File > Settings while the VM is off, or reset the VM and press a key during boot).
- Navigate to the Secure Boot or Security menu in the firmware and choose the option to Enroll Key or Custom Mode.
- Load your certificate file (often in .der or .esl format) from a virtual FAT filesystem (like a floppy disk image or ISO) to add it to the VM’s trusted database.
Hopefully, with these solutions, your issue will be resolved.
Read: How does Virtualization or Hyper-V work on Windows
Does Hyper-V require a Secure Boot?
No, Hyper-V itself does not require Secure Boot. Secure Boot is an optional security feature available only for Generation 2 virtual machines, which use UEFI firmware. You can create and run both Generation 1 (BIOS-based) and Generation 2 VMs without ever enabling Secure Boot. It is primarily recommended for modern Windows and Linux guests to protect against boot-level malware, but it is not a requirement for the hypervisor to function.
Also Read: Use Quick Create in Hyper-V Manager to create Virtual machine.