Noise suppression in Microsoft Teams is designed to filter out keyboard clatter, hum, and background chatter. When it stops working, your calls become distracting for everyone. In this guide, we will see why Teams noise suppression is not working.

Teams noise suppression usually fails because of a conflict between Teams’ own audio processing and Windows’ built‑in microphone effects, such as Noise Suppression or Acoustic Echo Cancellation. Another common cause is that Teams is picking up the wrong microphone input, for example, a webcam mic instead of your headset. Sometimes the Teams cache gets corrupted, or an audio driver update has changed how your mic behaves. Finally, if you are using the free version of Teams or your IT admin has disabled the feature via policy, the noise suppression option may be present but non‑functional.
Fix Teams Noise suppression not working
If Teams noise suppression is not working for you, follow the solutions mentioned below to resolve the issue.
- Disable Windows audio enhancements
- Clear Teams Cache
- Check if the correct microphone is selected
- Check Microsoft 365 Subscription
Let us talk about them in detail.
1] Disable Windows audio enhancements
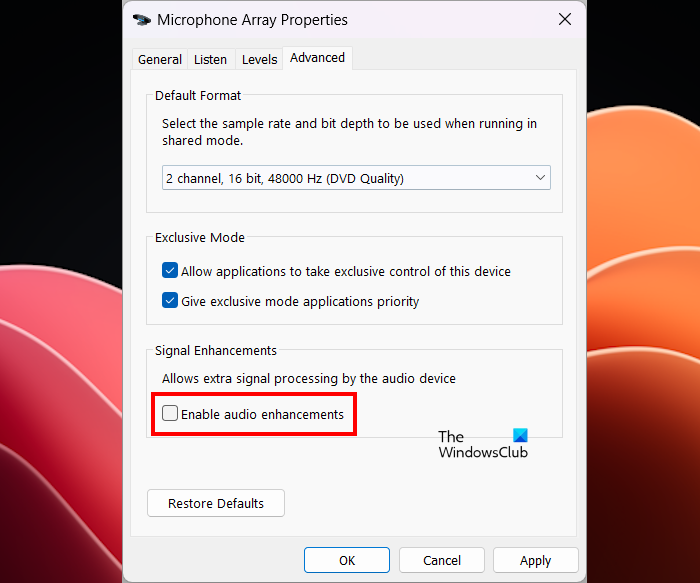
Since Windows will also have its own noise-filtering tool at play, it can conflict with Teams’ and cancel both out. Therefore, letting Teams handle all noise removal alone yields a clean, predictable result. First, to disable the Windows noise filtering tool, turn off audio enhancements as follows:
- Right-click on the speaker icon on the taskbar and select Sound settings.
- Now, go to Advanced > More sound settings.
- Go to the Recording tab, double‑click your active microphone.
- Switch to the Advanced tab, uncheck Enable audio enhancements, then click OK.
Now, in your Teams, enable Noise filtering and see if that helps.
2] Clear Teams cache
![]()
If there are old or broken cache files in Teams, they can prevent specific features, including noise suppression, from loading correctly. Therefore, it is crucial to clear the Teams cache and force a rebuild of their settings without affecting your account or preferences.
To do so, you need to open Run, paste %appdata%\Microsoft\Teams, and press Enter.
Open the following specified folders and delete the files they contain. Delete all the files but keep the folders:

- %appdata%\Microsoft\Teams\application cache\cache
- %appdata%\Microsoft\Teams\blob_storage
- %appdata%\Microsoft\Teams\Cache
- %appdata%\Microsoft\Teams\databases
- %appdata%\Microsoft\Teams\GPUcache
- %appdata%\Microsoft\Teams\IndexedDB
- %appdata%\Microsoft\Teams\Local Storage
- %appdata%\Microsoft\Teams\tmp
Once cleared, restart Teams and see if that helps.
3] Check if the correct microphone is selected
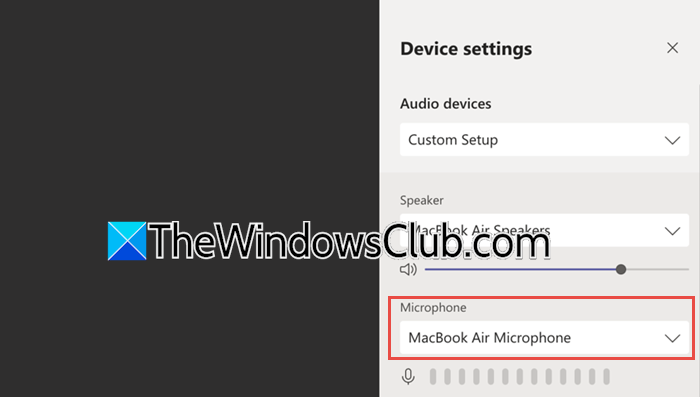
We need to make sure that you have not selected an incorrect microphone, as it may pick up a different audio signal and try to process it, which can make it seem as if no noise is being suppressed. To check if you have selected the correct microphone, in Teams, click on your profile icon, go to the Microphone section, and select the correct one.
4] Check Microsoft 365 Subscription
A Microsoft 365 subscription is what unlocks the full noise suppression experience. With a subscription, you typically get the professional version of Teams and the ability to adjust the suppression level. The free version of Teams may still offer basic noise suppression, but it usually lacks the full range of control, or the feature might be entirely unavailable to general consumers.
Hopefully, with these solutions, your issue will be resolved.
Read: Microsoft Teams not working with VPN
Teams noise suppression/voice isolation greyed out
If the noise suppression dropdown or the Voice Isolation toggle is greyed out and unclickable, there are four common reasons. First, you might be using the free version of Microsoft Teams, but noise suppression is fully available only in work, school, or premium consumer accounts. Second, your IT administrator has enforced a policy that disables user‑controlled noise suppression or Voice Isolation. Third, Voice Isolation specifically requires you to enroll your voice: go to Settings > Recognition (or Privacy) and create a voice profile before the feature unlocks. Fourth, some older or low‑powered microphones (like basic webcam mics) lack the signal quality needed for AI‑based Voice Isolation, so Teams greys out the option automatically. If none of the above apply, try repairing the Teams installation via the Windows Installed apps panel, or reinstall the application completely.
How to enable noise suppression in Microsoft Teams?
To enable noise suppression in Microsoft Teams, open the app, click your profile picture, then select Settings followed by Devices on the left sidebar. Once on the Devices page, scroll down to the Noise suppression section, where you’ll find a drop-down menu of options; choose your desired level, Auto lets Teams decide, High blocks most background sound, Low handles persistent hums, or you can switch it Off completely, and the setting will be saved automatically.
Read: How to enable Noise Cancellation in Microsoft Teams
Why are my headphones picking up background noise on Teams?
When your headphones pick up background noise on Teams, it can happen for a few reasons: your computer’s sound card might be applying its own noise filtering that conflicts with what Teams is doing, or the built-in AI feature may just be turned off or set to the wrong level in the Device settings. To stop it, simply open your Teams settings, go to the Devices menu, and make sure the Noise suppression dropdown is set to either High or the default Auto level so the app’s AI can properly isolate your voice and filter out everything else for your meeting.
Also Read: Save this message missing in Teams.