It is a frustratingly common experience to face connectivity issues with MS Teams while connected to a VPN. The user may find themselves unable to send messages, calls failing to connect, or the app constantly showing a network error despite an active Internet connection. In this post, we will see what you can do if your Microsoft Teams is not working with VPN.

Microsoft Teams not working with VPN
If Microsoft Teams stop working while you are connected with a VPN, execute the solutions given below.
- Disable VPN location routing conflicts
- Switch the VPN protocol to support UDP
- Flush DNS and configure Public Resolver
- Adjust network stack and MTU size
- Enable Split tunnelling
Let’s get started with the troubleshooting guide.
1] Disable VPN location routing conflicts
If you are connected to a VPN server in a different country, Microsoft security might flag this as unusual activity. To check, disconnect and reconnect using that specific server. If the problem persists, temporarily disconnect from the VPN entirely and test Teams for a few minutes. If Teams works perfectly without the VPN but fails when connected, the location conflict is confirmed.
Once confirmed, manually set the VPN location by opening the VPN client and looking for a server selection menu. Instead of using Fastest Server or a default location, manually choose a VPN server that is geographically closest to the current physical location or confirm with the IT team if you are required to connect to a specific regional gateway for compliance reasons. If this is not the issue, slide to the next solution.
2] Switch the VPN protocol to support UDP
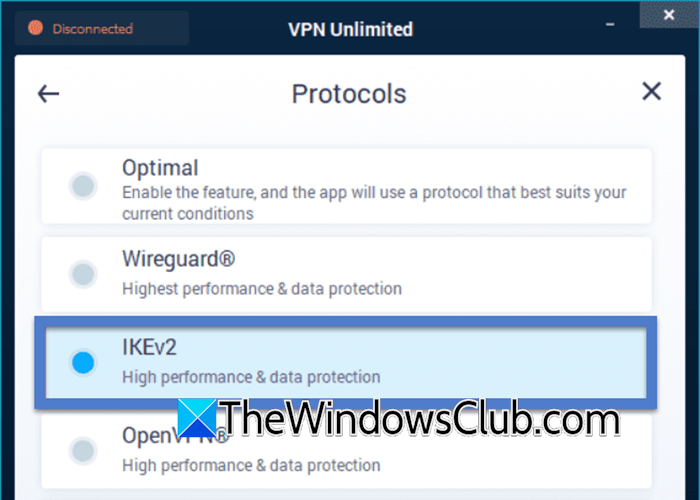
Teams is designed to use UDP for voice and video because it prioritises speed over perfection. It is necessary to switch the VPN protocol to one that natively supports UDP to allow the media packets to flow without being converted into slower error-checked TCP packets.
- Open the VPN client software and navigate to the settings or preferences menu, and look for a section labelled Protocol, Connection Type, or VPN Protocol.
- Go to the Settings.
- Change the protocol from the current selection to IKEv2, IPsec, or WireGuard.
After you complete the steps, reconnect to the VPN and join a test call to check for improvements. If this doesn’t resolve the issue, move to the next solution.
3] Flush DNS and configure Public Resolver
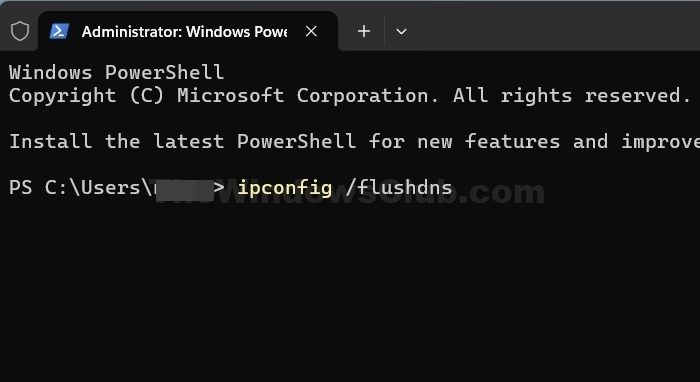
VPNs often assign an internal DNS server that may have outdated records or fail to resolve Microsoft’s endpoints correctly. To remove old entries, we are going to flush the DNS and switch to a reliable external server.
- Go to the Start menu, type cmd, and select the Run as administrator option.
- Type the command given below and hit Enter to flush the cache:
ipconfig /flushdns
A confirmation message will appear on the screen confirming that the cache has been flushed.
- Next, type netsh winsock reset, and press Enter, and follow it by executing the netsh int ip reset command to reset the network catalogue.
- To change DNS, go to Control Panel, click on Network and Sharing Centre, and select Change adapter settings.
- Right-click on the VPN connection, select Properties, and click on Internet Protocol Version 4 (TCP/IPv4).
- Next, click Properties, select the Use the following DNS server addresses, and enter 8.8.8.8 for Preferred and 8.8.4.4 for Alternate, or 1.1.1.1 and 1.0.0.1 for Cloudflare.
Resboot the device to apply all the changes, reconnect the VPN, and test Teams. Continue to the next solution if the issue remains the same.
4] Adjust network stack and MTU size
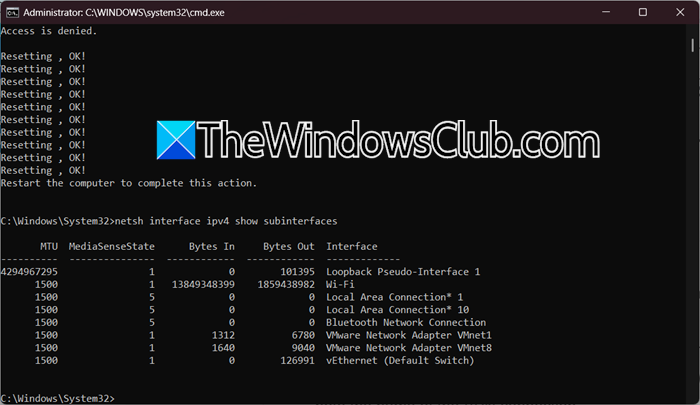
VPNs add an extra header to each data packet and increases it over all size. In this solution, we are going to reset the network stack and lower the MTU size to force the system to send smaller packets that fit within the VPN’s limit. This prevents package fragmentation, which stops Teams from timing out.
- Run Command Prompt as an administrator by clicking the Windows key, typing cmd, and selecting the Run as administrator option.
- Run the commands netsh winsock reset and netsh int ip reset to reset the network stack.
- To adjust MTU, we need to identify the VPN adapter’s interface name. For that, in the same command prompt, type netsh interface ipv4 show subinterfaces and note the name of the VPN connection.
- To set a lower MTU value, type netsh interface ipv4 set subinterface “your VPN name” mtu=1400 store=persistent. If 1400 doesn’t work, try 1350, and then reboot the device for the changes to take effect.
Once reboots, reconnect the VPN and test Teams. Go to the next solution if the situation remains the same.
5] Enable Split tunnelling
VPNs, by default, route all Internet traffic through the corporate network. This creates a bottleneck for real-time apps like Microsoft Teams. In such cases, it is recommended to ask the IT team to enable split tunnelling. Doing so tells the VPN to exempt Microsoft 365 traffic from the tunnel, allowing Teams to connect directly to the internet while other corporate data remains secure. This reduces latency and packet loss because audio and video packets no longer travel through potentially congested corporate gateways, resulting in clear calls and instant message delivery. After the changes, hopefully, there won’t be any more issues.
That’s it!
Read: Microsoft Teams call disconnects or keeps dropping
Does VPN affect Microsoft Teams?
Yes, a VPN can affect MS Teams. It is because VPN can reroute and sometimes filter Internet traffic. It can also increase latency, block required Microsoft 365 endpoints, or restrict real-time media ports. This may lead to slow loading, sign-in issues, dropped calls, or poor audio and video quality.
Read: Hardware VPN vs Software VPN – Difference explained
How do I fix Microsoft Teams connection issues?
To fix Microsoft connection issues, start with basic steps such as checking the Internet stability and switching networks if possible. If you are using a VPN and the issue occurs, check out the article mentioned above.
Also Read: Fix Microsoft Teams Error CAA5004B.