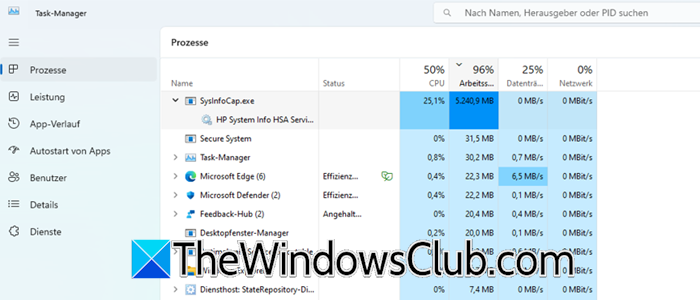
SysInfoCap.exe is a data collection process part of HP’s software ecosystem, often linked to tools like HP Support Assistant. While legitimate, it is notorious for occasionally malfunctioning and consuming excessive GPU, CPU, and Memory resources, severely impacting system performance and causing freezes. In this post, we are going to see what you can do if SysInfoCap.exe has high GPU, CPU, or memory usage.
Fix SysInfoCap.exe High GPU, CPU Memory usage in Windows 11
This high resource usage typically occurs when the process enters a faulty state where it gets stuck in a continuous loop, often due to a software glitch, a conflict with another HP service or application, or an issue with it trying to repeatedly scan or collect system data from a corrupted Windows Management Instrumentation (WMI) repository.
If SysInfoCap.exe has high GPU, CPU, or memory usage, follow the solutions mentioned below.
- End the task and prevent its Service from restarting
- Use the HP Performance Tune-up utility
- Troubleshoot in Clean Boot
- Uninstall the Specific HP Software Component
Let us talk about them in detail.
1] End the task and prevent its Service from restarting
The SysInfoCap.exe application is a child process launched by the HP Support Assistant Service. If it malfunctions and you terminate it in Task Manager, the parent service will automatically restart it, leading to high resource usage again. To stop this, first disable the parent service, which will prevent the automatic restart. After that, when you end the task, it won’t relaunch since the service is disabled.
Follow the steps mentioned below to do the same.
- Open Win + R, type “services.msc”, and press Enter.
- The Services window will open. Scroll through the list and find the HP Support Assistant Service.
- Right-click on it and select Stop. This will halt the service immediately.
- Now, hit Ctrl + Shift + Enter to open Task Manager.
- If it opens in a simple view, click More details at the bottom.
- Scroll down and look for SysInfoCap.exe. If it’s consuming high resources, it will be near the top of the list for CPU, Memory, or GPU.
- Right-click on it to select it, then click the End task button.
- Now, go back to Services.msc, right-click on HP Support Assistant Service again, but this time select Properties.
- In the Properties window, find the Startup type dropdown menu.
- Change it from Automatic to Disabled.
- Click OK.
Finally, check if the issue is resolved.
You may wonder if disabling the service will have any bad implications on your system; the short answer is no. The HP Support Assistant Service checks for driver updates, performs health scans, and provides support tips, but it’s not essential for your PC’s basic operations. You can disable it completely. To check for updates, manually open the HP Support Assistant application, which will initiate the necessary processes temporarily. Disabling the service stops it from running in the background 24/7.
2] Use the HP Performance Tune-up utility
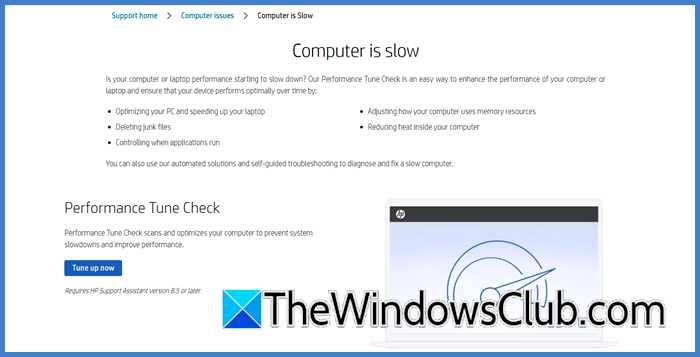
HP specifically programs the HP Performance Tune-up utility to detect and break the faulty data collection loops that cause SysInfoCap.exe to consume excessive resources. You can go to support.hp.com to use the Tune Up utility. Download the tool and install it on your computer. When the tool is installed, open it, click Next to begin the scan, and follow the on-screen instructions.
3] Troubleshoot in Clean Boot
A Clean Boot works by temporarily disabling all non-Microsoft startup programs and services, which isolates the software conflict causing SysInfoCap.exe to enter its resource-intensive loop. If the high usage stops, you can systematically re-enable items to identify the specific third-party application responsible for the conflict. To perform a Clean Boot to resolve the issue, follow the steps mentioned below.
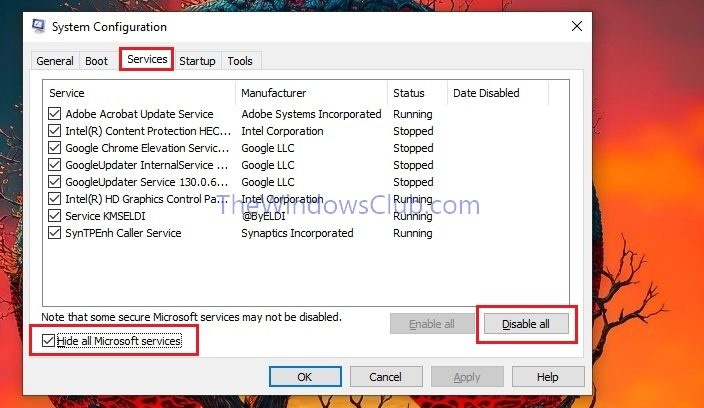
- Search “System Configuration” in the Search Menu.
- Go to the Services tab, check Hide all Microsoft services, then click Disable all.
- Navigate to the Startup tab and click Open Task Manager. Disable every item in the Startup list.
- Close Task Manager, click OK in System Configuration, and restart your computer.
After the restart, if the issue is resolved, return to msconfig and re-enable services/startup items in small groups, restarting each time, until you identify the conflicting software.
4] Uninstall the Specific HP Software Component
By uninstalling the parent application (like HP System Event Utility or HP Support Assistant), you eliminate the source of the problematic process at its root, preventing it from running altogether. Follow the steps mentioned below to do the same.
- Open Settings by Win + I.
- Go to Apps > Installed apps.
- Search for HP System Event Utility, click on the three dots, and select Uninstall.
Repeat the search for HP Support Assistant and uninstall it following the same steps.
That’s it!
Read: Fix 100% Disk, High CPU, Memory or Power usage in Windows
What is SysInfoCap.exe and what does it do?
The legitimate SysInfoCap.exe file from HP is typically located in the C:\Program Files\HP\SysInfoCap directory.. Its primary function is to run in the background, collecting system diagnostics and hardware information to facilitate support features and check for relevant driver or software updates automatically.
Read: How to use HP System Event Utility in Windows 11
SysInfoCap.exe has stopped working
The SysInfoCap.exe has stopped working error means the process has crashed unexpectedly, typically due to a temporary software conflict or glitch. The most effective immediate solution is to simply restart your computer, which will clear the error. If the problem recurs, updating or performing a clean reinstall of the HP Support Assistant application will provide a permanent fix
Also Read: Check, Lower or Increase CPU usage in Windows 11.