
When you try to run Python code in the Visual Studio Code terminal, you might encounter errors like ‘python’ is not recognized or the script fails to execute. This usually indicates that VS Code cannot locate or properly use your Python installation or environment. In this guide, we will see what you can do if Python is not working in the Visual Studio Code Terminal.
Python not working in Visual Studio Code Terminal
Python may not work in the VS Code terminal due to several reasons: the Python executable path is missing from your system’s PATH environment variable, the wrong Python interpreter is selected in VS Code, a virtual environment is not activated, or the terminal shell itself is misconfigured. Additionally, multiple Python installations can cause conflicts, and sometimes a simple restart of VS Code or the terminal is needed to refresh the environment settings.
If Python is not working in the Visual Studio Code Terminal, follow the solutions below.
- Add Python to your system PATH
- Select the correct Python interpreter in VS Code
- Activate your virtual environment manually
- Restart VS Code and the terminal
Let us talk about them in detail.
1] Add Python to your system PATH
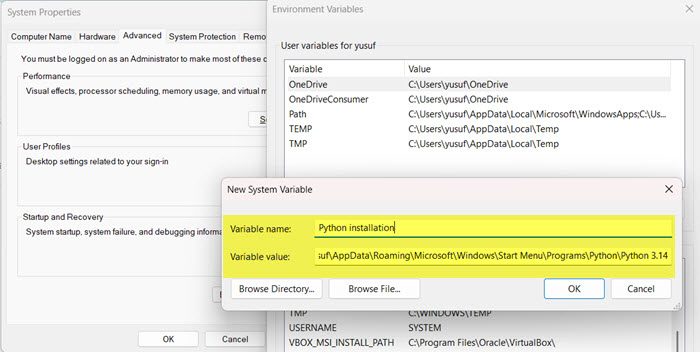
If Python isn’t recognized when you type python in the terminal, it means the terminal cannot find the Python executable. Adding Python to the PATH environment variable tells your operating system where to look for Python, so it can be launched from any directory. Follow the steps below to resolve the issue.
- Locate your Python installation folder (e.g., C:\Python39 or C:\Users\<username>\AppData\Local\Programs\Python\Python39).
- Also, locate the Scripts subfolder inside it (e.g., C:\Python39\Scripts).
- Open System Properties > Advanced > Environment Variables.
- Under System variables select Path and click Edit.
- Add both the Python installation folder and the Scripts folder as new entries.
- Click OK, close all dialogs, and restart VS Code.
Now, check if the issue is resolved.
2] Select the correct Python interpreter in VS Code
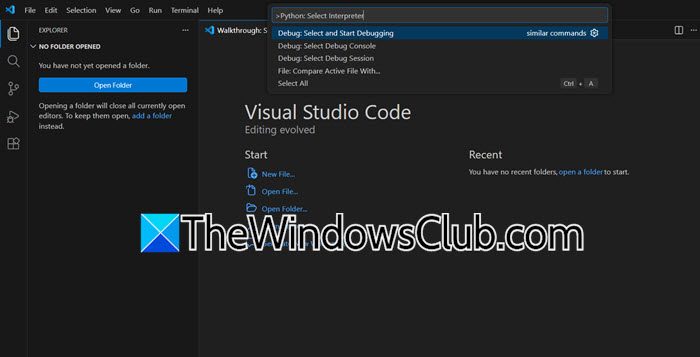
VS Code uses a selected Python interpreter to run and debug code. If the interpreter is set to a Python version that doesn’t exist or is misconfigured, commands in the terminal may fail. Explicitly selecting the correct one ensures that VS Code uses the correct Python environment.
Follow the steps below.
- Open VS Code.
- Now, hit Ctrl + Shift + P to open the Command Palette.
- Type Python: Select Interpreter and select it.
- A list of available Python installations appears. Choose the one you want to use (e.g., the system Python or a virtual environment).
- After selection, open a new terminal (Ctrl+“) – VS Code will automatically activate that environment in the terminal.
Now, check if the issue persists.
3] Activate your virtual environment manually
If you are using a virtual environment and it isn’t activated, the terminal will default to the global Python interpreter. This can cause missing package errors or even a command not found error if the environment’s Python is not on the PATH. Activating the environment sets the correct paths for that session.
You need to open the VS Code terminal, navigate to your project folder, and run the following command to activate your environment.
Windows Command Prompt
venv\Scripts\activate
Windows PowerShell
.\venv\Scripts\Activate.ps1
If execution policy blocks it, run Set-ExecutionPolicy Unrestricted -Scope Process first.
You should see the environment name in the terminal prompt. Now Python commands will use the virtual environment.
4] Restart VS Code and the terminal
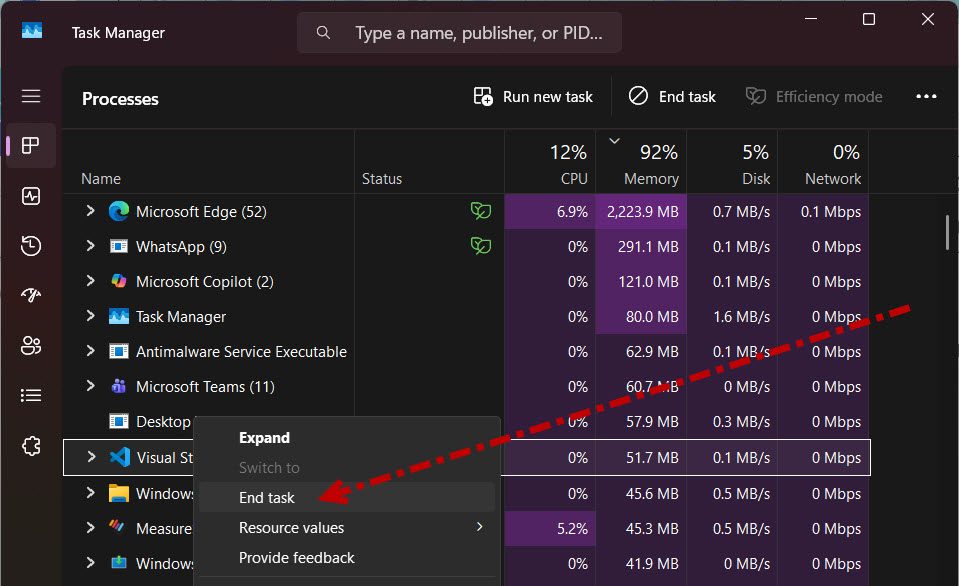
Sometimes, environment variables or VS Code’s internal state become stale. A full restart of VS Code clears cached settings and reloads the terminal with fresh environment variables, resolving transient issues.
Save all your work, now, close VS Code completely. To do so, open the Task Manager, right-click on Visual Studio Code, and select End Task. Reopen VS Code and your project. Open a new terminal (Ctrl + “) and try running Python again.
If the problem persists, also try using the Developer: Reload Window command from the Command Palette.
Hopefully, these solutions will do the trick for you.
Read: How to install Python in VS Code
How to enable Python in VS Code terminal?
To enable Python in the VS Code terminal, first ensure that Python is installed on your system and added to your PATH environment variable. Next, open VS Code and press Ctrl+Shift+P to open the Command Palette. From there, run the command Python: Select Interpreter to choose the appropriate Python installation. After selecting the interpreter, open a new terminal by pressing Ctrl+` (the backtick key). VS Code will automatically activate the selected Python environment, allowing you to run Python commands directly. If the terminal still does not recognize Python, try restarting VS Code or manually adding Python to your system PATH as outlined in the previous guide.
Read: How to install Python Libraries in Visual Studio Code
How to fix VS Code terminal not working?
If the VS Code terminal isn’t working, such as not opening or failing to run commands, start by restarting both VS Code and your computer. Then, check your default terminal profile via the Command Palette and set it to a reliable shell like PowerShell, Command Prompt, or bash. If the issue continues, reset your VS Code settings by searching for terminal.integrated in Settings and reverting any changes. You can also run the Developer: Reload Window command. Finally, disable any recently installed extensions that could cause conflicts, and check for environment variables that might prevent shell execution.
Also Read: PIP is not recognized as an internal or external command.
