Python is one of the most popular coding languages right now, and if you are a developer, you must leverage their libraries as well. Python Libraries are collections of pre-written code that provide functionality for specific tasks, simplifying programming and development. In this post, we are going to see how you can install Python Libraries in Visual Studio Code.
Install Python Libraries in Visual Studio Code
Python libraries are pre-written collections of code designed to simplify programming by providing ready-made functions for specific tasks. They eliminate the need to write repetitive code and cover areas like data analysis, visualization, machine learning, and web development. These toolkits enhance efficiency and streamline development. To install Python Libraries in Visual Studio Code, you need to follow the steps mentioned below.
- Install Python on your computer
- Download and install Visual Studio Code
- Configure Python Environment
- Start installing libraries
Let us talk about them in detail.
1] Install Python on your computer
First of all, we need to go ahead and install Python on your computer. Since we are going to set up the Python environment, it is crucial to tick the Add Python to PATH option during the installation process. After installing Python, go to the next step.
2] Download and install Visual Studio Code
Visual Studio Code is a free IDE from Microsoft that we need to install. So, go ahead and install Visual Studio Code on your computer.
3] Configure Python environment
Now that we have installed both the IDE and the language, let us go ahead and configure it on your computer. But before we do that, we need to install the Python Extension in VS Code. To do so, open Visual Studio Code and click on the Extensions icon. Now, search for “Python” and install Microsoft’s published Python extension.
Once done, we need to create an environment for our project. Think of it like an isolated environment to keep every tool at your disposal. Even though it is optional, it gives you the ability to make things project-specific.
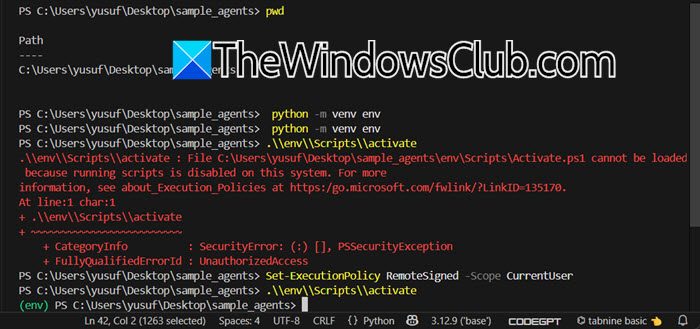
Open your project file in VS Code, and click on Terminal > New Terminal. Now, run pwd in Terminal to know your path, it should be the path of your project folder. If it’s not, you need to run cd <location-of-the-folder>.
Once you are in the correct location, run the following command.
python -m venv env
The command above creates a new folder in your project directory called env. This folder will contain your virtual environment and all the libraries you install for the project.
To activate the environment, you can run the following command.
.\\env\\Scripts\\activate
I failed to activate the environment the first time, as it runs a script, and as per the error message, running scripts is disabled on my system. In that case, we can run the following command to start running scripts.
Set-ExecutionPolicy RemoteSigned -Scope CurrentUser
Finally, run the script, and it will work. You will see (env) in the prompt before the path upon successful execution of the activation command.
4] Start installing libraries
Finally, let us go ahead and start installing libraries. We are going to use PIP for the same. It is Python’s package manager that allows you to install, upgrade, and manage Python libraries and packages easily. To install libraries, you need to run the following command.
pip install <name-of-the-library>
We have listed five of the most useful Python libraries and the commands to install them.
- Numpy: For numeric calculation and array manipulation. Installation Command: pip install numpy.
- Pandas: For data analysis and manipulation. Installation Command: pip install pandas.
- Matplotlib: To create plots and graphs. Installation Command: pip install matplotlib.
- Requests: To make HTTP requests and work with APIs. Installation Command: pip install requests
- TensorFlow: For machine learning, Deep Learning, and AI projects. Installation Command: pip install TensorFlow.
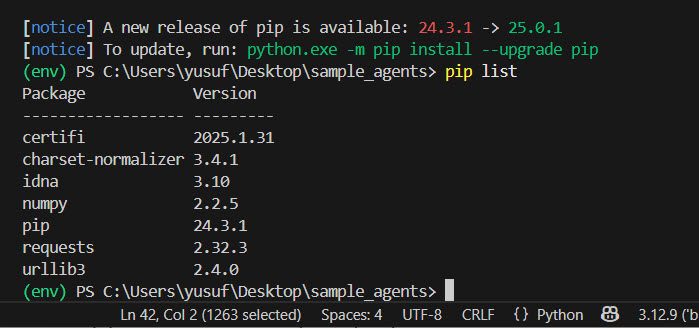
After installing, you can run pip list to see if the libraries are installed or not.
You can also create a file and list all the libraries in it for bulk installation, or if you want to install on multiple computers. To do so, create a libraries.txt file and then populate it with the library name along with its versions.
numpy==1.23.5
pandas==1.5.1
requests==2.28.1
tensorflow==2.11.0
matplotlib==3.6.2
Finally, run the following command to install using the text file.
pip install -r libraries.txt
Hopefully, with the help of this post, you will be able to install set up Python environment and install its libraries.
Read: How to install Python in VS Code
How to check installed libraries in Python VS Code?
We can use the PIP command to check if Python libraries are installed or not in VS Code. First of all, you need to open Terminal by clicking on Terminal > New Terminal. Then, run the command pip list as it will list all the installed binaries.
Read: How to setup LocalGPT on Windows for beginners
How to install pip in VSCode?
PIP comes preinstalled with Python as it is a package manager that allows you to install, upgrade, and manage libraries. However, if you tried to run the command but ended up seeing an error stating that PIP is not recognized, you can need to follow our guide to resolve this issue.
Also Read: Install and run Makefile on Windows 11.