
In this tutorial, we will show you how to perform an Internet speed test from the Taskbar on a Windows 11 PC. Microsoft is gradually rolling out this new and built-in feature in Windows 11 known as Perform speed test or Test internet speed. It lets you test network speed for WiFi, mobile, and Ethernet connections with a few mouse clicks from the taskbar. Although the feature is quite good, it directs you to the Bing page to access the internet speed test tool provided by the popular Speedtest by Ookla (Speedtest.net) service, which serves the purpose.
How to perform Internet Speed Test from Taskbar in Windows 11 natively
There are two native ways to perform an Internet speed test from the Taskbar in Windows 11:
- Perform an Internet speed test using the Taskbar system tray
- Test Internet speed using Quick Settings.
Let’s check both options.
1] Perform an Internet speed test using the Taskbar system tray
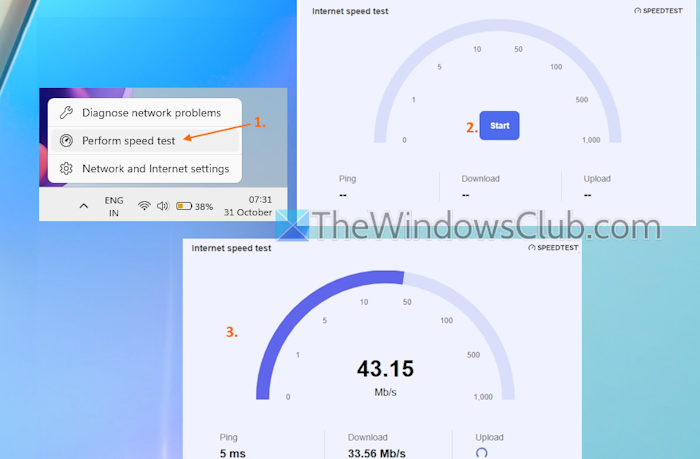
Here are the steps:
- Right-click on the network icon (WiFi, mobile network, or Ethernet) visible in the system tray of the taskbar
- Select the Perform speed test option
- A Bing page will open, and the network speed test tool will be there
- Press the Start button to begin the test. It will check the Ping, download speed, and upload speed of your connection. If the results are not good, you can fix slow internet speed on your PC using different ways (like power cycling your WiFi router, configuring the router, flushing DNS cache, updating drivers, and more)
- You can also rerun the test if needed.
Related: Check your Internet Connection Speed using Google Chrome
2] Test Internet speed using the Quick Settings
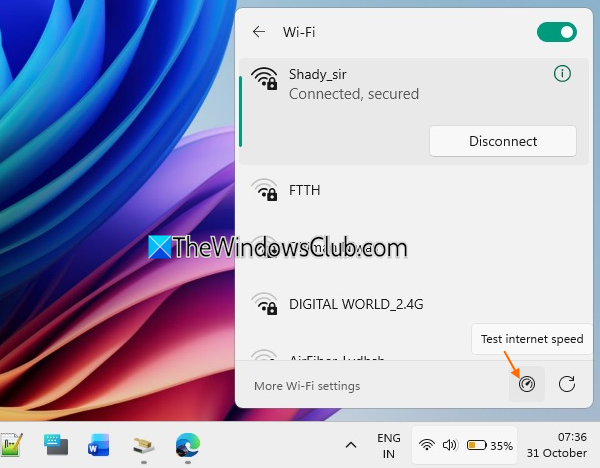
The steps are as follows:
- Click on the volume, battery, or WiFi icon to open the Quick Settings panel in Windows 11. You can also use Win+A hotkey to open it. In case Quick Settings is not displayed or disabled, you can enable or show Quick Settings using the Group Policy or Registry Editor
- Click on the Manage Wi-Fi connections icon (>)
- Select the Test internet speed icon available on the bottom right corner, just before the Refresh network list icon
- Your default browser will open with a Bing page and display the Internet speed test tool
- Press the Start button to begin the test.
This feature is surely a nice addition to Windows 11. However, it would be more convenient if it had come with a pop-up option or a simple interface to test internet speed directly from the taskbar or desktop, rather than opening a web browser separately, because we already have similar options.
That’s all.
Now read: Network Speed Test Microsoft Store app for Windows PC from Microsoft Research
Is Microsoft adding an Internet speed test to the Windows 11 taskbar?
Yes, Microsoft is adding a new feature (Perform speed test) in Windows 11 to perform an internet speed test from the taskbar, which is rolling out gradually. It doesn’t start the test and display results on the Taskbar, though. Instead, the test is performed on a webpage in your default web browser. If you don’t see this feature, you should wait and check for updates.
Related: How to display your Internet speed on the Taskbar in Windows 11
How do I check my Internet speed on Windows 11?
There are numerous ways to check the internet speed test on Windows 11. For example, you can use some free internet speed test Microsoft Store apps (like Network Speed Test, Net Speed Meter, Data Usage, etc.). Apart from these, you can also use some free internet test services and websites. Windows 11 also supports a built-in option (Perform speed test) to check the network speed.
Read next: How to increase Upload and Download Speed in Windows 11.
