
Microsoft Paint is an important Windows 11/10 application for creating or drawing pictures on the Paint canvas. The Paint application offers various tools, including brushes and shapes, and a wide palette of colors for drawing and editing pictures. It also allows you to download a picture from the web and copy it on the Paint canvas or page, and edit it the way you want!
Microsoft Paint has a new, refreshed look with the latest Windows 11 operating system. Paint has been with Windows since its inception, and while the operating system has been upgraded many times, Paint has remained almost the same with no or minimal changes. Thankfully, with the latest Windows 11, our beloved MS Paint has got some new looks and features aling with AI features. The overall interface is still the same, but the design is new. Let’s check in detail what has changed with the new Microsoft Paint in Windows 11 and how to use the new features out there.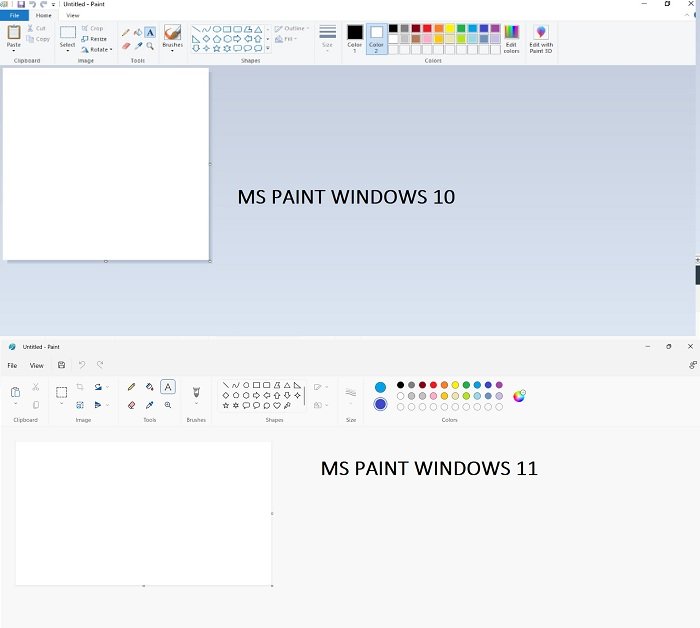
MS Paint wasn’t actually updated with the new operating system. You don’t need to update it manually, if you have installed Windows 11 on your PC, your MS Paint will automatically be updated.
What’s new in MS Paint in Windows 11
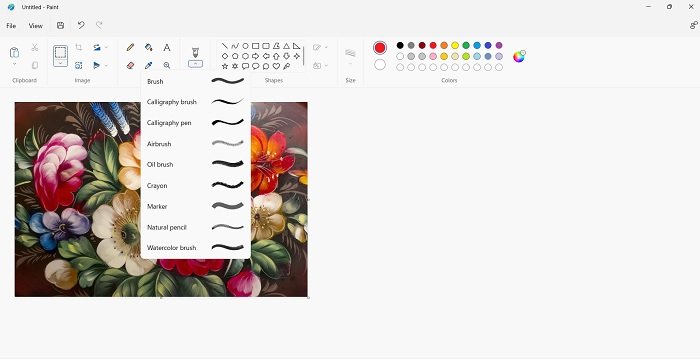
As mentioned above, the look has changed completely. Apart from AI features, you will see the rounder corners, changed toolbar icons and symbols, and a new UI. You will also see a drop-down menu for brushes with different brush types and a new round color palette. This might not sound like a big change, but you will literally feel the change while using the app. It’s way better now and feels like all new.
How to open Paint app in Windows 11
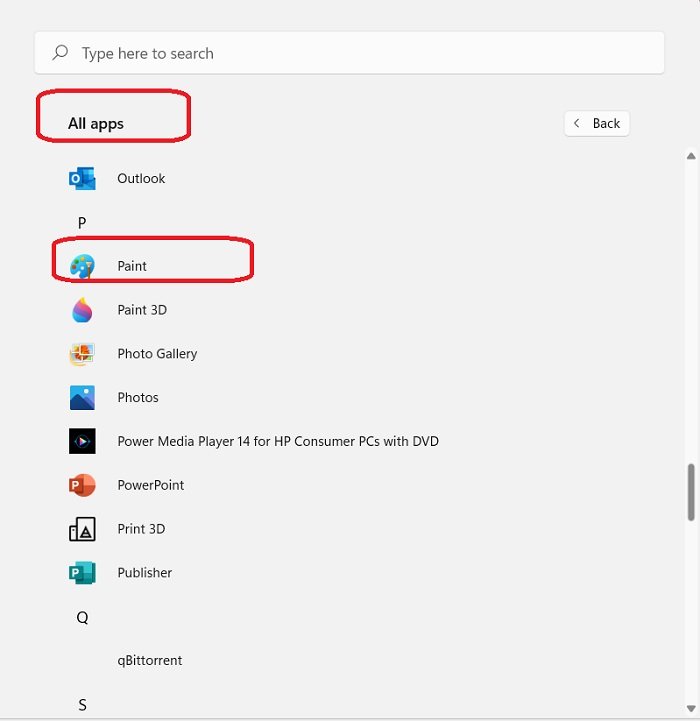
Alternatively, you can also launch Start–> All Apps–> and scroll down to the letter P and open Paint. If you think that you will frequently need this app, it’s better to pin it to the taskbar or your Start menu.
How to use Microsoft Paint in Windows 11/10
To open the Paint application, click on the START button > Windows Accessories > Paint OR type Paint in the search box on the Taskbar and then select the Paint application from the results. The following window will open on your screen. This is how the Paint canvas looks like.
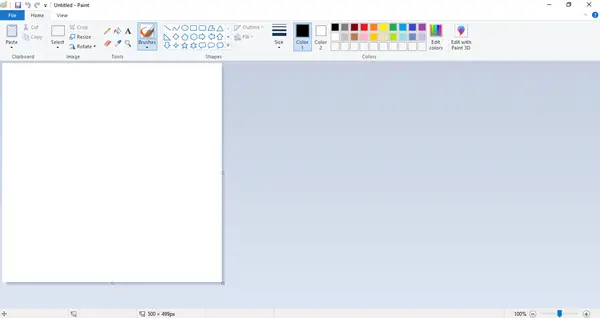
At the top of the Paint window, you will see the Toolbar, where you can carry out various functions. This toolbar includes the File tab, Home tab, and View tab. Let us now look into it in detail.
1] Home
The Home tab is the default when you open Paint. In the Home tab, you can carry out various functions related to the image, clipboard, tools, shapes, and colors.

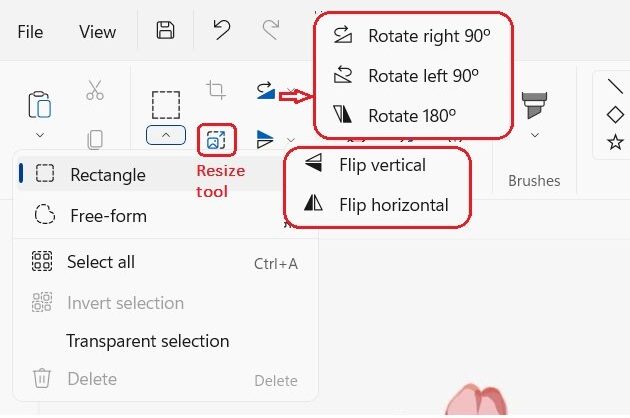
Under Clipboard, you can perform commands such as cut, copy, and paste, where you can cut or copy a selection from the canvas and paste it on the keyboard. Under the Image section, you can crop, resize, and rotate the picture. You can rotate left and right to 90 degrees, rotate to 180 degrees and flip vertical and horizontal as well.
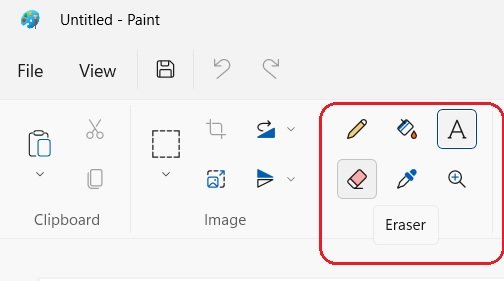
The Tools group will allow you to draw a free-form pencil line with the selected width, add text, pick a color and use it for drawing, fill an area on the canvas with the selected color, use the magnifier for a particular area on the canvas, and use the eraser to erase a particular area of the picture. Click on the Brushes drop-down menu to draw using different kinds of brushes. You will find a variety of brushes with different effects such as crayon, marker, natural pencil, etc. In the reference picture below, I have used a few tools to show you how they look and feel.
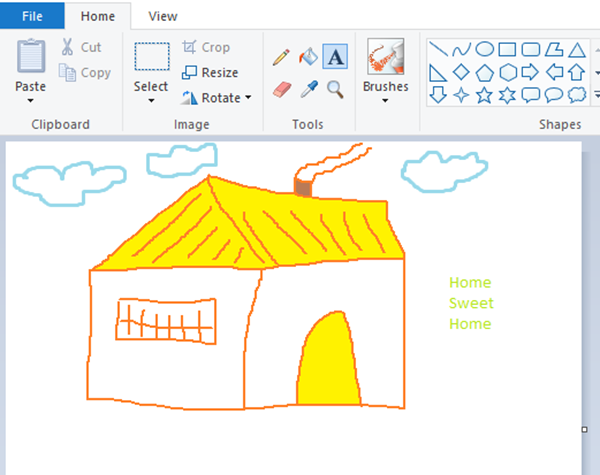
Here, I have used the free-form pencil tool, a few brushes, the shape fill tool, and the text tool. You can also convert your 2D drawing into a 3D picture by editing it in Paint 3D. Go ahead and simply explore! With all these tools, you are sure to make your picture look attractive and simply awesome!
Read: How to create AI Images using Image Creator in Paint app
Text Tools
On your Paint canvas, please select the location where you want to add the text box, then type the desired text. You can format the text by selecting the font type, font size, changing the font to bold and italics, and underlining or striking through the text. You can choose the foreground and background colors. Refer to the example shown below.
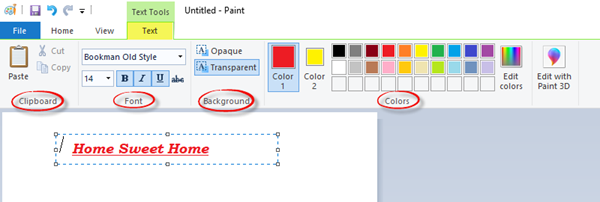
Under the Shapes group, you can insert ready shapes such as rectangle, pentagon, diamond, star, callout, and so on. Click on Outline to choose from the various options such as solid color, crayon, marker, oil, natural pencil, watercolor, or even no outline. Click on Shape Fill to select the medium for the fill, such as, solid color, crayon, marker, oil, natural pencil, watercolor, or no fill. Under the Size drop-down menu, you can select the size or width of a particular tool. You will see four variations under Size such as 1px, 3px, 5px, and 8px. See an example shown below.
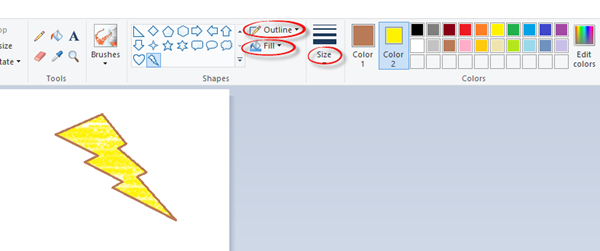
I used the text tool, pencil, brushes, and the fill tool with a Color tool to draw the following picture. Select the shape you want to draw and the size of the width of the tool. Here, I have selected a 3px stroke for the Lightning shape, with a solid outline in brown and a crayon fill in yellow.
The Colors group includes a wide palette of colors that you can choose for your drawing. You can also edit with Paint 3D using advanced tools, which we will later cover in detail in another post.
Read: Microsoft Paint Tips & Tricks.
2] View
The View tab includes three groups named Zoom, Show or hide, and Display.
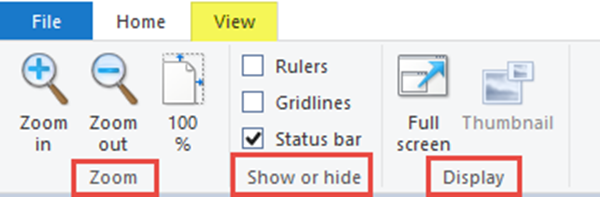
The Zoom group enables you to zoom in or zoom out of the picture as much as you want for a better viewing experience, or you can also zoom to exact 100%. Under the Show or hide group, you will find settings related to rulers, gridlines, and the status bar. With the help of Rulers, you can view and measure objects or particular pictures on your Paint canvas. Gridlines will help you to align objects in your picture. By checking or unchecking the Status Bar option, you can show or hide it at the bottom of the Paint window.
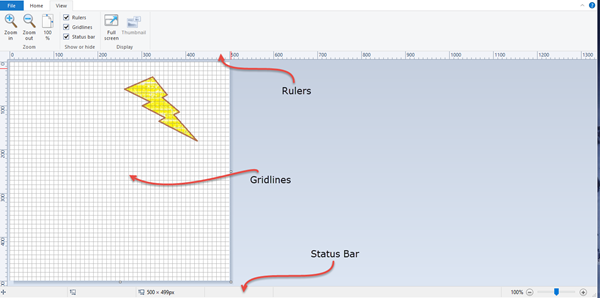
In the Display group, you can view the picture in Full Screen; and you can show or hide the Thumbnail window.
Read: How to disable AI features in the Paint app in Windows 11
3] File
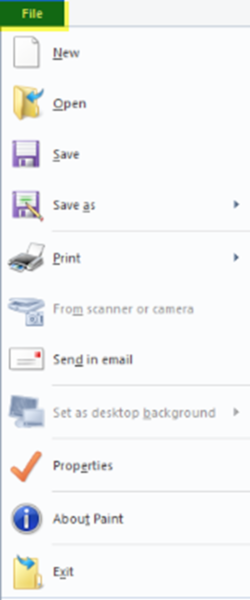
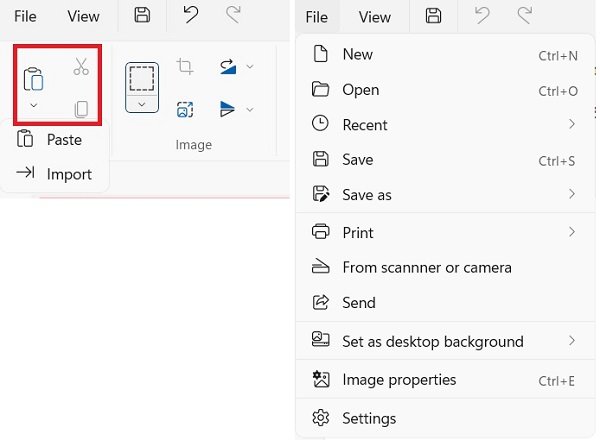
Under the File menu, you can open an existing or already created picture, create a new picture, and save the current picture in the desired location. You can import files from a scanner or camera, print a picture, and send a picture as an email attachment as well. You can change the desktop background by setting the current picture as it. You can change the Properties of the current picture as well. And finally, you will see the Exit option to close or exit the application.
Quick Access Toolbar
On the top left side of the Paint window, above the Toolbar, you will see the Quick Access Toolbar.
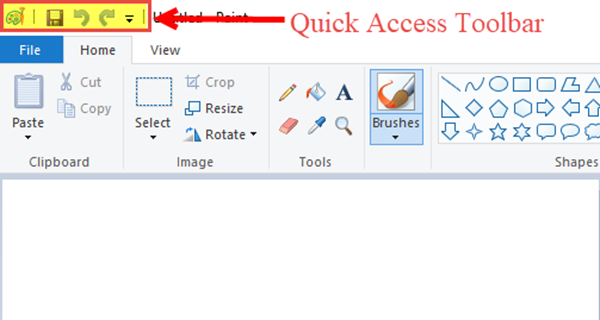
Here, you will find the shortcuts to save the current picture, undo or redo the last action, and minimize, maximize, and close the application. You can also customize the quick access toolbar as per your requirements. You will find additional settings here to minimize the ribbon, to show the quick access toolbar below the ribbon, etc. So, go ahead and customize and make changes to the quick access toolbar as per your requirements. This will make your work much easier and quick.
Read: How to create Images using Cocreator in Paint app
MS Paint Tools in Windows 11
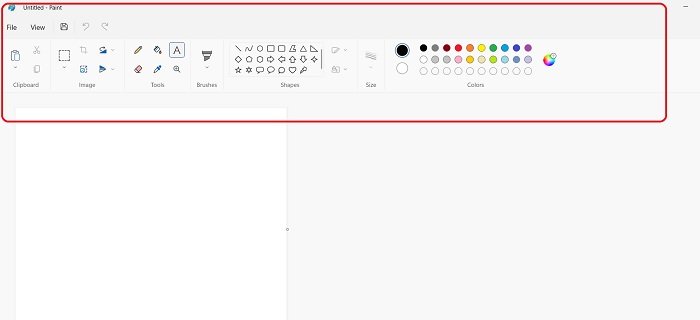
In the top main menu ribbon, you will see all the tools organized by category. The first step in editing any image is to import or copy/paste the image in the Paint app, so the first toolset in the menu ribbon is Paste and Import. You can either directly import your image or copy it in the clipboard (CTRL+C) and paste it into the Paint app. You can also click on the File option in the main menu ribbon and open the image. The Scissors symbol is the tool to cut a portion (Ctrl+X) from the image and below that is the clipboard option (Ctrl+C).
The next set of tools include Cut, Crop, Flip and rotate tools. There are not many changes in this toolset except the symbol of the Resize tool. Rest all if the same as we had in MS Paint Windows 10.
The next set of tools has, the pencil, eraser, paint bucket, color picker, text tool, and magnifier. These are again the basic tools we need to edit an image. Pretty much the same as they were before in the earlier versions of Windows. Eraser here is to correct the mistakes but you can anytime use the shortcut Ctrl+Z to undo any changes or correct your mistakes. I don’t recall ever using the eraser tool in MS Paint.
Adding the text has some changes though. To add text to your image in the Paint app, click on the letter A written in the third toolset in the main menu ribbon. You will then see options to select the font, font size, and bold/italic/underline/strikethrough. The new feature added here is text alignment. You can align your text in the left, center, or right. This feature wasn’t available in the Paint app in earlier versions of Windows. Next, you can keep the text transparent or add a background.
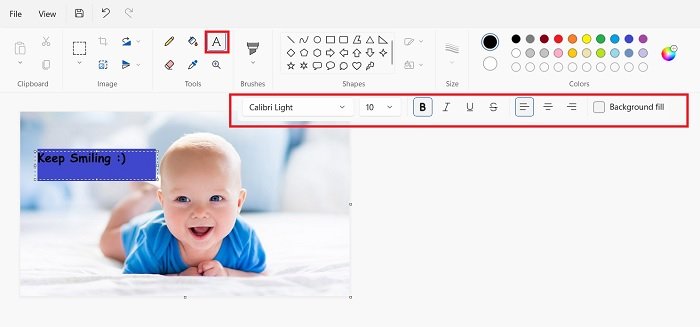
Tick the checkbox to add a background to your text, as shown in the screenshot below.
Brushes in MS Paint Windows 11
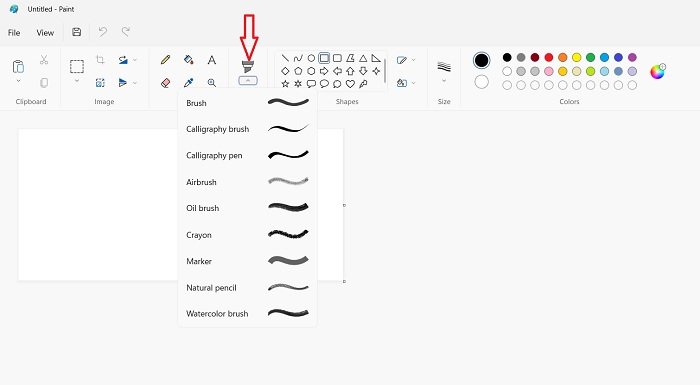
Brushes again are one of the most used tools in the MS Paint app. Click on the Brush icon in the main menu ribbon and you will see a drop-down menu where you can select the brush as per your requirement.
How to add shapes in MS Paint
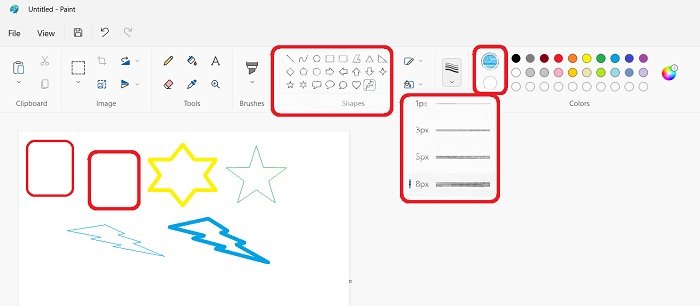
Next comes the toolset which has different shapes. Using these, you can add various shapes to your images. These shapes are very useful in making presentations, or anywhere you need to mark some pointers in an image. You can add shapes in different colors and for that, you first need to pick the color from the color palette which is the next and last toolset of the app. Also, if you want to adjust the thickness of your brush or shapes, there’s a tool to select the brush size too.
How to use the color palette in the MS Paint
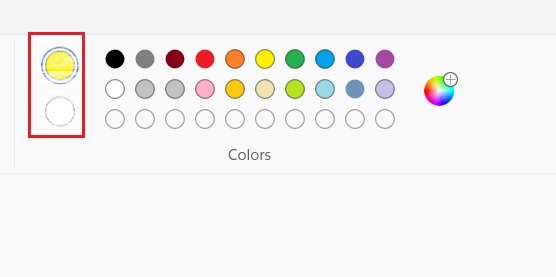
The color palette is last in the tool menu. Earlier, we had labels for Color 1 and Color 2, but now in the new Paint app, you will see two circles on the left side of the color palette, representing the new Color 1 and Color 2. The circle at the top is color 1 (a primary color), and the bottom one is color 2 (a secondary color). You just need to click on the circle to activate the color option. Besides the given colors in the palette, you can also select other colors. Click on the small multicolored circle on the right side of the color palette.
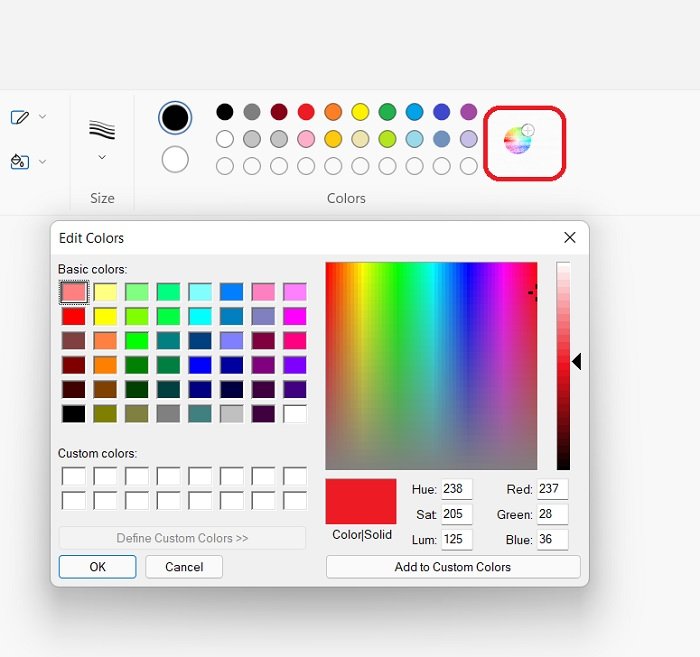
This is all our new Paint has.
Read next: Microsoft Paint Tips and Tricks for Windows 11.
We have tried to cover every tool and feature of the new, refurbished Paint app. We saw two main ways to open the Paint application. We also covered all the components of the ribbon and the quick-access toolbar. I hope this post covered all the details on how to use the Paint application and how to create or draw a new picture by using the various Paint tools and accessories.
Now read: How to use Paint 3D App in Windows.
