
Microsoft Paint which was introduced as a graphic editing application in Windows 3.1 has finally got a new and refurbished look after years. With the latest Windows 11 operating system, our favorite MS Paint has got a brand new design, new UI, and some new features too. Microsoft Paint now has a simplified toolbar. There is now a Fluent header in place of the menu ribbon, which contains all available options, such as File, Edit, and brushes.
Microsoft Paint Tips and Tricks for Windows 11
We have recently covered a topic on how to use MS Paint in Windows 11 and today, in this post, I will be sharing some cool tips and tricks for MS Paint which you might not know.
- Flip or Rotate a part of your image
- Convert images
- Set image as your Desktop background
- Email your image directly
- Make a straight line using the pencil tool
- Change the brush size
- Invert colors
- Undo/Redo Shortcuts
- Transparent Background Selection
- Add custom colors to the color palette
- Clear Outlines
- Trace a pic in Paint
- Make Custom Brushes
- Use Eraser as Color Replacement Tool
- Create a Gradient Effect.
1] Flip or Rotate a part of your image
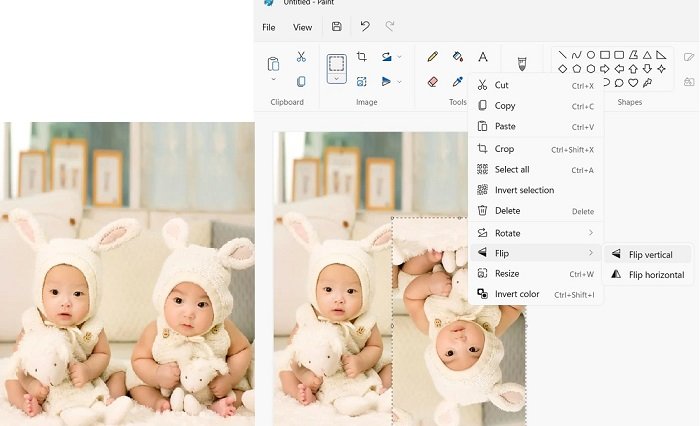
You can easily rotate or flip a particular part of your image in just a few clicks. Open the Paint app from the Start menu or by typing Paint in the Search option in your taskbar. Copy and paste the image you want to edit or open it using the File option in the main menu ribbon. Now, select the part of the picture you want to flip or rotate, right-click, and select the corresponding option. That’s it.
2] Convert images
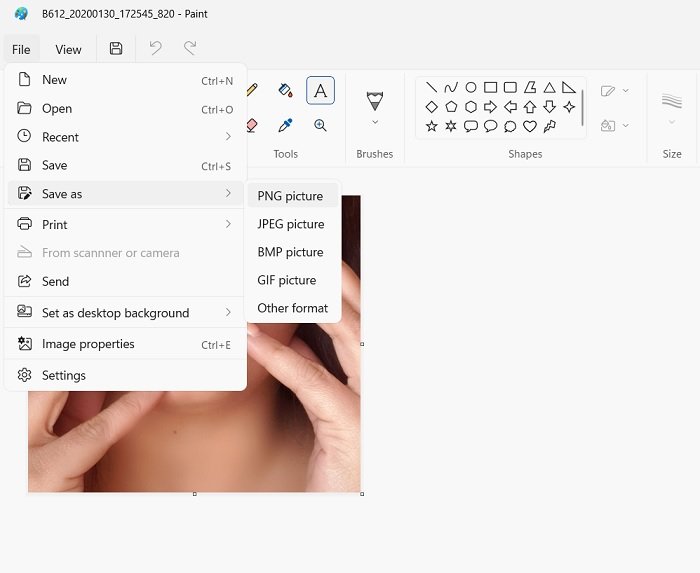
We often need to change our image format and use some image converters for that but not many of us know that we can convert the image format using MS Paint. To convert any image, open it in MS Paint, click File, and then select Save As. Choose the desired format.
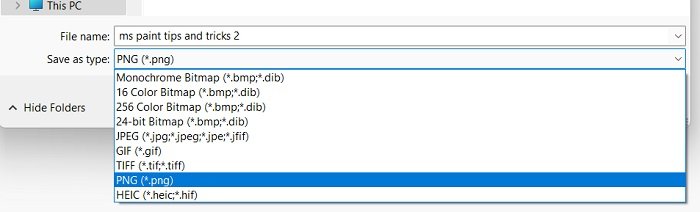
MS Paint can save your image in PNG, JPEG, BMP, and GIF format but if you want to save it in some other formats, you can check them from the file explorer while saving the image. This way, you can convert your image to the desired format without needing any third-party software.
3] Set image as your Desktop background
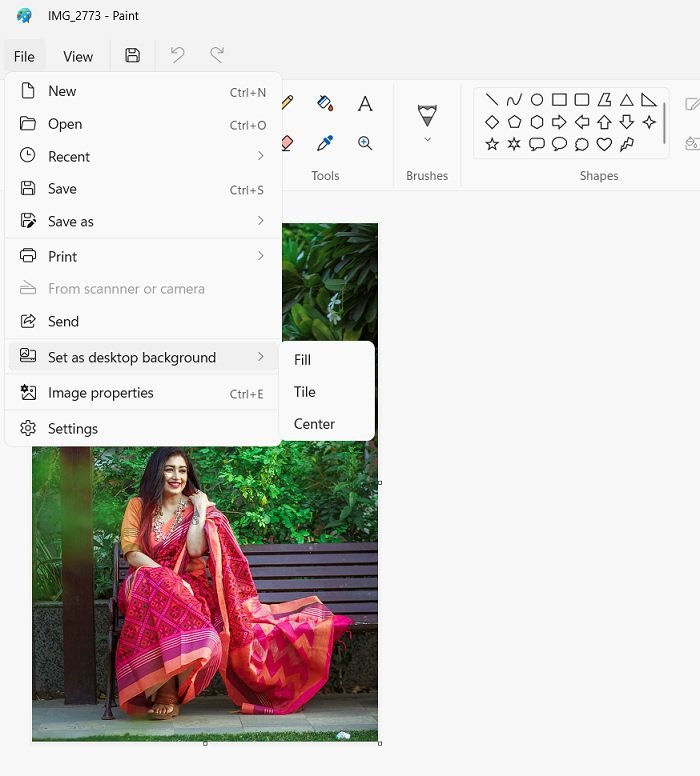
If you are liking the image you’ve just edited on MS Paint, you can directly save it as your Dekstop background. Just click on the File option in the main menu ribbon and click on Set as desktop background, you will then get the options Fill, Tile, and Center. Please select the one you want and that’s it. You don’t really need to go all the way to the Desktop Personalization settings for changing your desktop background.
4] Email your image directly
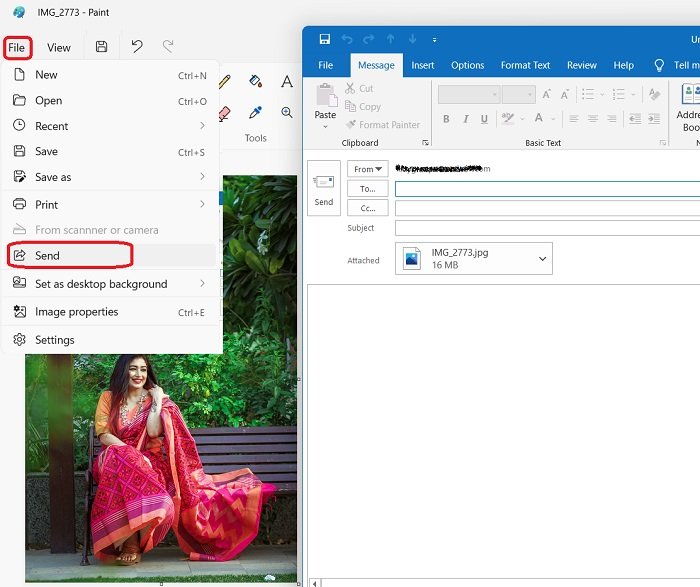
Same as we can set any image as our desktop background directly from MS Paint, we can also share it via email directly from the app itself. When you are done editing the image, click on File–>Share. It will instantly open your Outlook account and will automatically attach the image as an attachment in the email. Select the recipient’s contact and click on Send.
5] Make a straight line using the pencil tool
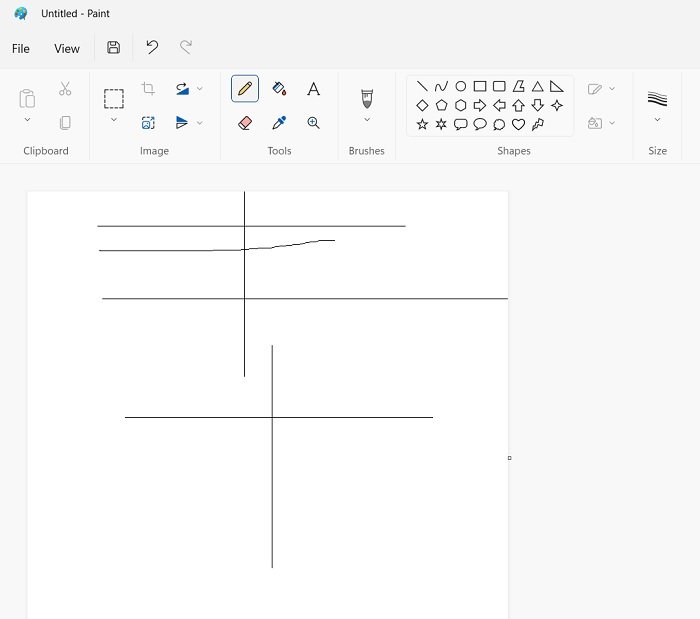
It is quite challenging to create a straight line using the pencil tool in MS Paint. For me, it’s always a little curved. But here’s a trick. You can make an absolutely straight line using the pencil tool in MS Paint by pressing the Shift key on your keyboard. Select the Pencil tool, press and hold the Shift key on the keyboard, and then draw the line.
6] Change the brush size
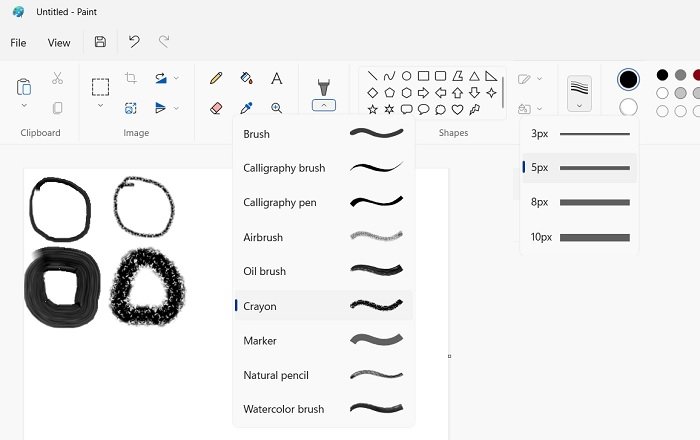
The brushes in MS Paint were not named in the previous versions, but with the updated interface, we now have all 9 brushes with the names- brush, calligraphy brush, calligraphy pen, airbrush, oil brush, crayon, marker brush, natural pencil, and watercolor brush. You can change the brush size using the size tool, located immediately before the color palette. You can also increase the brush size by pressing the Ctrl+Numpad Plus button.
7] Invert Colors

Not many of us know, but MS Paint lets you invert the colors of an image, so the light colors become dark and the dark colors become light. You can invert the colors of the entire image or a selected area.
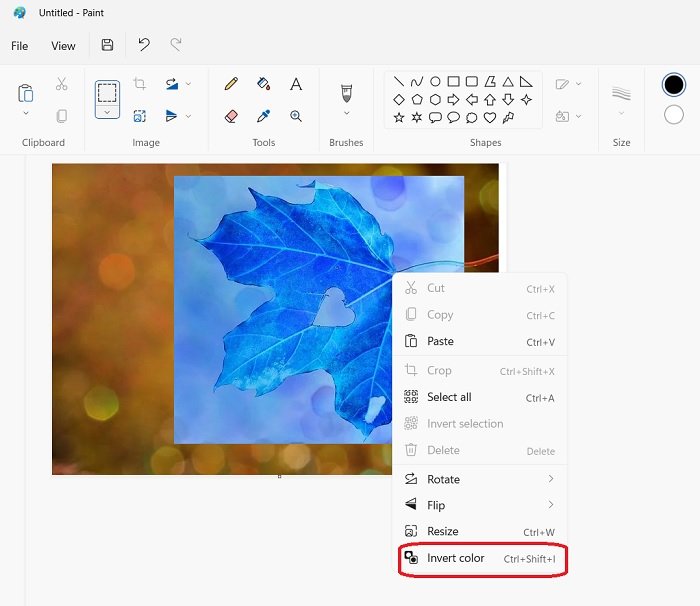
You can simply invert the colors in an image in just a few clicks. Open the image in MS Paint, select the area you want to invert the colors for, right-click, and then click on ‘Invert Color’. You can also use the shortcut Ctrl+Shift+I. To undo the change, simply press Ctrl+Z or click the Undo button, located directly next to the Save option in the main menu.
8] Undo/Redo Shortcuts
While there is a undo button given in the main menu right next to the Save option, you can also do that with your keyboard. The shortcut for Undo is Ctrl+Z and the shortcut keys for Redo is Ctrl+Y in MS Paint.
9] Transparent Background Selection
Images with transparent backgrounds are easier to merge with other images. MS Paint lets you cut and copy a selected area of an image with a transparent background. To cut or copy a selected area with a transparent background, click on Select–> and click on Transparent Selection from the background.
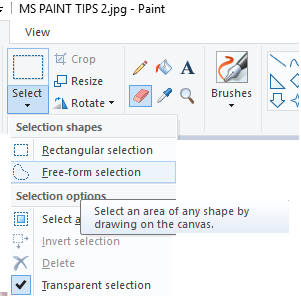
Now select the Free Form Selection, carefully mark the outline of the preferred area and cut or copy as desired.
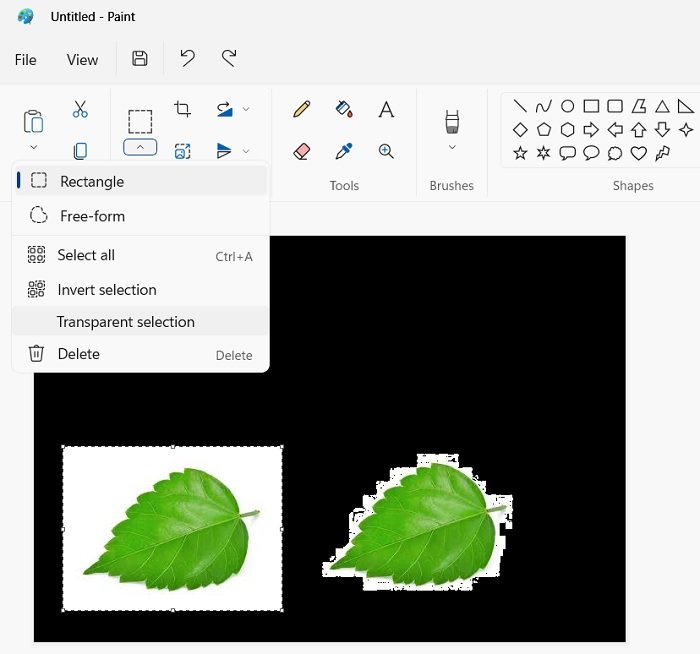
You can select a part of an image with a transparent background in MS Paint. However, it is not really precise, but it can still work for some. Before selecting any part, go to the Select option (the square button located to the right of the resize button) and click the downward arrow. Select Transparent Selection and now select any part of the image. It will select the image without its background.
10] Add custom colors to the color pallete
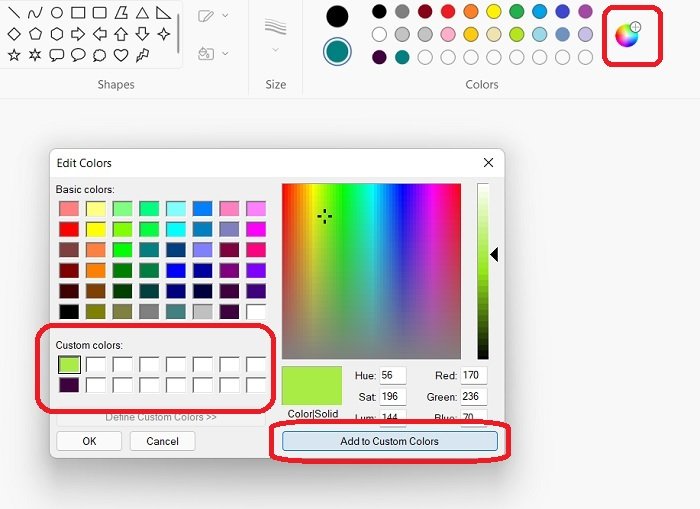
The color palette in MS Paint has 20 colors by default. If you want any color other than these twenty, you can click on the Edit Colors button beside the pallet. The third row in the color palette is empty and you can add your own custom colors there. Click on Edit Colors, arrange the cursor to set the color you want, and click on Add to Custom Colours tab. You will then see your custom color in the third row of the palette.
11] Clear Outlines
We sometimes want to shade a picture in Paint but are worried about the messy line-work. So this trick helps you shade freely without worrying about the outlines. Open the image in MS Paint, zoom it out completely, and copy it to the clipboard. Make sure your selection is transparent. Zoom in the image again and shade out freely without worrying about the outlines of the shape. 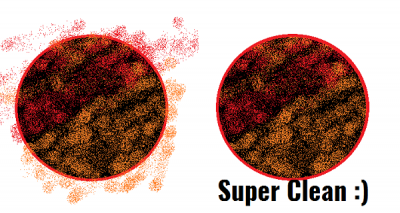
When done with the shading and other editing, hit paste or CTRL+V. Bang on! You are done!
12] Trace a pic in Paint
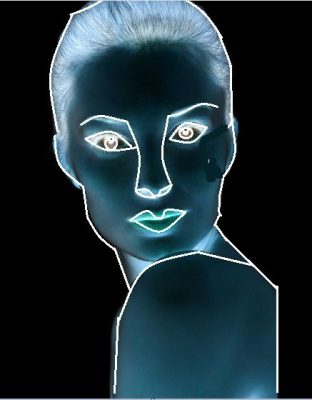 Select a picture you want to trace. Select the black color in the color swatch and start outlining the picture. When done, press CTRL+A and invert colors. Now click on File tab and select Properties in the drop-down menu.
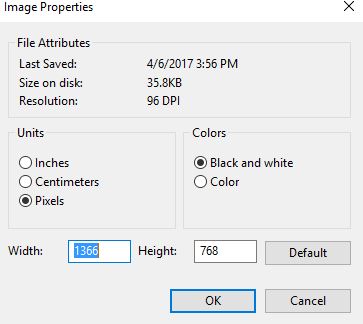
Tick on the checkbox of ‘Black and White‘ and click OK. Now press CTRL+A and invert colors again. Use the Eraser tool to clean the small spots and bingo, you are done!
13] Make Custom Brushes
Draw any random shape for your custom brush. Select the shape and make sure that Transparent Selection is ON. 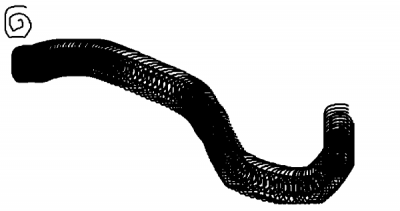
Now hold, shift, and drag your selected shape. Here, you get your custom-shaped brush in MS Paint.
14] Use Eraser as Color Replacement Tool
Open the image you want to make edits in. Choose the color you want to replace in color swatch 1 and select the color you want to replace within swatch 2. 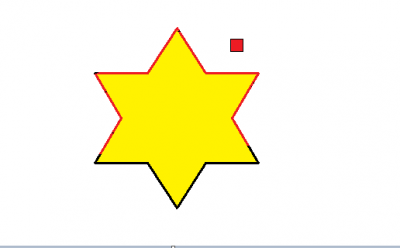
Now select the ERASER tool and wave it across the image while holding the right-click button on your mouse.
15] Create a Gradient Effect
Open Paint and select the work area size according to your requirements. Now cut the image diagonally and fill in two different colors. 
Now go to Resize tab and edit the Horizontal value to 1. Make sure you’ve unchecked the aspect ratio check box. Now edit the Horizontal value to 500 thrice or more and you are done. The more you change it to 500, the smoother the gradients will be.

These were some not-so-common Microsoft Paint Tips and Tricks for Windows users.
Read: How to disable AI features in the Paint app in Windows 11
What’s new in Microsoft Paint in Windows 11?
The appearance of the Paint app has undergone a complete transformation. You will see the rounder corners, changed toolbar icons and symbols, and a new UI. You will also see a drop-down menu for brushes with various brush types and a new round color palette. It’s way better now and feels like a whole new experience.
Read: How to create AI Images using Image Creator in Paint app
How do you trick an eraser in MS Paint?
If you want to increase your eraser size, press “CTRL and +”. To decrease the eraser size, press “CTRL and -” at the same time.
What is the useful commands of MS Paint?
Some of the useful MS Paint keyboard shortcuts are:
| Right arrow | Move the selection or active shape right by one pixel |
| Left arrow | Move the selection or active shape left by one pixel |
| Down arrow | Move the selection or active shape down by one pixel |
| Up arrow | Move the selection or active shape up by one pixel |
Read next: Windows 11 Tips and Tricks.
