
With Outlook, you can share your calendar with any person. When you share the calendar, you can also choose whether the user has full or limited access. In this article, we will describe how to share an Outlook Calendar.

How to share Calendar in Outlook
We will explain here the following two methods using which you can share your Outlook Calendar with others:
- By using the Microsoft Outlook desktop application.
- By using Outlook for the Web.
1] Share Outlook Calendar using Outlook desktop application
The steps below apply to the Microsoft Outlook desktop application. To share your calendar, follow the steps listed below:
- Open Outlook application.
- Open Calendar.
- Click on the E-mail Calendar option.
- Select the date range and permissions.
- Enter the receiver’s email address and click on the Send button.
Let’s see these steps in detail:
1] Launch the Outlook desktop application and open the calendar in it.
2] Now, go to the “Home > E-mail Calendar” option. When you click E-mail Calendar, a new window will open.

3] In the Send a Calendar via E-mail window, select Calendar from the drop-down menu. In the Date Range drop-down menu, you can select the schedule which you want to share with another person. For example:
- Today’s schedule
- Tomorrow schedule
- Schedule of the next 7 days, 30 days, etc.
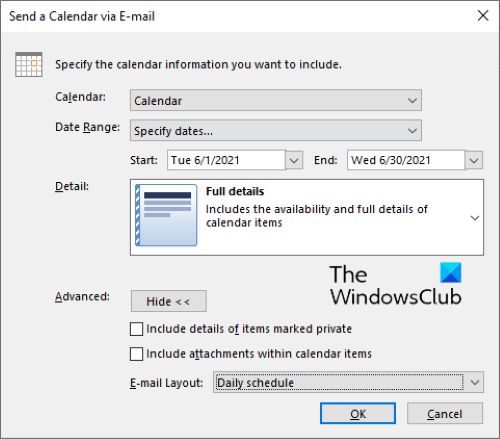
If you want to share the calendar with some specific date range, select Specify Dates from the drop-down menu, and then select the start and end dates accordingly.
In the Detail drop-down menu, you can choose whether to share full or limited calendar details. You can also include or exclude the following advanced features while sharing the complete details of your calendar:
- Details of items marked private.
- Attachments within calendar items.
When you are done, click on the OK button to attach the calendar to the email.
4] Now, enter the receiver’s address and click on the Send button. The recipient can download the shared calendar and open it with any compatible app, such as Outlook, the Windows Calendar app, etc.
2] Share an Outlook Calendar via Outlook for the Web
The following steps will guide you on how to share an Outlook Calendar via Outlook for the Web.
- Open Outlook online and log into your account.
- Switch to the calendar mode.
- Now, click on the Share button. You will find it on the top right side of the interface.
- A new window will open in which you have to enter the email address of the recipient. After entering the email address, select the permissions from the drop-down menu. You can choose whether the recipient can view all calendar details or edit it.
- When you are done, click on the Share button.
Once you click Share, the recipient will receive the calendar in their inbox. He can open it by signing into his Outlook account.
You can also share the calendar via a link by publishing it online. The steps to publish an Outlook Calendar are listed below:
- Open Outlook in your web browser and sign in to your account.
- Click on the gear icon on the top right corner of the blue ribbon and select View all Outlook settings.
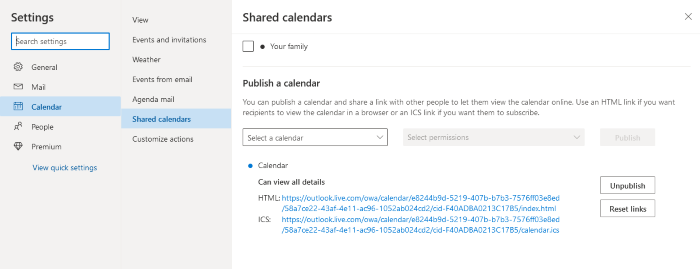
- Now, go to “Calendar > Shared calendars.”
- Scroll down and select Calendar and then select permissions from the drop-down menus. After that click on the Publish button.
After publishing the calendar, you will get the following two links:
- HTML: If you share this link with a person, he can view your calendar without signing into his Outlook account.
- ICS: If you share this link with a person, he can download your calendar and open it with any compatible application.
To copy the link, simply click on it and select Copy link.
That’s it.
Related posts:
