Traditional Hard drives, or HDD in short, are commonly found in older PCs and laptops. Hard drives are mechanical devices with magnetic platters that spin and an arm that reads or writes data. These were deemed fast and efficient until the introduction of Solid State Drives (SSDs). Lately, SSDs have become the common storage devices on every laptop. If you are stuck with a laptop that still runs on an HDD but supports an SSD upgrade, this guide is for you. In this guide, we show you how to install an SSD on your laptop. This method works when you want to upgrade to an SSD or replace an old SSD with a new one on your Windows laptop.

How to know if my laptop supports an upgrade to SSD?
To determine whether your laptop supports an SSD upgrade or can accommodate a new SSD to expand your storage, find the exact model of your laptop. Then search for the laptop online and head to the manufacturer’s product page. Look for storage specifications. You can see if there are any expansion slots there. The Manufacturer clearly states which SSDs are supported.
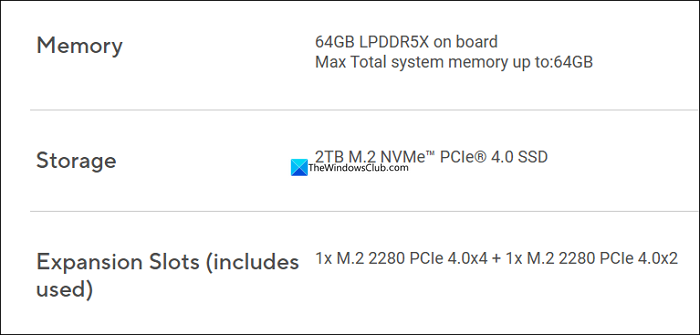
You need to note down the supported SSD type and buy the exact version to install on your laptop. If you miss these details, you might purchase the wrong one, which your laptop does not support.
How to install SSD on a Windows laptop
Before installing a new SSD on your laptop, back up your entire personal data to an external hard drive or cloud storage as a safety measure. Also, if you have never opened the back panel of your laptop or cleaned it for dust and debris, and cannot identify parts without Googling, you might want to take it to a service center to have your SSD installed. Experimenting is a bad idea, as it can break your laptop. You will also need a screwdriver that fits the screws of your laptop.
- Disconnect the power and remove the battery
- Remove the screws and open the back panel.
- Check if there is any residual power
- Find the storage section and install the new SSD
- Remove the old SSD and plug in the new one
- Fit all the disassembled parts back
Let’s dive deep and know how to do it perfectly and safely.
The first thing you need to do before opening the internal hardware of a laptop is disconnect the power cable. It allows you to work safely without any fear. If your laptop has an easily removable battery without any screws, remove it. Most modern laptops have batteries built in. They cannot be removed easily.
Now, open the screws of the back panel and unhook it gently. You need to be very careful and gentle in your actions. After removing the back panel, touch and check any uncolored steel frame for any power remnants.
Now, locate the storage section. It can be easily identified as you can find an SSD already installed there. Check the writings on every part you find there to know the SSD.
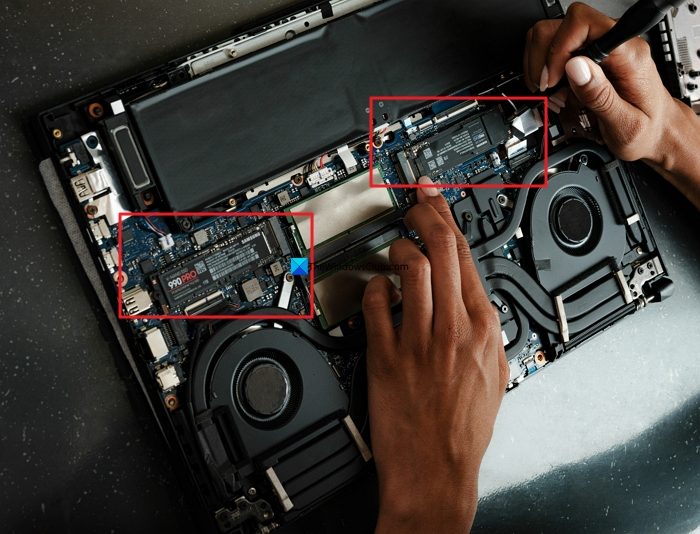
Plug the new SSD into the slot you find there. It fits easily. You do not have to apply any pressure. To install a new SSD in place of an old one, remove the old one gently by removing the screws or connections, and install the new one.

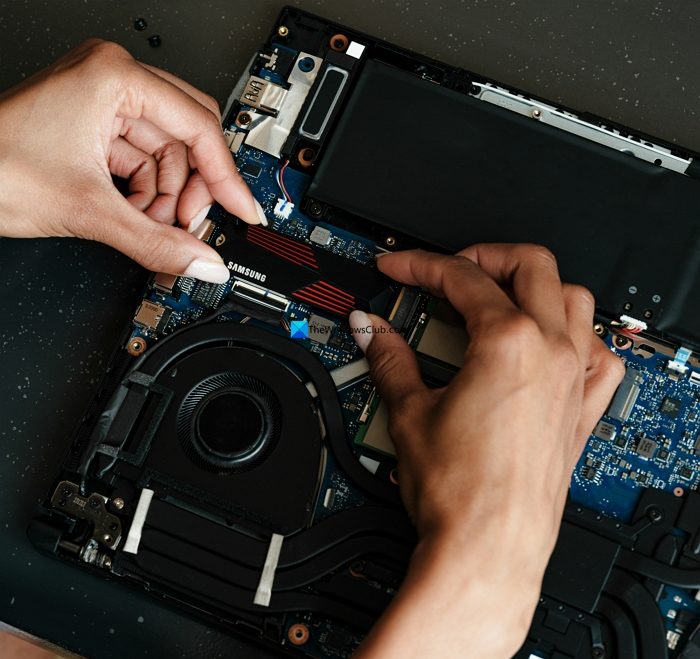
Make sure the fit is perfect not to mess up the installation. If you are removing the SSD that has Windows OS installed, you need to clone the existing data to the new SSD before getting into the installation process.
Now, replug all the parts (if any) you have removed in the same place, fit the back panel properly, and fasten the screws carefully. If you have removed the battery externally, plug it back in and turn on the laptop.
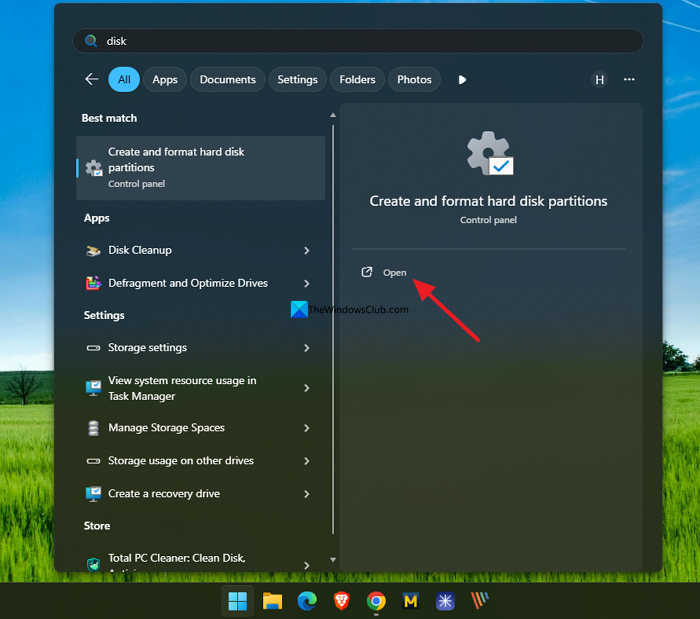
After turning the laptop on, click the Start menu and search for Disk Management. Open the Create and format hard disk partitions from the results.
Disk Management utility lists your new SSD but does not initialize it. You have to manually do it. To initialize the new SSD, right-click on the listing in Disk Management and select Initialize Disk.

You will now find the new SSD space on your laptop initialized. Assign the unallocated space, and create new partitions with the extra storage space. It is now ready to use.
Read: SSD keeps disappearing and reappearing on Windows 11
Can I add an SSD to my laptop without removing the HDD?
Yes, you can add an SSD to my laptop without removing the HDD. You need to check whether your laptop supports SSD storage expansion. If it does not support it, you have to use an external SSD for additional storage.
Read: Warning signs that tell if your SSD is failing in Windows 11
Do I need to reinstall Windows after a new SSD?
No, you do not need to reinstall Windows after installing a new SSD. If you want to replace the existing SSD on which Windows OS is installed, you need to clone it to the new SSD, and then install the new SSD in your PC. If you do not clone or migrate the data to a new SSD, your PC will not boot.
Related read: NVMe SSD not detected in Windows 11.