Does your Windows computer not recognize the drive after a forced eject? We get how frustrating it can be. This issue stems from file system errors or corrupted drivers that are caused by the abrupt disconnection. In this article, we see what to do if the External hard drive is not recognized after force eject.

External hard drive not recognized after forced eject
If the external hard drive is not recognized after a forced eject, follow the solutions below.
- Perform a full power cycle of the drive
- Bring the drive online and reassign a drive letter in Disk Management
- Disable USB selective suspend and remove hidden power management locks
- Clear the read-only and offline flags using DiskPart
- Uninstall the hidden ghost drive from Device Manager
- Use the manufacturer’s reset/diagnostic tool to clear the unsafe removal flag
Let’s get started with the troubleshooting guide.
1] Perform a full power cycle of the drive
A force eject can leave residual charge or a stalled state in both the drive’s firmware and the USB host controller. In such situations, resetting the component internal connection logic and re-negotiating the USB link from scratch by performing a full power cycle of the drive is the solution. This way, the drive’s controller will exit its error lock state, and Windows will see the drive as fresh. For that, shut down Windows completely, and unplug the external hard drive’s USB cable. Unplug the external power adapter if the drive has one, and wait 2-3 minutes for the capacitors to discharge. Plug the power adapter back in and wait for 30 seconds. Then, plug the USB cable into a different port, turn on the computer, and check if the drive appears in File Explorer. If the drive is still absent after this full power cycle, move on to the next solution.
2] Bring the drive online and reassign a drive letter in Disk Management
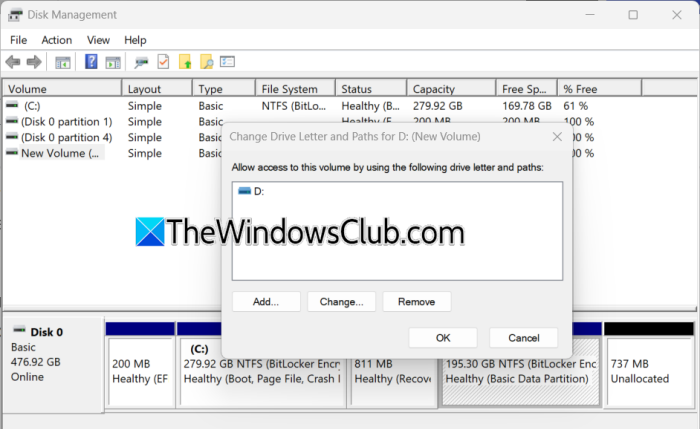
Windows often marks the external drive as Offline or simply forgets its drive letter after a forced ejection. We are going to manually bring the drive online to reactivate its connection to the system’s volume manager and assign a fresh drive letter to bypass any stale registry reference to the old letter. This resolves the most common post-force-eject issue that a drive is physically detected but invisible in File Explorer.
- Click Win + X to open the Quick Link Menu, select Disk Management, and locate the external drive.
- Right-click the disk label, choose the Online option if available, and then right-click the partition area.
- Select the Change Drive Letter and Paths option, click the Add button, and then assign a new drive letter.
Note: Avoid reusing the previous letter. - Click OK and verify the drive now appears in File Explorer.
If the issue persists, continue with the next solution.
3] Disable USB selective suspend and remove hidden power management locks
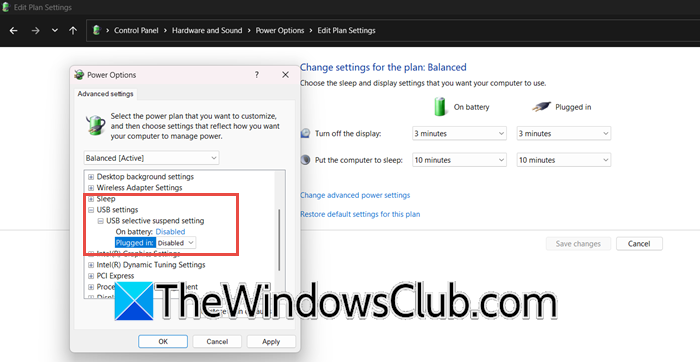
USB Selective Suspend is a power-saving feature in Windows that sometimes mistakenly keeps a drive in a low-power suspended state after improper removal. This prevents it from reinitializing correctly, so to force the USB ports to provide full power, we need to disable the feature. This resolves cases where the drive clicks and lights up but never fully enumerates because Windows thinks it is still sleeping after a forced eject.
- Open Control Panel, click on Power Options, and select Change plan settings.
- Click Change advanced power settings, scroll to USB settings, and click on USB selective suspend setting.
- Set it to Disabled, click Apply, and then OK.
- Next, open Device Manager, expand Universal Serial Bus controllers, and right-click each USB Root HUB.
- Select Properties, then go to the Power Management tab, and uncheck Allow the computer to turn off this device to save power. Repeat for every hub entry and then reboot the device and reconnect the drive.
If disabling power management does not help, the drive may still have read-only or offline flags set at the disk level; proceed to the next solution.
4] Clear the read-only and offline flags using DiskPart

A force eject often sets persistent flags that the graphical interface cannot override. In cases where Disk Management shows the disk as offline and disables the right-click online option, DiskPart can manually force the disk online and instruct the disk’s low-level driver to clear the read-only attribute.
- Open Command Prompt as administrator, type diskpart, and hit Enter.
- Type list disk; note the number of the external drive, and type select disk X.
Note: Replace X with the correct number. - Next, type attributes disk clear readonly and press Enter. Then type online disk and press Enter.
- If that fails, type san policy=onlineall, then online disk, and lastly, type exit to leave DiskPart.
- Next, open Disk Management and assign a drive letter as shown in Solution 2.
Go to the next solution if the issue persists.
5] Uninstall the hidden ghost drive from Device Manager

Windows caches a device configuration for every USB drive we have ever connected. This cached entry can become corrupted after a force eject, causing Windows to reuse a broken driver state every time. We are going to delete the corrupted cache so that when we reconnect the drive, Windows is forced to rebuild the device profile from scratch. To do that, follow the steps below.
- Open Device Manager, and click the View menu to select the Show hidden devices option.
- Expand the Disk drives entry and look for greyed-out entries matching the external drive. Right-click each and select Uninstall device.
- Next, look for Universal Serial Bus Controllers, expand it, and uninstall any greyed-out USB Mass Storage Device or USB Attached SCSI (UAS) Mass Storage Device Storage.
- Similarly, expand Storage controllers, and uninstall greyed-out entries that mention the drive brand or USB Storage.
Once done, reboot the device and reconnect the external drive, and let Windows reinstall drivers automatically. If the drive remains unrecognized after removing ghost devices, see the next solution.
6] Use the manufacturer’s reset/diagnostic tool to clear the unsafe removal flag
Many external drives have built-in firmware logic that records unsafe ejections and makes the drive less responsive or even hidden to protect data after a certain number. The manufacturer’s dedicated diagnostic tool issues a command to reset this unsafe removal or clear a pending error lock state. To run this tool, follow the steps given below.
- Identify the drive’s brand, and download the official tool:
- WD Drive Utilities for WD,
- SeaTools for Seagate, S
- amsung Portable
- SSD Software for Samsung or
- Toshiba Storage Utility for Toshiba.
- Install the tool, launch it and connect the external drive.
- Look for options such as Reset drive, Clear unsafe shutdown counter, Firmware Update, or Diagnostic > Fix All.
- Run the selected reset function and follow on-screen instructions.
After the process completes, safely eject and reconnect the drive.
Hopefully, the issue will be resolved.
How to reset an External hard drive that is not detected?
To reset an external hard drive, unplug it, restart the device, then reconnect it directly to a USB port. Check Disk Management to see whether it appears without a drive letter; if so, assign one. To know how to do it, check out the steps given above.
Read: USB 3.0 External Hard Drive not recognized in Windows 11
How do I fix an External hard drive being detected but not accessible?
If an external hard drive is detected but not accessible, users must check if the drive has a letter in Disk Management. If there’s no issue there, then run the Check Disk command to eliminate any file system errors. If the drive shows as RAW, users need data recovery software or to reformat it.
Also Read: External Hard Drive not showing up or detected in Windows 11.