Windows Sandbox framework is optimized for faster boot-up. It also runs faster than standard virtual machines. Once you close it, all the data is erased, and you begin with a fresh Windows installation again. We have already seen how to disable Networking in Windows Sandbox in Windows 11/10. Today, we’ll walk you through enabling or disabling video input in Windows Sandbox.
Enable or disable Video Input in Windows Sandbox
Follow the suggested methods to enable or disable video input in Windows Sandbox
- Registry Editor
- Group Policy Editor
You will need an administrator account to use both of these methods. Also, the Group Policy method is usually unavailable in the Windows Home version. If you need to enable the Group Policy in Windows PC, then you can follow the linked article.
1] Using the Registry Method
To enable or disable video input for Windows Sandbox, you need to open the Registry Editor, navigate to the Windows Sandbox key, create or modify the 32-bit DWORD value called “AllowVideoInput”, and set its value to 1 to enable or delete it to disable. Let us follow the steps:
- Press Win+R in combination to open the ‘Run’ dialog box.
- Type ‘Regedit’ in the empty field of the box and press ‘Enter’.
- When the Registry Editor opens, navigate to the following path address –
HKEY_LOCAL_MACHINE\SOFTWARE\Policies\Microsoft\Windows\Sandbox.

If you do not find a key with such a name, create one.
- Now, create a new 32-bit DWORD value and name it ‘AllowVideoInput’.
- To enable video input for Windows Sandbox, set the value for ‘AllowVideoInput’ to 1.
- To disable the same, delete the value.
2] Using Group Policy Editor
Open the Group Policy Editor and navigate to the following path –
Computer Configuration\Administrative Templates\Windows Components\Windows Sandbox
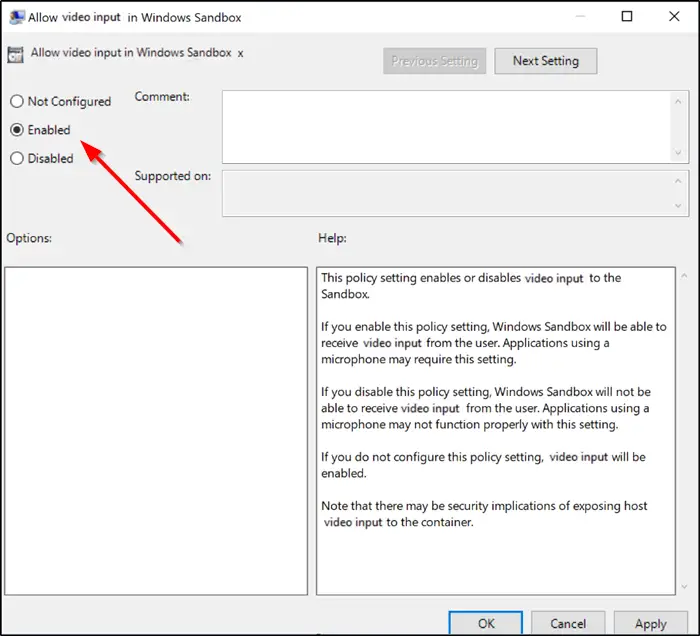
- Now, search the policy setting ‘Allow video input in Windows Sandbox’.
- When seen, check the ‘Enabled’ option to enable Video Input in Windows Sandbox.
- To disable the same, check the ‘Disabled’ option.
That’s all there to it!
Also read:
- How to Enable or disable Printer Sharing with Windows Sandbox
- How to enable or disable Clipboard Sharing with Windows Sandbox
- How to enable or disable Virtualized GPU sharing Sharing for Windows Sandbox
- How to disable Networking in Windows Sandbox.
What does enabling sandbox mode mean?
To make sure applications don’t spoil the existing Windows setup by any means, Windows offers Sandbox. It’s a safe environment where you can run and test applications and measure their impact. Since it’s the same desktop environment, your applications behave as expected. Once the sandbox is closed, all instances of the application and Windows are deleted.
Can Windows sandbox use GPU?
Windows Sandbox offers GPU as Virtualized GPU. So yes, Windows can use GPU like the rest of the resources. However, if you turn off GPU, the sandbox will switch to CPU or software rendering, which is drastically slow compared to vGPU.