
Hyper-V is useful for running another copy of Windows without installing it on separate hardware. The problem arises when the virtual machine requires substantial graphics performance. By default, the VM does not get access to the GPU installed in your PC. In this post, we will see how to enable GPU Partitioning (GPU-P) in Hyper-V on a Windows client or server machine.
Enable GPU Partitioning (GPU-P) in Hyper-V on a Windows client or server
GPU partitioning lets you divide a physical GPU into smaller parts that can be assigned to different virtual machines (VMs). Unlike Discrete Device Assignment (DDA), which gives one VM use of the entire GPU, GPU partitioning shares the GPU, allowing each VM to use a portion of its resources. It helps multiple VMs share a physical GPU, with each VM getting a dedicated share of the GPU’s resources. The specific resources available depend on the GPU and its driver. These can include video memory, computing power, and video encoding and decoding options. This is especially useful in a desktop Hyper-V lab, as it allows the host to continue using the graphics hardware while a VM accesses GPU resources.
To enable GPU partitioning (GPU-P) in Hyper-V, follow the steps mentioned below.
- Check if your GPU supports GPU-P
- Make sure Hyper-V is installed
- Shut down your machine
- Add and configure GPU Partitioning
- Start the VM and install the GPU Driver
Let us talk about them in detail.
1] Check if your GPU supports GPU-P
First, check whether Hyper-V can see a partitionable GPU on the host. Open PowerShell as Administrator and run the following command.
Get-VMHostPartitionableGpu
If Windows returns information about your GPU, that’s a good sign.
For a cleaner result, use Get-VMHostPartitionableGpu | Format-List Name, ValidPartitionCounts
The ValidPartitionCounts value tells you which partition configurations the GPU exposes.
For example, you might see:
Name : \\?\PCI#VEN_...
ValidPartitionCounts : {32, 4}
Don’t assume that every GPU will show the same values. The available configurations depend on the hardware and driver. If the command returns nothing, check the following things before continuing.
- Hyper-V is installed.
- Hardware virtualization is enabled in UEFI/BIOS.
- IOMMU or the required virtualization setting is enabled.
- The GPU driver is current.
- The GPU actually supports the required virtualization features.
If Get-VMHostPartitionableGpu still returns nothing, creating a GPU-P adapter for the VM won’t solve the problem.
2] Make sure Hyper-V is installed
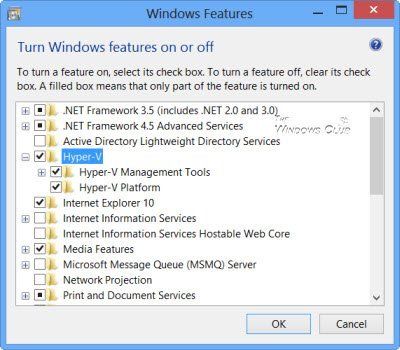
GPU-P obviously won’t work if Hyper-V isn’t enabled. To check, hit Win + R, type optionalfeatures, and press Enter. In Windows Features, make sure Hyper-V, Hyper-V Management Tools, and Hyper-V Platform are enabled. Click OK and restart Windows.
You can also enable Hyper-V from an elevated PowerShell window using the following command.
Enable-WindowsOptionalFeature -Online -FeatureName Microsoft-Hyper-V -All
Restart the computer after the installation finishes.
If you’re using Windows Server, you can install the Hyper-V role through Server Manager or PowerShell instead.
3] Shut down your machine
Now, let us identify the VM that we want to give GPU access to. For that, run the following command.
Get-VM
Then, check the specific machine using the command mentioned below.
Get-VM -Name "Win11-Test" | Select-Object Name, Generation, State
You want to see Generation 2.
For example:
Name Generation State
---- ---------- -----
Win11-Test 2 Off
Microsoft’s supported GPU-P configuration requires a Generation 2 VM.
If your existing VM is Generation 1, you can’t simply change its generation. You’ll need to create a new Generation 2 VM and move the workload to it.
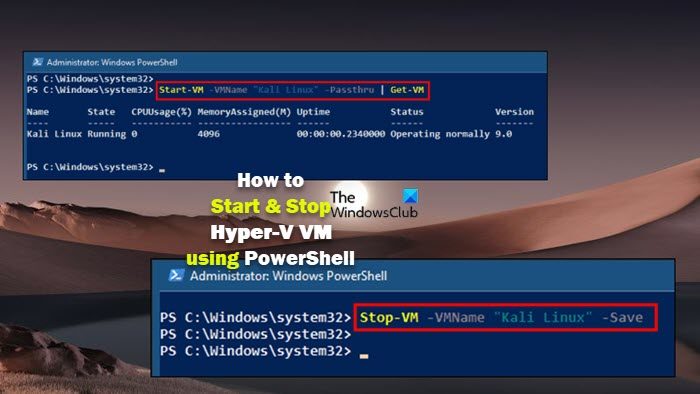
Now, we need to stop Hyper-V. We can do that using the following PowerShell command.
Stop-VM -Name "Win11-Test"
Then confirm its state using the command: Get-VM -Name "Win11-Test" | Select-Object Name, State
Make sure it reports:
State
-----
Off
If the VM refuses to stop, don’t continue with the GPU configuration until it is actually powered off.
4] Add and configure GPU Partitioning
Before adding the GPU partition, give the VM enough Memory-Mapped I/O (MMIO) space. Insufficient MMIO resources can cause errors such as Code 12 when Windows tries to initialize the virtual GPU. Microsoft lists MMIO allocation as one of the areas to check when troubleshooting GPU assignment problems.
Run this command with the VM powered off.
Set-VM -Name "Win11-Test" `
-GuestControlledCacheTypes $true `
-LowMemoryMappedIoSpace 1GB `
-HighMemoryMappedIoSpace 32GB
The values above are an example. The amount of MMIO space you need depends on the GPU and its configuration.
Now add the GPU partition to the VM using the command mentioned below.
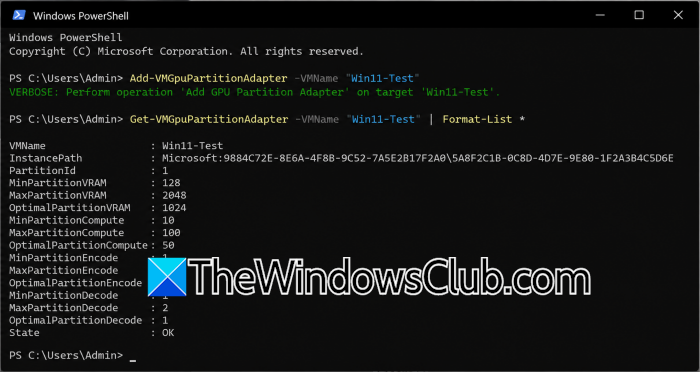
Add-VMGpuPartitionAdapter -VMName "Win11-Test"
Microsoft provides Add-VMGpuPartitionAdapter to attach a GPU partition adapter to a Hyper-V virtual machine.
Once that’s done, verify the adapter using the command mentioned below.
Get-VMGpuPartitionAdapter -VMName "Win11-Test" | Format-List *
You can also check which partition configurations the physical GPU supports:
Get-VMHostPartitionableGpu | Format-List Name, ValidPartitionCounts
The output shows the GPU resources and partition counts exposed by the hardware and driver. If you need to fine-tune the amount of VRAM, compute, encoding, or decoding resources assigned to the VM, Set-VMGpuPartitionAdapter provides the relevant parameters.
For most setups, though, there’s no reason to start changing those values manually. Add the adapter, verify that Hyper-V detects it, and proceed to install the GPU driver inside the VM.
5] Start the VM and Install the GPU Driver
Now, start the virtual machine, either from the GUI or using the command: Start-VM -Name "Win11-Test".
Log in to Windows and open Device Manager. Now, go to Display adapters to check whether Windows has properly recognized the virtual GPU. If the adapter appears with a warning icon, the guest probably needs the correct graphics driver. The driver situation matters here. A GPU working perfectly on the Hyper-V host doesn’t automatically mean the guest has everything it needs. Microsoft lists driver compatibility as one of the areas to investigate when GPU assignment fails.
That’s it!
Read: How to import, export, or clone Virtual Machines in Hyper-V
Use GPU-P on Windows 11
If you’re running Hyper-V on Windows 11, there is an important limitation to keep in mind. Microsoft currently supports GPU Partitioning on Windows Server 2025 and later hosts. GPU-P is not supported on Windows 11 Pro as a host, even though Windows 11 can run as a guest in a supported GPU-P configuration.
That means the commands shown above are primarily intended for a supported Windows Server setup. You may find community guides that demonstrate GPU-P on Windows 11, but those configurations aren’t covered by Microsoft’s current support model.
If you are setting up GPU-P for a lab or testing environment on Windows 11, you can still check whether Hyper-V exposes a partitionable GPU by running the following command
Get-VMHostPartitionableGpu
If the command returns a GPU, you can investigate the configuration further. However, obtaining a result does not change Microsoft’s host support requirements.
For a supported deployment, use Windows Server 2025 or later as the Hyper-V host and install the appropriate GPU driver. Windows 11 can then be used as the guest operating system. Microsoft lists Windows 10 or later as a supported guest operating system for GPU-P.
Read: How to attach a physical video card to a VM on a Hyper-V host
How do I enable Hyper-V on Windows Server?
To enable Hyper-V on Windows Server, open PowerShell as Administrator and run Install-WindowsFeature -Name Hyper-V -IncludeManagementTools -Restart. Windows Server will install the Hyper-V role and restart the server automatically when the installation finishes. You can verify the installation afterward with Get-WindowsFeature Hyper-V. Hyper-V can also be installed through Server Manager by selecting Add Roles and Features, choosing Hyper-V, and completing the installation wizard.
Read: How does Virtualization or Hyper-V work on Windows 11/10
Can you do GPU passthrough on Hyper-V?
Yes, Hyper-V supports GPU passthrough through Discrete Device Assignment (DDA), which assigns an entire physical GPU directly to a virtual machine. GPU Partitioning (GPU-P) is another option on supported systems, allowing a physical GPU to be shared between multiple VMs. DDA is supported on Windows Server 2016 and later, while Microsoft’s current GPU-P implementation requires Windows Server 2025 or later. Client versions such as Windows 11 Pro aren’t supported hosts for DDA or GPU-P.
Also Read: Enable or disable Virtualized GPU sharing for Windows Sandbox.
