
Point-in-time restore is a new system restore feature in Windows 11. It lets you revert your PC to the exact state it was at an earlier point in time in minutes. You can revert the entire system (including the OS, user settings, passwords, apps, keys, certificates, local files, etc.) to a selected restore point. In this tutorial, we will show you how to enable and configure Point-in-time restore on a Windows 11 computer with a step-by-step guide.
Once enabled, it automatically captures restore points at a default frequency (24 hours), which can be configured or changed. Like the traditional System Restore feature in Windows 11, the Point-in-time restore feature uses Volume Shadow Copy (VSS) to capture restore points. This feature works offline; restore points are captured in the background and stored locally on your PC.
As of now, this Point-in-time restore feature is in a preview version available to Windows Insiders. But it will be available in the stable release soon.
Difference between Point-in-time restore and System Restore in Windows PC
While both the System Restore feature and the Point-in-time restore feature use Volume Shadow Copy service to roll the device back to a previous state, the Point-in-time feature focuses on minimizing downtime, a wide range of issues, and fast recovery, without any lengthy troubleshooting process. In addition, some key points differentiate Point-in-time and System Restore, which are as follows:
- Restore point trigger: In Point-in-time restore, the restore points are captured automatically at a scheduled frequency. In System Restore, the restore points are event-triggered or started manually
- Configuration: The Point-in-restore feature is configured from the Settings app, and the System Restore is accessed and configured using Control Panel
- Retention period: In the Point-in-time restore feature, a restore point is kept for a maximum of 72 hours. In System Restore, the retention period is indefinite (depends on disk usage/cleanup)
- Target scope: Point-in-time restore focuses on the Full system state. Therefore, system restore points are comprehensive. In System Restore, Registry settings, system files, and installed programs are reverted, and user data or app data coverage may vary
- Management: Point-in-time restore includes a modern approach and will support remote management, but there’s no modern management in the System Restore feature.
Read: How to perform Point-in-time restore in Windows 11
How to enable Point-In-Time Restore in Windows 11
The Point-in-time restore feature is enabled by default on devices with 200 GB disk space or more. You can enable Point-in-time restore in Windows 11 using two native options. These are:
- Using the Settings app
- Using the Registry Editor.
1] Using the Settings app
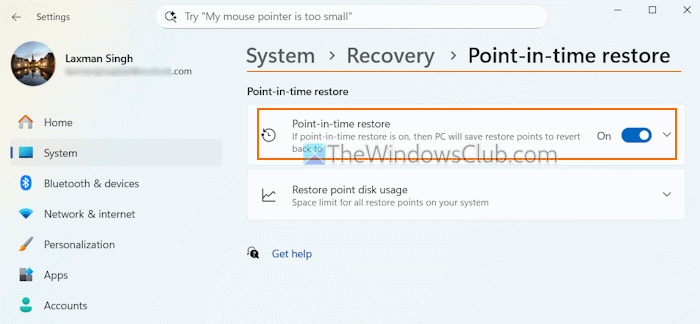
The steps to enable Point-in-time restore using the Windows 11 Settings app are as follows:
- Use Win+I hotkey to open the Settings app
- Select the System category
- Access the Recovery page from the right side
- Click on the Point-in-time option under the Recovery options section
- Use the toggle for Point-in-time restore to turn it on.
You can turn off this option to disable the Point-in-restore using the Settings app anytime you want.
Related: How to schedule System Restore Points in Windows PC
2] Using the Registry Editor
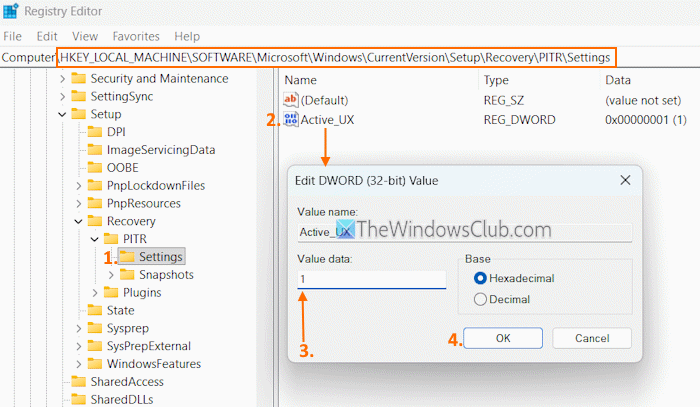
First, you should take a backup of the Windows Registry. After that, follow these steps to enable Point-in-time restore using the Registry Editor:
- In the Search box, type regedit, and press Enter. The Registry Editor window will open
- Access the Settings Registry key present under the PITR key. Here is the path:
HKEY_LOCAL_MACHINE\SOFTWARE\Microsoft\Windows\CurrentVersion\Setup\Recovery\PITR\Settings
- If the key is not present, create it manually. Right-click on PITR > New > Key. Rename the new key with Settings
- Double-click on the Active_UX DWORD (32-bit) Value. If this value is not there, create a new DWORD (32-bit) Value, and name it Active_UX
- Put 1 in the Value data of the Edit Value box
- Press OK.
To disable or turn off the Point-in-time restore feature using Registry Editor, you can either delete the Active_UX value or set its value data to 0.
Also read: How to increase System Restore point frequency in Windows PC
How to configure Point-in-time restore in Windows 11?
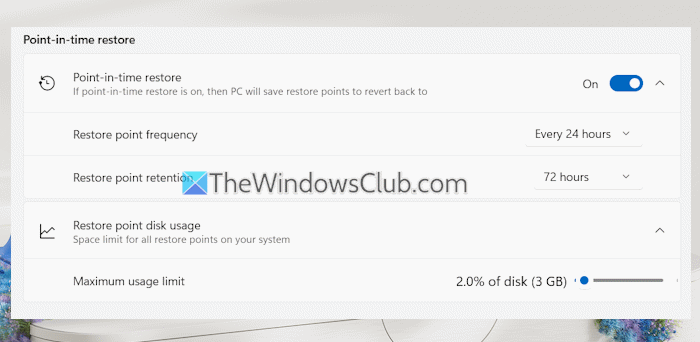
Point-in-time restore configuration is possible only when the feature is enabled. If not, all the configuration options are greyed out or remain disabled. So, once the feature is enabled, you can configure Point-in-time restore in Windows 11 using these steps:
- Open the Settings app
- Select System
- Access Recovery
- Expand the Point-in-time restore option
- Now you can set the Restore point frequency to every 4 hours, 12 hours, every 24 hours (default setting), 6 hours, and every 16 hours. The scheduler will schedule a restore point promptly if no restore point is available. If restore point(s) exist, it will plan the next restore point based on the most recent point and boot timing
- Select the Restore point retention. The default timing is 72 hours, after which a restore point is removed automatically. You can change the retention period to 12 hours, 6 hours, 24 hours, or 16 hours
- Expand the Restore point disk usage option and set it using the slider. It’s the maximum usage limit for restore points. The minimum and default usage limit is 2%, which can be extended up to 50 GB.
Note that the maximum usage limit is not pre-allocated or reserved for creating restore points. Instead, it is the upper bound that VSS can use (when needed). If there is unused space, it will remain available to the system.
When the VSS maximum storage limit is reached, restore points are automatically deleted in the order they were created. The restore points will also be deleted if VSS encounters a condition (such as a disk failure to allocate memory, write errors, or the disk being full). So, consider these points while choosing the maximum usage limit for restore points.
That’s all.
Read: How to use Cloud Rebuild in Windows 11
Now read: What should be the frequency of System Restore Points in Windows PC
How to enable System Restore point in Windows 11?
Open the System Properties window, select the C drive, and press the Configure button. Select the Turn on system protection option, press the Apply and OK buttons. If the System Restore is disabled or greyed out, open the Local Group Policy Editor window. Access the System Restore folder. There, open the Turn off System Restore setting, and set it to Not Configured to enable it.
How to create a restore point automatically in Windows 11?
You can automatically create a system restore point at startup in Windows 11. For this, create a SystemRestorePointCreationFrequency DWORD (32-bit) Value in the Registry Editor, and use the Task Scheduler to create a task and set it up for creating a restore point automatically. Additionally, you can use the Point-in-time restore feature from the Settings app to create and manage restore points and set restore point frequency.
Read next: System Restore not working, failed, or did not complete successfully in Windows PC.
