Suppose you’re running Windows 11 inside Oracle VirtualBox. In that case, you may have found yourself stuck with a low, unsightly screen resolution, and the display settings offer no way to change it to something more suitable for your monitor. In this post, we’ll discuss this issue and explore what you can do to resolve it.
Can’t change Windows 11 resolution in VirtualBox
The reason you can’t change the Windows 11 resolution in VirtualBox is that the virtual machine lacks the proper graphics drivers to communicate effectively with the host system. By default, VirtualBox uses a basic, generic video driver that only supports a limited set of resolutions. Until you install the specialized VirtualBox Guest Additions software, which contains these essential drivers, Windows 11 cannot dynamically detect and offer the full range of available resolutions.
Since you cannot change the Windows 11 screen resolution in a VirtualBox VM, follow the solutions below.
- Install VirtualBox Guest Additions
- Configure the correct Graphics Controller
- Manually set a High Resolution via the Command Line
- Update Oracle VirtualBox to the latest version
- Change the VM’s Firmware from BIOS to UEFI
Let us talk about them in detail.
1] Install VirtualBox Guest Additions
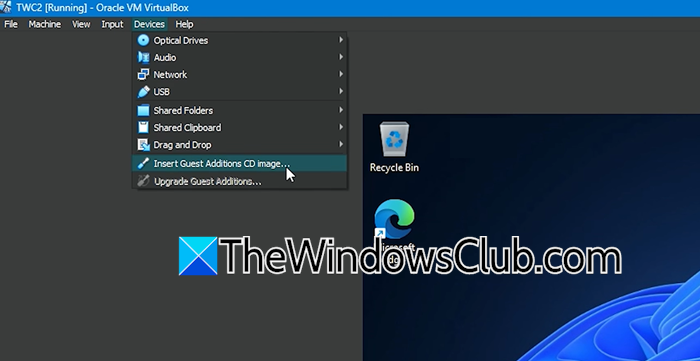
Guest Additions installs optimized graphics and display drivers specifically for the virtual environment, enabling features like seamless mode, shared clipboard, and, most importantly, automatic resolution scaling. To install it on your computer, follow the steps below.
- Open VirtualBox.
- Launch your Windows 11 VM and log in.
- From the VirtualBox menu at the top of the VM window, select Devices > Insert Guest Additions CD image…
- Inside the Windows 11 VM, an auto-run dialog should appear. If it doesn’t, open File Explorer, navigate to the virtual CD drive (usually This PC > VBox_GAsX.X.XX), and run VBoxWindowsAdditions.exe.
- Follow the installation wizard’s prompts, using the default settings. Once complete, restart the virtual machine.
Finally, check if the issue is resolved.
2] Configure the Correct Graphics Controller

The virtual graphics controller must be compatible with Windows 11’s modern display requirements. Using the wrong one (like the legacy VBoxVGA) can prevent proper driver installation and high-resolution support. To make the necessary changes, follow the steps below.
- Make sure your Windows 11 VM is fully powered off (not saved).
- In the VirtualBox Manager, select your VM and click Settings.
- Go to the Display section on the left.
- Increase the Video Memory to at least 128 MB.
- From the Graphics Controller dropdown, select VBoxSVGA. Click OK.
Now, start your virtual machine and try changing the screen resolution.
3] Manually set a High Resolution via the Command Line
We will use a command to force VirtualBox to make a specific resolution available to the guest OS, bypassing any automatic detection issues. It’s a direct method to add a resolution that isn’t showing up in the Windows display settings.
To do so, first ensure that the guest machine is closed. Then, on the host machine, open the Command Prompt as an administrator and run the following command, replacing “Your VM Name” with the exact name of your virtual machine and the resolution with your desired one.
VBoxManage setextradata "Your VM Name" CustomVideoMode1 1920x1080x32
Start your VM. The new resolution should now appear in the Windows 11 display settings.
4] Update Oracle VirtualBox to the latest version
An outdated version of VirtualBox can contain bugs that prevent the guest display drivers from functioning correctly with Windows 11. Updating ensures you have the latest compatibility fixes, feature support, and stability improvements for modern operating systems.
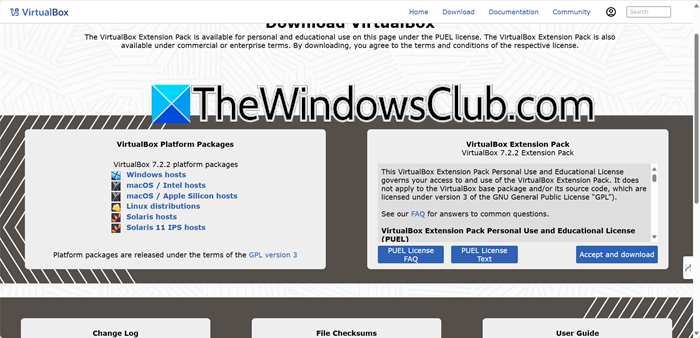
You need to shut down your Windows 11 virtual machine completely, then on the host machine, go to virtualbox.org and download the latest version of the VirtualBox client application. Run the installer. It will automatically detect your existing installation and upgrade it.
5] Change the VM’s Firmware from BIOS to UEFI
Windows 11 requires UEFI firmware to operate, but some virtual machines (VMs) may be set up with legacy BIOS instead. This mismatch can cause various compatibility issues with drivers and hardware, particularly concerning the graphics adapter and available screen resolutions. To resolve the issue, it’s important to configure the VM to use UEFI.
To change the firmware setting, follow these steps.
- First of all, make sure that your VM is completely powered off.
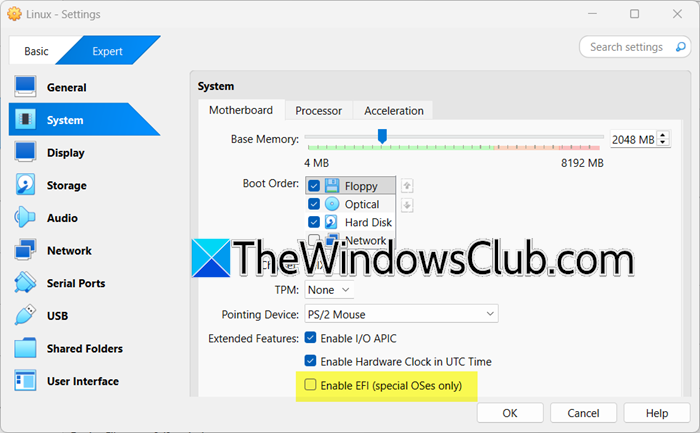
- Then, in the VirtualBox Manager, select your VM and click Settings.
- Navigate to the System section on the left.
- In the Motherboard tab, check the box that says Enable EFI (special OSes only).
- Click Ok to save settings.
When you start the VM after this change, it will boot into the EFI shell. You will need to exit this shell to proceed. Type exit at the Command Prompt and press Enter. Use the boot manager that appears to select your virtual hard disk to boot from. Windows will then start normally. This change is permanent and should resolve underlying firmware conflicts.
That’s it!
Read: VirtualBox displays Black screen and not Booting guest OS
How to force 1920×1080 resolution in Windows 11?
To force 1920×1080 resolution, right-click your desktop and select Display settings, then choose 1920 x 1080 from the Display resolution dropdown menu. If the resolution isn’t listed, you may need to update your graphics drivers or use your GPU control panel (like NVIDIA or AMD software) to create a custom 1920×1080 resolution.
Read: VirtualBox resize screen greyed out
How to make Windows 11 full screen in VirtualBox?
To make Windows 11 full screen in VirtualBox, you must first install the VirtualBox Guest Additions software inside your Windows 11 virtual machine. After installation and a reboot, you can simply press the Host key, typically the right Ctrl key, + F to toggle full-screen mode seamlessly.
Also Read: VirtualBox not detecting Graphics Card in Windows 11.