Often, we want to close the laptop without shutting it down, so we use the Sleep option. Using this way, you can wake up your system instantly, rather than rebooting it, which takes extra time. For security concerns, Windows by default asks you to enter the user account password each time when you wake up your system. We have already seen how to disable Login after Sleep in Windows 11/10.
In Windows 11/10, you can also disable requiring a password on wake up from the Settings screen and log in automatically.
In Windows 10, you can do it via Settings > Accounts > Sign-in options.
For your information, if you’re using a Microsoft account on Windows 11/10, and in case your PC is not connected to the Internet, then you can log in using the last used password. You can make Windows 10 auto-logon at wake-up using two ways mentioned below:
Make Windows Auto Login After Sleep
In Windows 11, open Settings > Accounts > On the right side locate Sign in options.

You will see If you’ve been away, when should Windows require you to sign in again. Set it to Never.
From the Windows 10 WinX Menu, open Settings > Accounts > Sign-in options.
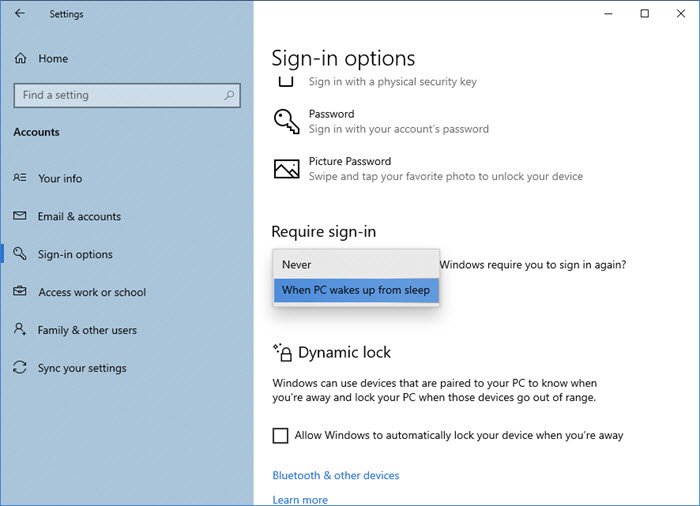
Here, under Require sign-in, drop-down menu, you will see two options:
- When PC wakes up from sleep.
- Never.
Select Never.

You can restart the machine now to make changes effective.
Read: How to delay Automatic Logon process in Windows
Make Windows Auto Login after Sleep using Registry
1. Press Windows Key + R combination, type put Regedt32.exe in the Run dialog box and hit Enter to open the Registry Editor.
2. Navigate to the following location:
HKEY_CURRENT_USER\Control Panel\Desktop
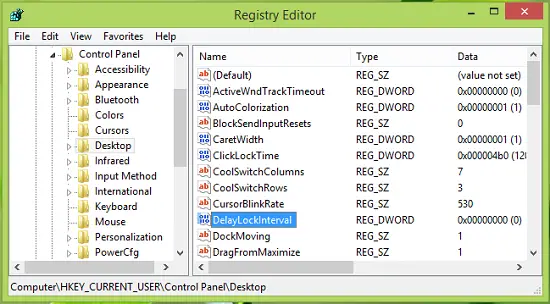
3. In the right pane of this location, you’ll find a DWORD named DelayLockInterval having its Value data set to 1. Double click on the same DWORD to modify its Value data:
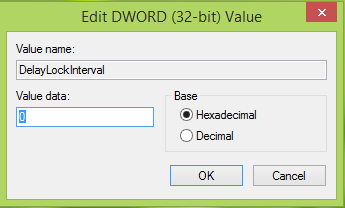
4. In the above-shown box, put the Value data as 0 so that whenever your system wakes up, it doesn’t ask you for the password. Click OK. You may now close Registry Editor and reboot to observe the changes. That’s it!
I hope you find the trick useful!
Now read:
- Log in directly into Windows without entering a password
- How to prevent Automatic Sign-in after installing Windows Updates.