Windows Ink Workspace is a useful feature in Windows 11/10. It empowers you to engage more digitally with your computing environment by allowing you to interact with your system and navigate the screen with a digital pen. This post will show us how to use Windows Ink Workspace like a pro.

What is Windows Ink function
Most tablet devices support pen technology, but using the same on Windows can be a complicated process. However, things appear to be changing with the introduction of Windows Ink. The technology intends to simplify the pen experience on Windows 10 devices and deliver on the promise of making your writing on electronic devices as easy as on paper.
Windows Ink is the set of pen-driven experiences that help you set your ideas in motion with your pen, says Microsoft.
Windows Ink simplifies the Pen experience on Windows devices and helps you set your ideas in motion by combining all ink-powered features and apps via Windows Ink Workspace. The section provides all features in one single, easy-to-access UX canvas.

To witness the working power of the Windows Ink feature, just press the Windows Ink Workspace button in the system tray.
Where to find & open Windows Ink
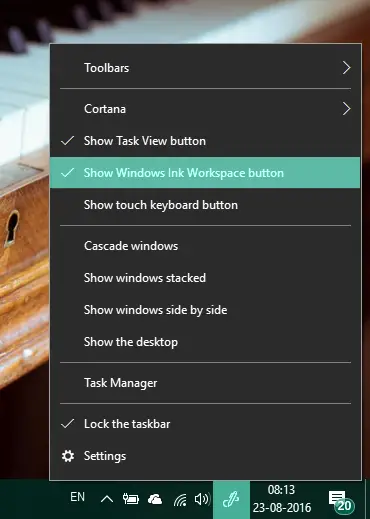
Windows Ink Workspace is a hub present on your PC that contains several tools, utilities, and apps that are pen-friendly. You can launch it from the far right end of the taskbar by clicking on the icon that looks like a pen. However, if it is not present, you might have to add it to your taskbar. To do so, right-click anywhere on the taskbar and select Show Windows Ink Workspace button.
What does it offer
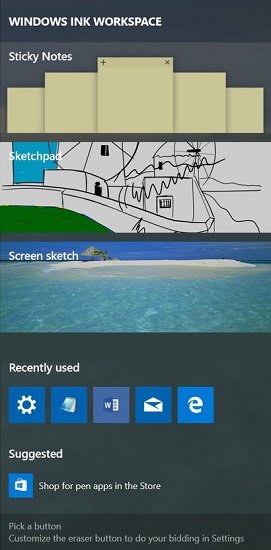
When you launch the Windows Ink hub, it slides from the right, just like Action Center, containing several pen-friendly apps. On the top, you can see utilities like Sticky Notes, Sketchpad and Screen Sketch which forms the prime core of Windows Ink. Sticky Notes is available as a separate Windows Store app, but the other two are bundled with Windows Ink only. We’re going to see how to use these nifty little tools later in the post.
Apart from these three major components, you can also see the apps that you have recently used and that are compatible with a pen.
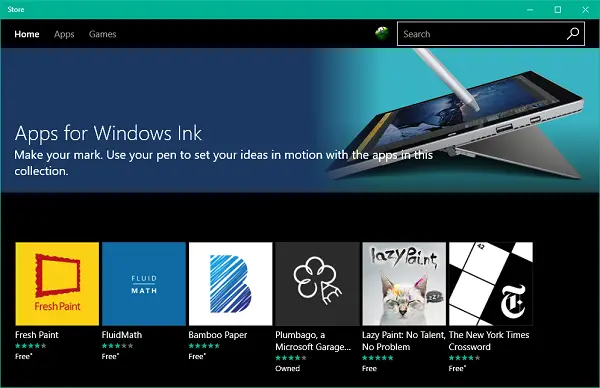
Down below, you can see the suggested apps from the Microsoft Store that you can download to enhance your pen experience. Click on Get more pen apps to land on a Store page with lots of pen-friendly apps. You can download these and add up your collection.
How to use it
Now, let’s examine how to use the three main features encapsulated at the top level of Windows Ink.
Sticky Notes
Earlier bundled in Windows as a built-in system component, Sticky Notes is now available for everyone as a separate Windows Store app. In Windows 10, you can use Sticky Notes to set a reminder, view flight information, send an email or visit web links and even more. You need to set your region and language to English[US] and enable insights for sticky notes, post which, you will be able to test out the enhanced capabilities of Sticky Notes.

Sketchpad
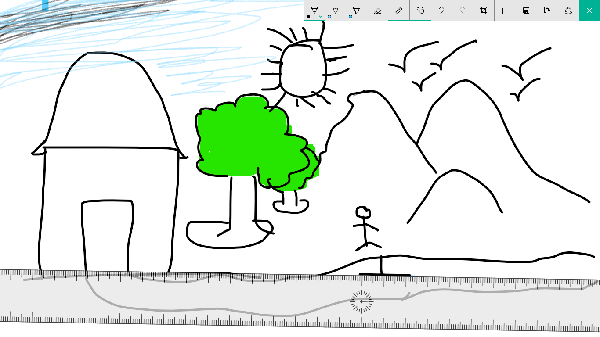
Sketchpad can be used for putting your art to practice. You can use the available pen, pencil, crayons, etc., to draw and then share with your friends. You can also use a handy scale to draw straight lines. Use your pen/stylus device to shift your way around the canvas.
Screen Sketch
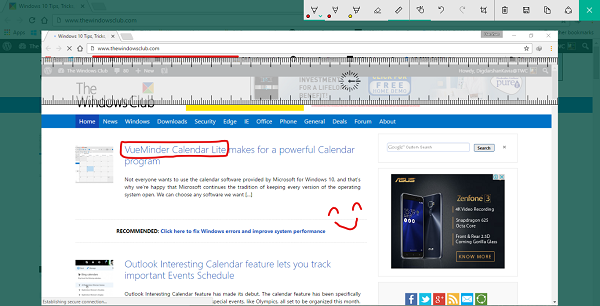
Similar to taking web notes in Edge, this particular feature enables you to take a screenshot of the currently open window and then use Sketchpad features to annotate, draw or highlight any parts of the image. Quite useful when you want to share an annotated image among your friends!
The Ink workspace also has a dedicated application section where app developers recommend the best pen app to users based on their needs. The suggested apps are primarily artist-focused and will help you complete your work efficiently.
Pen and Windows Ink Settings in Windows 11/10
To open Pen and Windows Ink settings, go to:
- Open Settings, click on Devices.
- On the left side see for Pen & Windows Ink Tab. Click on it.
You would see that the whole page to be divided into different sections which will include settings for Pen and Windows Ink Workspace.
Pen
In the Pen section, you may see the settings on what task the Pen should perform when connected, which hand you are using to hold the pen, etc. If a pen is not connected, then you may find a different scenario when Pen & Windows Ink settings are opened up.
To pair a pen with your PC, select Start > Settings > Devices > Bluetooth & other devices. Hold down the shortcut button on your pen for seven seconds to turn on pairing mode, then choose the pen from the list of devices and select Pair.
When paired, Windows assumes that you are a right-handed person and works accordingly. It’s because when a pen is used for opening the context menus, the menu opens on the opposite side of the hand being used. Its because if you are right-handed and the menu opens on the right side of the tip then you might not be able to see it.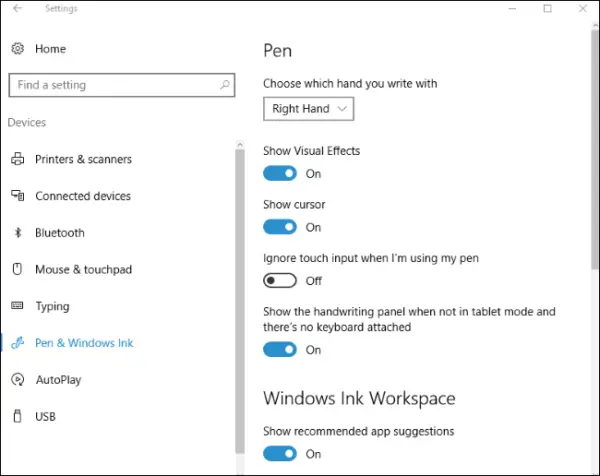
The settings for Pen also include the options for Visual Effects and Cursor that appear while using the Pen. Yes, you can disable them any time you want. The cursor is shown as a dot at the position where the tip of the Pen is hovering. Another setting that will definitely come in handy to you is “Ignore touch input when I’m using my pen”. This setting will ignore your hand gestures and touch when a pen is connected or being used.
Lastly, there is one more setting that you may want to use. It will allow you to write anything using a Pen and it will be converted into text. It is named as “Show the handwriting panel when not in tablet mode and there’s no keyboard attached”. When enabled. It will show you a keyboard icon in the notification area.
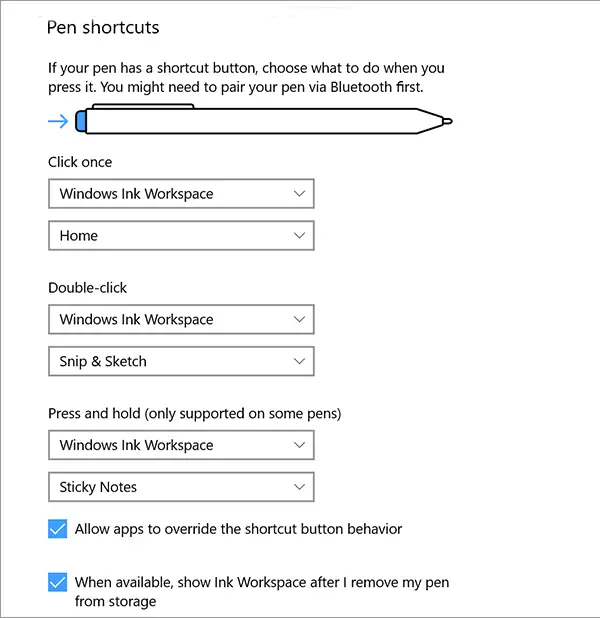
How to change what the Pen button does in Windows 11?
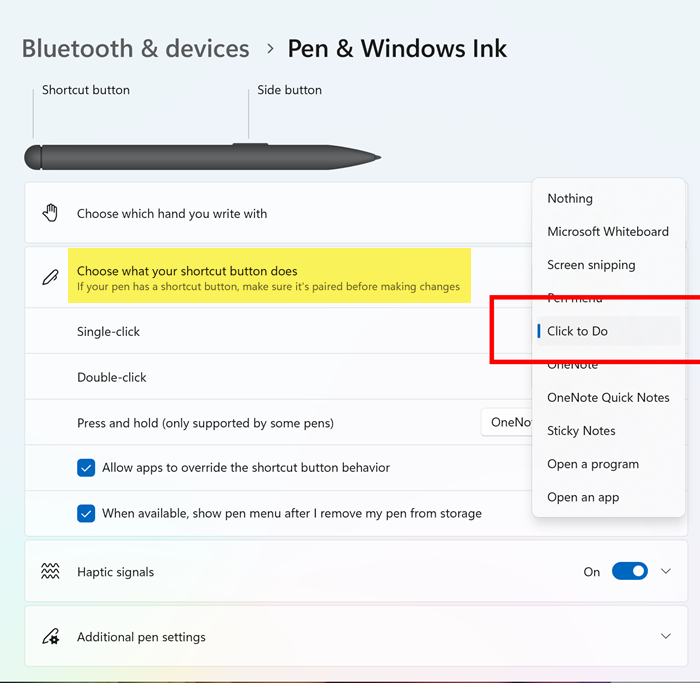
Open Windows Settings > Bluetooth & devices > Pen & Windows Ink > On the right side click on the Choose what your shortcut button does to expand it. Here you can configure what the shortcut button does:
- Single-click – Select what actions to perform on a single click.
- Double-click – Select what actions to perform on a double-click.
- Press and hold – Select what actions to perform when pressed and held.
Enable Windows Ink Workspace
The Windows Ink Experience is similar to the app drawer or Start menu, which gathers all the applications you can use with the help of a stylus or digital Pen. To access Windows Experience, you need to enable Windows Ink Workspace.
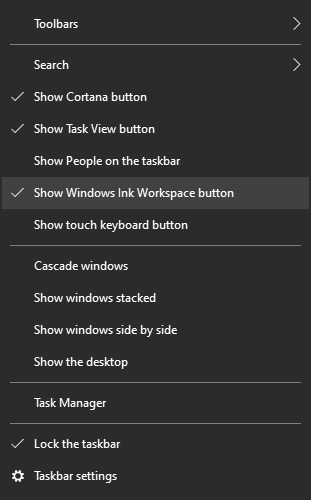
- Right-click on the taskbar.
- Click on the Windows Ink Workspace button.
- A new button should appear on the right end of the taskbar.
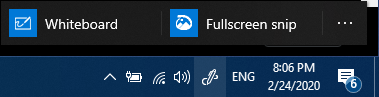
The workspace used to include applications like Sticky notes, Sketchpad, Screensketch, and recent applications.
But with an update to Windows 10, it has changed. Right now you get two options which include Windows Whiteboard and Fullscreen snip.
You may have figured out that these applications in Windows Ink Workspace are the ones that can work with a Pen and can do wonders.
If you have a Surface device then you may have already understood the wonders I’m talking about.
So, how do you benefit from using Windows Ink? First, it helps you put your “ideas in motion”. Have a thought? Write it straight away on a sticky note or draw it effortlessly on the sketchpad! This will require nothing more than a simple click of your digital pen. How would you feel if you wrote a flight number on a sticky note and automatically obtained all details regarding the route, timings, etc. of the flight? By clicking on “Enable Insights”, you can integrate the sticky notes with Cortana and other apps.
Here’s how to use Windows Ink to enhance your user experience:
- Go to the taskbar in the lower-right part of your screen and select the Windows Ink Workspace or click the back of your pen. In case you don’t see the Windows Ink icon, you can right-click anywhere in your taskbar and then select Show Windows Ink Workspace button.
- That’s it! You are ready now to start drawing, editing documents, and writing sticky notes. There are no worries for those of you who do not have a pen; you can conveniently use your mouse or finger to get started!
The Windows Ink Workspace even allows you to customize your pen’s settings by going to Start> Settings > Devices > Pen & Windows link. This enables you to exert greater control over how your pen functions. You can also assign programs to certain button presses so that the set program gets opened when you press those buttons. All you have to do is to simply set up pen shortcuts by clicking the eraser button on top of the pen. Of course, if you do not use it, you can always disable Windows Ink Workspace.
Let us know about your experience of using Pen with your Windows device.
How do I calibrate my Surface Pen Windows 11?
Sometimes, your Pen does not work properly on your Surface device. A corrupted driver can cause this. Additionally, calibrating the Pen can also be helpful. To calibrate your Surface Pen on Windows 11, search Calibrate and then tap on Settings. Now, verify that the monitor displayed on the screen matches the one you want to calibrate. After that, follow the on-screen instructions to calibrate your Pen.
Read: How to show the Pen Menu Taskbar Icon on Windows 11.
How do I get the Pen menu on Windows 11?
You can easily bring the Pen menu on your screen on Windows 11. If you have a Pen, tap it on the screen. After that, the Pen menu will appear at the corner of the Taskbar.