We took a look at how to use Windows Ink Workspace. This new feature in Windows 11/10 helps deliver a more personal Pen experience. Windows Ink empowers you to get more from your touch device, such as a Laptop or a Surface. As a central depot for the new features like Screen Sketch, Sketchpad, and a revamped Sticky Notes, Windows Ink stands out from the conventional pen experience. Several developers are signing up for this to build pen-friendly apps, and we can expect expertise to improve shortly.
However, if you are not much into drawing or do not own a touch device like Surface Book and Surface Pro, this guide will walk you through the steps to completely disable Windows Ink Workspace on your Windows 11/10 PC.
Disable Windows Ink Workspace
While there may be several ways to disable Windows Ink Workspace, we’re going to list those using the Local Group Policy Editor and Registry Editor.
Turn off Windows Ink Workspace using Group Policy Editor.
1. Hit Windows Key + R on your keyboard to launch the Run prompt. Type gpedit.msc and hit Enter to open the Group Policy Editor.
2. Next, navigate to the following path on the left side pane of the GPO window.
Computer Configuration > Administrative Templates > Windows Components > Windows Ink Workspace

3. Now, in the right-side pane, double-click Allow Windows Ink Workspace to open its properties.
4. Up next, in the properties window for the selected policy, select Enabled from the available options. Afterward, choose Disabled from the drop-down menu under the Options section. Refer to the below image for more details.
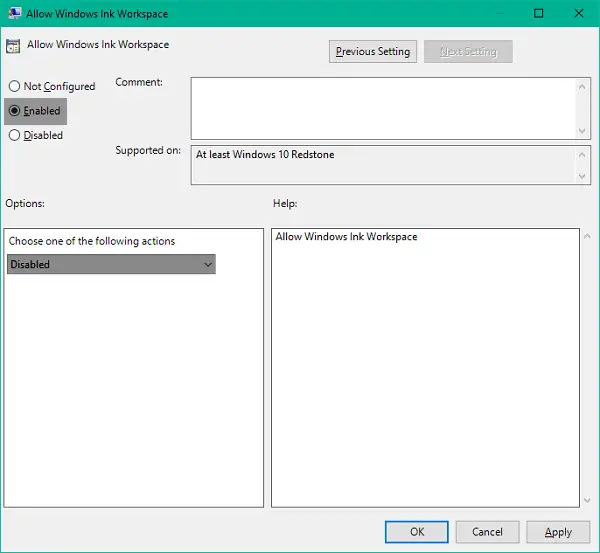
Incidentally, you will also see an option OK but disallow access above lock here.

5. Click OK and then Apply. Restart your PC to make the changes effective. Once logged back in, you’ll notice that Windows Ink Workspace has been disabled, and you can no longer access it through the taskbar.
However, if you are using Windows 11/10 Home as your primary OS, you will not be having access to Local Group Policy Editor. Under such circumstances, Registry Editor comes into play. You can install it by using this method.
Disable Windows Ink Workspace using Registry Editor
1. Create a system restore point first, and then press Windows Key + R on your keyboard to launch the Run prompt. Type regedit.exe and hit Enter to open Registry Editor.
2. Navigate to the below path on the left side pane of Registry Editor.
HKEY_LOCAL_MACHINE\SOFTWARE\Policies\Microsoft
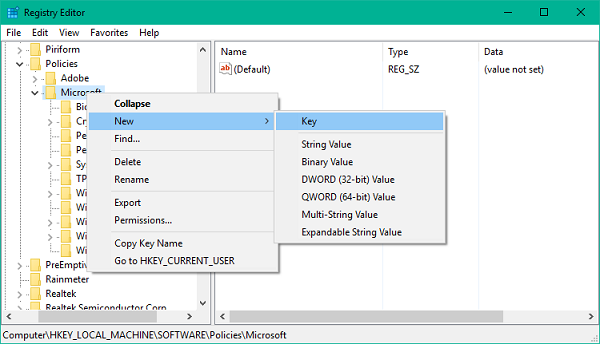
3. You’ll need to create a new key for Windows Ink Workspace here if you cannot see it there. Right-click the Microsoft key and select New>Key.
4. Name the Key as WindowsInkWorkspace and hit Enter.
5. Now, select the WindowsInkWorkspace key and right-click anywhere inside the right-side pane of Registry Editor. Select New > DWORD (32-bit) Value. Name it as AllowWindowsInkWorkspace and hit Enter.
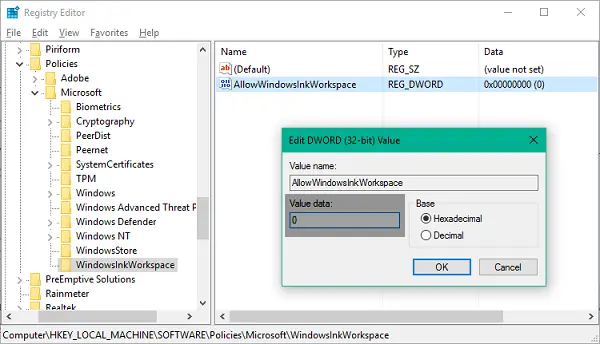
6. Double-click and open the key AllowWindowsInkWorkspace and set its value as 0. Click OK and close the Registry Editor. Restart your computer to make the changes effective. Once signed back in, you should see Windows Ink Workspace disabled.
If you want to use a .reg file content, copy-paste the following into Notepad, save it as “disableinkspace.reg” or any other name, and then clickon it to run it:
Windows Registry Editor Version 5.00

[HKEY_LOCAL_MACHINE\SOFTWARE\Policies\Microsoft\WindowsInkWorkspace]
"AllowWindowsInkWorkspace"=dword:00000000

[HKEY_LOCAL_MACHINE\SOFTWARE\Microsoft\TouchPrediction]
"Latency"=dword:00000000
"SampleTime"=dword:00000000
Restart your computer to apply the changes. Once signed back in, you should see Windows Ink Workspace disabled.
You won’t be able to access Windows Ink and its included features, Sketchpad and Screen Sketch, at this time. However, Sticky Notes remain available as a separate Windows Store app.
What is the use of Windows Ink Workspace?
Windows Ink Workspace is an app for Windows that allows you to use fingers on apps that support pen and handwriting. It helps to improve using pa en on Sticky Notes, Sketchpad, and Screen Sketch. You can capture screens or windows, pin custom apps, take screenshots or lock your device.
How to turn on Windows Ink in Windows 11?
To enable Windows Ink in Windows 11, open Windows Settings > Personalization > Taskbar > Enable Pen Menu. As mentioned in this post, you can also create a Registry key AllowWindowsInkWorkspace and give it a value of 1 or enable the Allow Windows Ink Workspace Group Policy setting.