The 5.1 Surround audio in Windows allows the computer to fire the audio from front left, front right, center, rear left, rear right, and a subwoofer simultaneously. Even though this enhances the audio experience in certain situations, it can’t be used all the time. Therefore, users have to switch to 5.1 Surround only when needed. However, we have noticed that Windows 11 keeps changing audio to 5.1 Surround after a restart. Additionally, other users experience Windows switching 5.1 Surround to Stereo after a restart. In this post, we are going to talk about this issue and see how it can be resolved.

Fix Windows 11 keeps changing audio to 5.1 Surround after restart and vice versa
If Windows 11 keeps changing audio to 5.1 Surround after a restart or vice versa, you need to follow the steps mentioned below to resolve this issue.
- Test the speakers
- Make sure that the speaker is enabled and set as the default audio device
- Make registry changes
- Use Audio Troubleshooter
- Reinstall Drivers
- Manually switch among audio channels
Let us talk about them in detail.
1] Test the speakers
First of all, we need to get one thing out of the equation: the speakers. You need to plug your speaker into a different computer and check if the issue persists. If the other computer follows the same trend of switching the audio devices, we can say that the speaker or its drivers are at fault here. You can go to the official website of your speaker and download the driver. Hopefully, updating drivers will do the trick. If this attempt is to no avail, you need to contact the manufacturer and ask them for a solution.
2] Make sure that the speaker is enabled and set as the default audio device
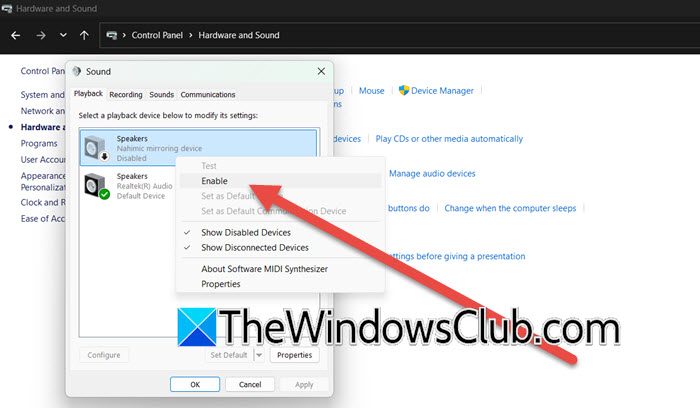
Next up, we need to check and ensure that the speaker is marked as the default audio device and is not disabled. To do so, you need to follow the steps mentioned below.
- Open Control Panel by searching for it in the Start Menu.
- Now, you need to click on Hardware and Sound > Sound.
- Right-click on the disabled speaker and click on Enable.
- Then, right-click again and select Set as Default Device.
- Click on Apply > Ok.
Finally, check if the issue is resolved.
Also, if you see Monitor as your output device, you should take a note of it, and disable it.
3] Make registry changes
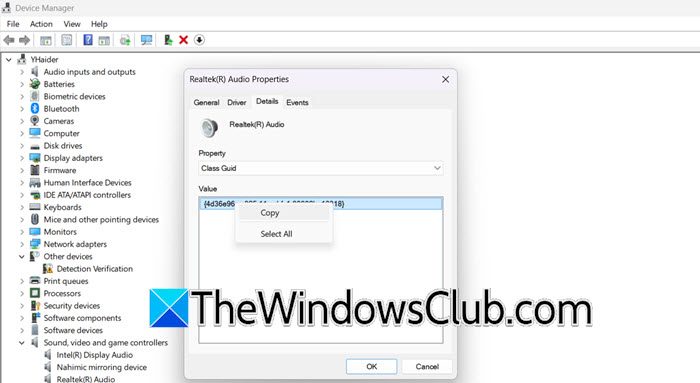
Since your audio channel changes automatically, we can presume that it has something to do with the registry, as it contains setting information. However, before making any changes, you need to back up the registry. Once done, we need to fetch the GUID of your audio device. To do so, follow the steps mentioned below.
- Open the Device Manager.
- Expand Sound, video, and game controllers.
- Right-click on your audio device and select Properties.
- Go to Details, set the Property to Class GUID, and then copy the Value.
Once you have copied the GUID, open the Registry Editor from the Start Menu. Then, paste the following string.

Computer\HKEY_LOCAL_MACHINE\SYSTEM\CurrentControlSet\Control\Class\<Copied-GUID>\0000\PowerSettings
In my case, it was:
Computer\HKEY_LOCAL_MACHINE\SYSTEM\CurrentControlSet\Control\Class\{4d36e96c-e325-11ce-bfc1-08002be10318}\0000\PowerSettings
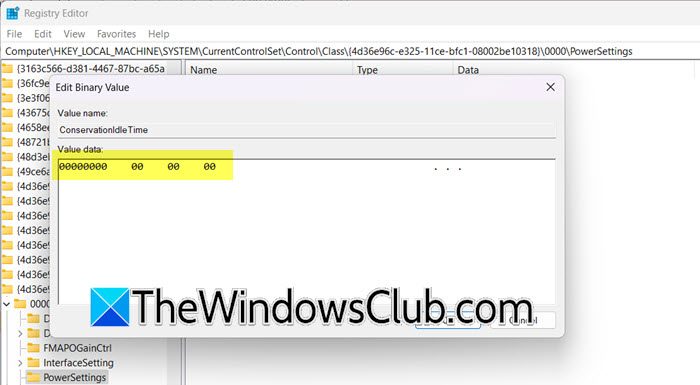
Now, you will see the following keys.
- ConservationIdleTime
- IdlePowerState
- PerformanceIdleTime
Double-click on the key and set its value to 000…. using the Delete key.
Finally, check if the issue is resolved.
4] Use Audio Troubleshooter
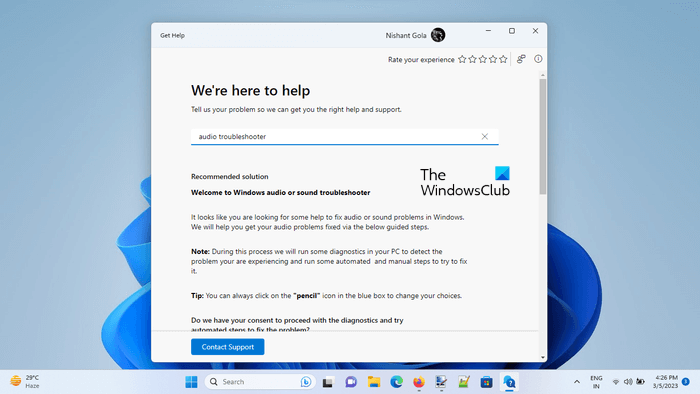
If you are not able to access Stereo or 5.1 Surround Sound, you should try using the Audio Troubleshooter. Since Microsoft is going to remove the MSDT (Microsoft Support Diagnostic Tool) troubleshooter, we have a better option. You can run Audio Troubleshooter in the Get Help app. It will detect if there is any problem with your settings and give you the result. You can even search for your problems in the search bar and get potential solutions.
5] Reinstall Drivers
If the issue persists, your next solution should be to reinstall the audio drivers. We need to uninstall the driver from the Device Manager and then install a fresh version of that from the manufacturer’s website.
6] Manually switch among the audio channels
If all else fails, we have to resort to manually switching between the Audio Channels. To do so, you need to follow the steps mentioned below.
- In the Control Panel, go to Hardware and Sound > Sound.
- Now, select the Audio device and click on Configure.
- You can now select the preferred audio channel.
You need to wait for Microsoft to release an update that will resolve this issue.
Hopefully, our issue will be resolved using the solutions mentioned earlier.
Read: Stop Windows from changing Audio device
How do I fix the audio glitch in Windows 11?
You can fix audio glitches in Windows 11 by updating your sound drivers, running the built-in audio troubleshooter, and disabling sound enhancements. Sometimes, restarting the Windows Audio service or checking your output device settings can help. If the issue persists, reinstalling the audio driver or adjusting sound properties may resolve it.
Read: Fix Channel Surround Sound not working in Windows 11
How do I turn off 5.1 on Windows 11?
To turn off 5.1 Audio, you need to navigate Settings > System > Sound. Now, select your audio device under Output, scroll down to Spatial sound. Click the drop-down menu, and then choose Off to disable 5.1 surround sound and switch to stereo.
Also Read: Play 5.1 audio in VLC on PC.