You turn on your Windows 11 PC and everything works fine, but you notice the operating system is running from the D: drive instead of the usual C: drive. This odd letter swap can confuse file paths, break software installations, and make drive management messy. In this post, we will see what to do if Windows is booting from D drive instead of C.

Windows normally assigns the letter C: to the primary boot partition. You see Windows booting from D: because another drive or partition already occupies the C: letter when the system starts. This often occurs after cloning a hard drive, installing a second Windows copy on a different disk, or incorrectly changing drive letters. A hidden system, a reserved partition, or an external USB drive with an active boot loader can also steal the C: letter. The boot configuration database (BCD) may point to the Windows installation on D:, while some legacy boot files still reside on what should be C:.
Windows booting from D drive instead of C drive
If Windows is booting from D instead of C, follow the solutions mentioned below.
- Swap Drive Letters using Registry Editor
- Change Drive Letters via Disk Management
- Rebuild Boot Configuration Database (BCD) and reassign System Drive
- Clean Install Windows 11 with only the Target Drive Connected
Let us talk about them in detail.
1] Swap Drive Letters Using Registry Editor
The registry stores drive letter assignments in the MountedDevices key. By swapping the binary values for C: and D: while booted from recovery media, you force Windows to treat the current D: as the new C: on next boot.
- Boot Windows computer using the Installation Media.
- On the Install now screen, click on Repair your computer > Troubleshoot > Command Prompt.
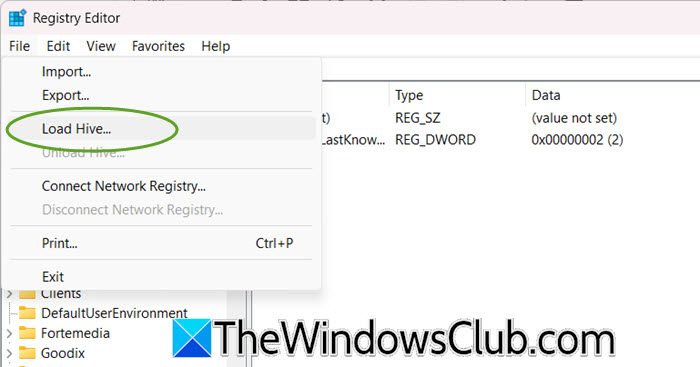
- Type regedit and hit Enter.
- Select HKEY_LOCAL_MACHINE, then click File > Load Hive.
- Navigate to C:\Windows\System32\config (the drive letter may be different in recovery; find your actual Windows partition using diskpart and list volume.
- Open the SYSTEM file, name the key OfflineSystem.
- Go to
HKEY_LOCAL_MACHINE\OfflineSystem\MountedDevices.- Rename \DosDevices\C: to \DosDevices\X: (temporary).
- Rename \DosDevices\D: to \DosDevices\C:.
- Rename \DosDevices\X: to \DosDevices\D:.
- Select the OfflineSystem key, click File > Unload Hive, then close Regedit and restart.
Finally, remove the USB stick and boot into Windows 11.
2] Change Drive Letters via Disk Management
If you have a second bootable Windows or a WinPE environment, you can reassign the drive letters without touching the registry manually. The tool dismounts the volumes, swaps letters, and updates mount points safely.
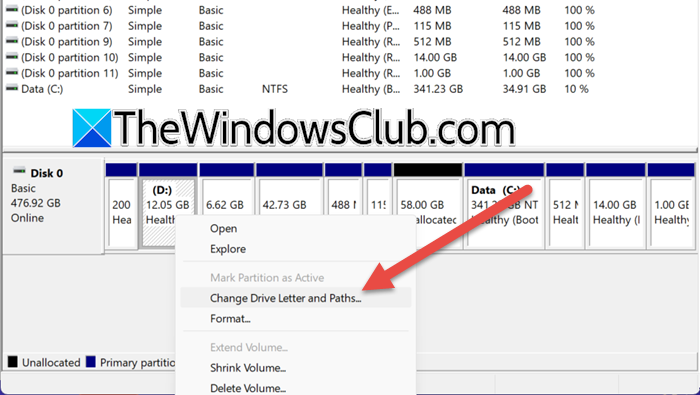
- Boot from a Windows PE drive or another Windows installation on a different disk.
- Right-click Start > Disk Management.
- Right-click the volume currently labeled D: (your actual boot partition) and choose Change Drive Letter and Paths.
- Click Change, select a new letter (e.g., C:). Click OK – if C: is in use, first remove the letter from the partition that currently holds C:.
- Right-click the partition that currently owns C: (likely a small system or data partition) and assign it D: or another free letter.
Restart the PC normally. Your Windows will now boot from C:.
3] Rebuild Boot Configuration Database (BCD) and reassign System Drive
The BCD tells the firmware where to find Windows. Sometimes the boot loader’s osdevice and device parameters point to D:. By recreating the BCD, you reset these entries to the correct partition, and Windows then respects the default letter assignment. Follow the steps mentioned below to do the same.
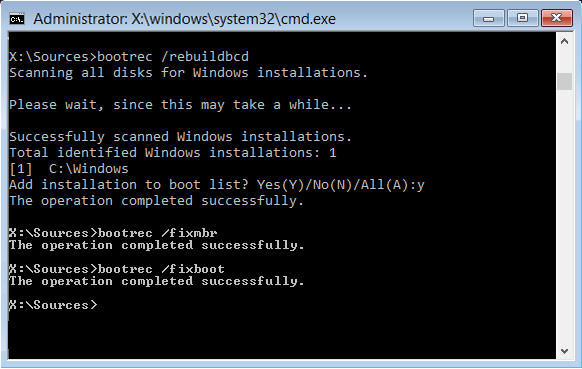
- Boot from Windows 11 installation media, open Command Prompt as shown in Solution 1.
- Run diskpart, then list volume to identify your Windows partition (note its volume letter, e.g., D:).
- Type exit to leave diskpart.
- Run bcdedit /export C:\bcd_backup (use any available drive for backup).
- Run attrib C:\boot\bcd -s -h -r (adjust drive letter to your system reserved partition, often the one marked “System”).
- Run ren C:\boot\bcd bcd.old.
- Run bootrec /rebuildbcd – it will find your Windows installation on D:. Press Y to add it.
- Run bootrec /fixboot and bootrec /fixmbr.
Restart your system. Windows will now boot from the correct partition and usually reassign C: to it.
4] Clean Install Windows 11 with only the Target Drive Connected
Drive letter conflicts almost always arise when multiple disks or old boot partitions are present during installation. By physically disconnecting all other drives, you force the Windows installer to see a single disk, so it creates the boot and system partitions in their default layout with C: as the boot drive. You need to follow the steps mentioned below to do the same.
- Shut down your PC and unplug all hard drives or SSDs except the one where you want Windows on C:.
- Insert a Windows 11 USB installer and boot from it.
- Delete all existing partitions on the drive (if you don’t need data) or select the unallocated space.
- Click Next – Windows automatically creates the required partitions and assigns C: to the main OS volume.
After installation completes, shut down, reconnect your other drives, and boot normally – your system drive is now C:.
Read: Windows computer will not boot up, start or turn on
How to go from C:\ to D:?
Open Command Prompt or PowerShell and type D: then press Enter. That changes your working drive from C to D. To also change the current directory, use cd \ after switching drives. In File Explorer, simply click on This PC and double-click the D: drive. For a direct path, type D:\ in the address bar. This action does not move system files; it only changes your active drive for file operations. Use cd /d D:\folder in Command Prompt to switch drive and folder in one command.
Read: How to add Safe Mode to Boot Menu options in Windows 11
How to adjust drive C partition to drive D?
You cannot directly rename the Windows boot partition from C to D without breaking the operating system. Instead, use Disk Management to shrink the C: partition, creating unallocated space, then extend D: into that space if D follows C physically. If you want data from C moved to D, copy folders manually. For a letter swap, boot from recovery media and edit the registry MountedDevices – but this risks an unbootable system. Safer approach: backup data, delete partitions, then reinstall Windows with the desired layout.
Read: Windows computer won’t boot after enabling Secure Boot.