
It can be frustrating to encounter the Unable to insert the virtual optical disk error in VirtualBox when trying to mount an ISO or install guest additions. The issue is generally due to corrupted media registries, locked disk images, or misconfigured storage controllers, which stop the virtual machine from accessing the optical drive. However, you are in the right place if you are experiencing it. In this article, we explore the reasons and solutions to resolve the error.
Unable to insert the virtual optical disk C:\Program Files\VirtualBox\VBoxGuestAdditional.iso into the machine <machine-name>
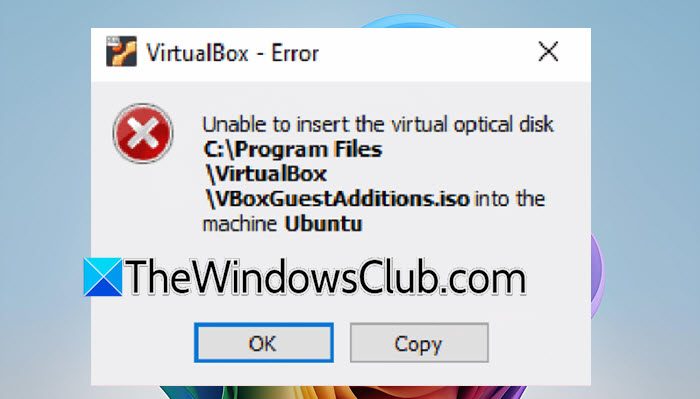
VirtualBox Unable to insert the virtual optical disk
If you are unable to mount an ISO file or a physical host drive as a virtual optical disk in a VirtualBox virtual machine, execute the solutions mentioned below.
- Remove/eject the existing mounted ISO from VirtualBox and the Windows host
- Power off the VM and discard the saved state
- Recreate or move the optical drive/controller
- Release media from Virtual Media Manager
- Use VBoxManage CLI attach command
- Copy ISO locally to the internal drive
- Antivirius exclusion
Let’s get started with the troubleshooting guide.
1] Remove/eject the existing mounted ISO from VirtualBox and the Windows host
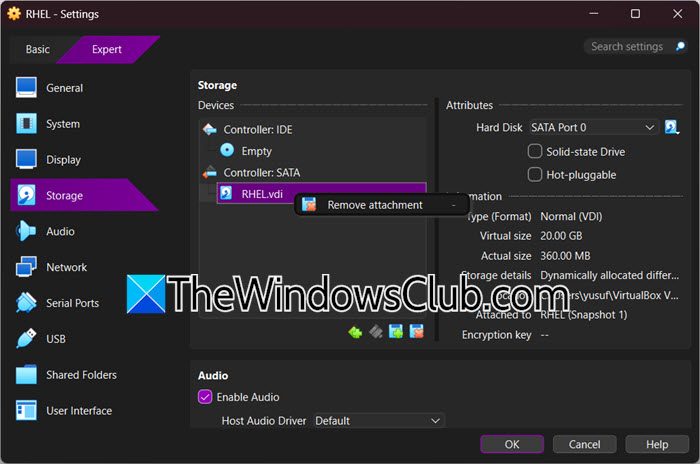
VirtualBox and Windows can place a temporary hold on the ISO file to prevent it from being modified, deleted, or moved while it is in use. VirtualBox does it through the storage controller, while Windows mounts it as a virtual drive after double-clicking. To force the ISO to become free for a clean reattachment, we need to eject it from both places. Moreover, VirtualBox cannot access a file that Windows has opened with exclusive read rights.
- Launch VirtualBox, select the VM, and go to Settings, then click on Storage.
- Right-click on the optical drive, and select the Remove Attachment icon.
- Close the settings window, and then go to the Windows File Explorer and locate the ISO file.
- Right-click on the ISO and select the Eject option. If it is not visible, then it was not mounted by Windows. Once done, reopen VirtualBox, go back to Storage, and reattach the ISO via Choose a disk file.
Now, start the VM and see if the ISO loads correctly. If not, see the next solution.
2] Power off the VM and discard the saved state
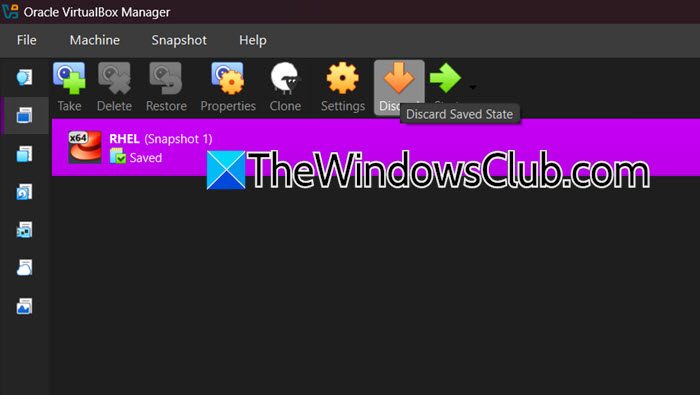
VirtualBox preserves the exact state of the virtual optical drive when a VM is saved with a saved state. To fix this, one needs to power off completely and discard the saved state so that a cold start forces VirtualBox to reset the VM’s entire virtual hardware, break any stale references to the ISO, and reevaluate all media attachments from scratch.
In the VirtualBox main window, right-click the VM and see if it shows as Saved. Click on the Discard Saved State option or Power Off, then discard when prompted, and wait for the VM to show the Powered Off disclaimer.
Once done, restart the VM normally. In the running VM window, look for the optical disk icon on the status bar (bottom right), right‑click it, and select Choose a disk file. Alternatively, if the “Devices” menu is visible, click Devices > Optical Drives > Choose a disk file. Then select the ISO.
Check whether the VM successfully reads the disk. If the issue persists, see the next solution.
3] Recreate or move the optical drive/controller
A corrupted or mis-mapped storage controller entry can cause VirtualBox to fail when inserting an optical disk. It is recommended to remove the optical drive and re-add it to rebuild the virtual hardware binding to bypass any broken configuration. This gives the VM a fresh, enumerated optical drive.
- Properly shut down the VM, then open Settings, and go to Storage.
- Select the optical drive under the current controller, and click the minus sign to remove it.
- Next, click the Add Optical Drive (plus sign), and choose the Add New Optical Drive option.
- If available, attach it to a different controller, and then select the ISO file and click OK.
Save the new optical device with the ISO attached, then start the VM and test whether the error is resolved.
4] Release media from Virtual Media Manager
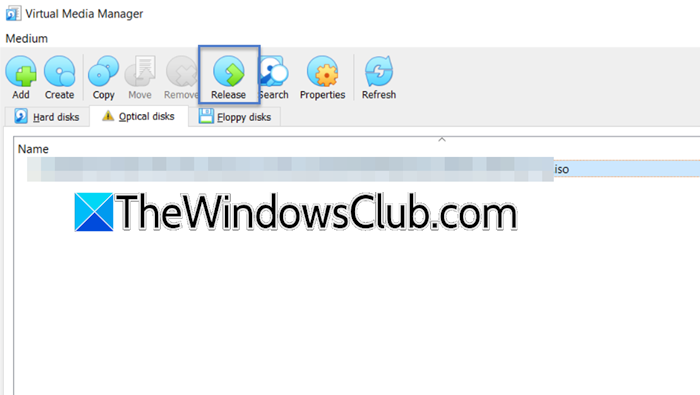
VirtualBox maintains an integral registry of all ISO files, so even if an ISO is removed from a VM, the registry may still mark the file as inaccessible or attached to a running VM. This blocks any new registry entries. Releasing the media from the Virtual Media Manager helps clean the entries and resolve the issue by forcing VirtualBox to forget any problematic metadata about the ISO. For that, close and reopen VirtualBox and do not start any VM. Go to File, and click on Virtual Media Manager or simply press Ctrl+D. In the Optical Disks tab, look for the problematic ISO by looking for a yellow triangle or Inaccessible next to it, and select it. Click the Release button, and then close the Virtual Media Manager, and reattach the ISO to the VM via Storage settings. After doing the process, check if the issue is resolved. If it stays the same, see the next solution.
5] Use VBoxManage CLI attach command
The VirtualBox graphical interface can sometimes add extra validation steps or hold onto file handles longer than necessary. The command-line tool VBoxManage performs a more direct, low-level attachment that bypasses GUI-related locks and caching.
- Close VirtualBox, and open the Command Prompt with administrative rights.
- To navigate to the VirtualBox installation folder, execute the following command:
cd "C:\Program Files\Oracle\VirtualBox"
- First, eject any existing media from the optical drive:
VBoxManage storageattach "YourVMName" --storagectl "SATA" --port 0 --device 0 --type dvddrive --medium emptydrive
Note: Replace SATA, port 0, device 0 with the actual controller details that can be found in Storage settings.
- Next, execute the following command to immediately attach the ISO:
VBoxManage storageattach "YourVMName" --storagectl "SATA" --port 0 --device 0 --type dvddrive --medium "C:\full\path\to\your.iso"
Once done, start the VM normally, and check. Glide to the next solution if the issue persists.
6] Copy ISO locally to the internal drive
Windows applies different locking and caching policies to files on network shares, external USB drives, or cloud-synced folders. VirtualBox may therefore be denied exclusive read access if an ISO resides in such a location. Thus, copying the ISO to a local internal drive resolves the issue by eliminating external factors because the local NTFS file system allows VirtualBox to obtain a stable, exclusive file handle. To do that, follow the steps mentioned below.
- Locate the ISO file on the external or network drive, copy it, and paste it into a new folder on the internal drive.
- Eject any previously attached ISO from the VM as mentioned above, and then go to the VirtualBox Storage settings.
- Attach the newly copied local ISO, and start the VM.
Verify that the optical disk is detected. Hopefully, the issue will be resolved.
Read: Unable to ping Virtual Machine from Host – VMware or VirtualBox
How to add an optical drive in VirtualBox?
To add an optical drive in VirtualBox, go to the VM’s Settings, Storage, and click on the Add Optical Drive icon under the Storage Devices list. In the pop-up, select the Choose disk option, browse to the ISO file, and click Ok to save and attach the drive.
Read: How to reset a Virtual Machine in VirtualBox.
How to add a virtual disk in VirtualBox?
To add a virtual disk, launch VirtualBox, go to Settings, and then select Storage. There, select the desired controller, then click the Add Hard Disk icon, and choose the Create New disk or Use existing disk option. Lastly, follow the wizard to set type, size, and location, and then click OK.
Also Read: VirtualBox VM is not opening or starting in Windows.
