
Wi-Fi Network Adapter is an electronic hardware device used in computers and laptops to connect the nearby local area network LAN to the system. It generates important commands required by the computer to communicate to the wireless internet device. The main function is performed by the antenna to transmit the radio wave to the Wi-fi connected to the computer. We have seen how to view Wi-Fi Network Driver information, now let us see view the Wi-Fi network adapter settings on Windows 11/10.
Check Network Adapter settings on Windows 11
Many essential functions of the Wi-Fi network adapter can be managed through the Settings application, but a rooted analysis requires a few more clicks. The methods below will guide you in viewing Wi-Fi network adapter settings on Windows 11/10.
1] Using Windows Settings
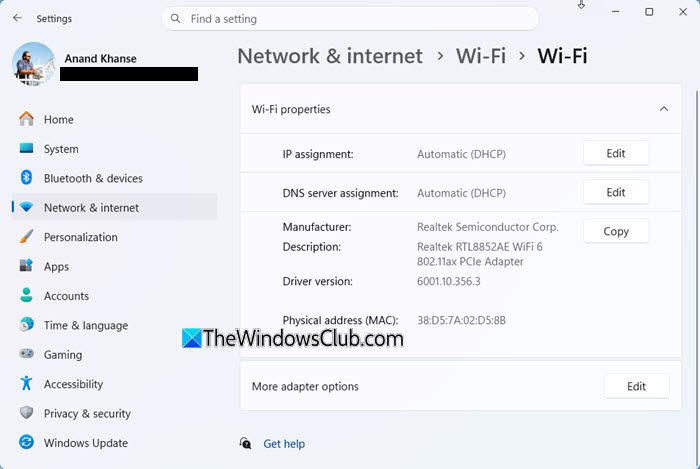
Open Windows Settings > Network & Internet > Wi‑Fi > Hardware properties. Here, you’ll see details like:
- Adapter name
- MAC address
- Link speed
- DNS servers
- Driver version
You can also edit them here.
2] Using Command Prompt
The Network Adapter settings can be accessed via the computer’s command prompt. Therefore, you first need to open an elevated Command Prompt and run the associated command.
To do so, right-click on Start and select the Run dialog box from the menu list. Then type cmd in the text box and press Ctrl+Shift+Enter.
If User Account Control (UAC) prompts you for permission, click the Yes button to continue.
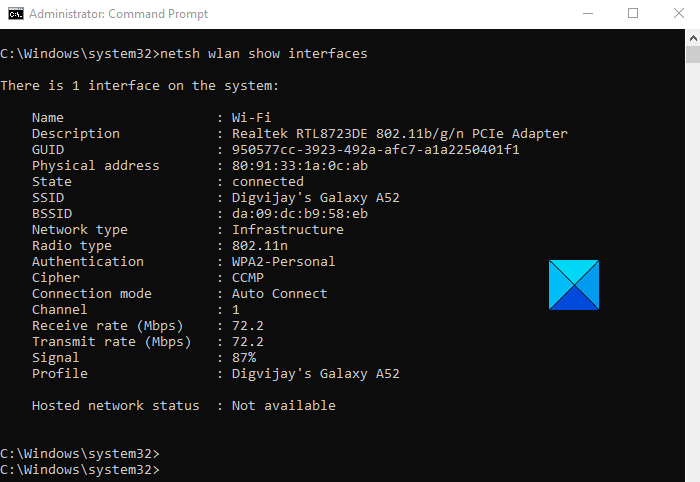
Now type the following command and press Enter to view Wi-Fi network adapter settings.
netsh wlan show interfaces
Running the command above will display the Wi-Fi network adapter settings on your screen. However, if you want to access the settings of a specific profile, you can do so by running a simple command.
To do so, type the command below and press Enter:
netsh wlan show interface name="WLAN-INTERFACE-NAME"
In the command above, replace WLAN INTERFACE NAME with the name of the specific profile the user needs to view. The most commonly used adapter is the Wi-Fi network adapter; in that case, the WLAN interface name will be “Wi-Fi”.
After completing the steps, you will be able to view the unique SSID, signal strength, name & attributes, radio signal, the wireless adapter’s address, and the transmission rate.
3] Using Device Manager
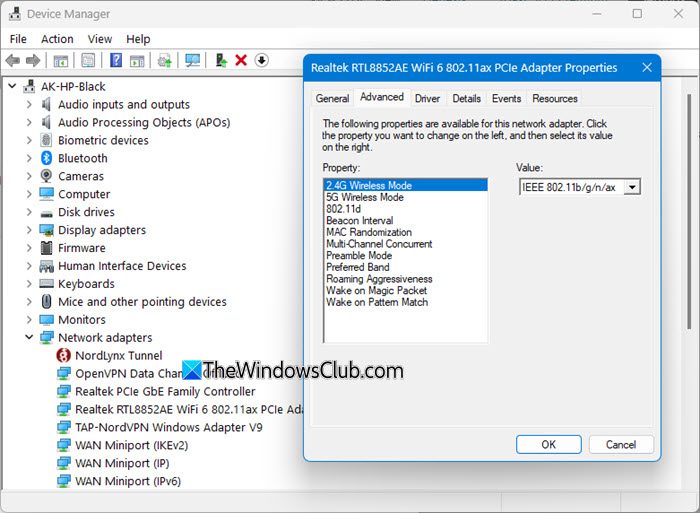
Open Device Manager and expand Network adapters.
Right‑click your Wi‑Fi adapter and choose Properties.
Under the Advanced tab, you can change the following:
- Roaming Aggressiveness
- Transmit Power
- Preferred Band
- Channel Width.
4] Using Network Connections
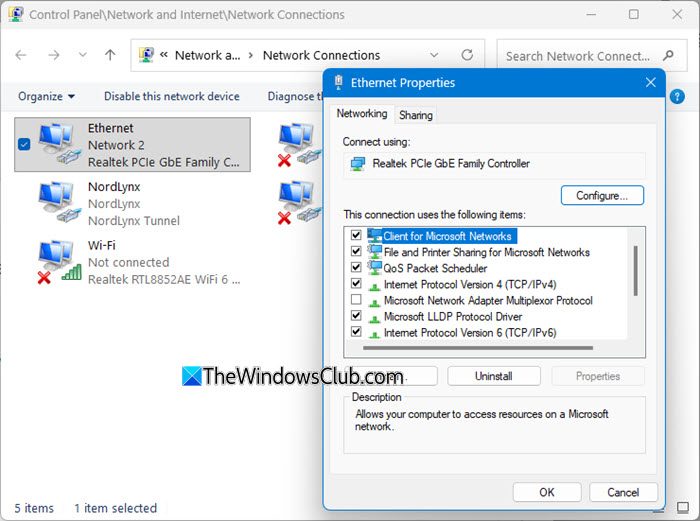
Type ncpa.cpl in the Start Search box and press Enter.
This opens the Network Connections window.
Right‑click your Wi‑Fi adapter (for example, Wi‑Fi 6 AX200) and choose Properties.
You can view or configure:
- IPv4/IPv6 settings
- Client for Microsoft Networks
- QoS Packet Scheduler
- File and Printer Sharing
That’s all.
These details are enough to manage all the functions of one or more adapters attached to your operating system.
Hope it helps!
Related:
