Windows 11/10 has an incredible feature that lets users create a WiFi history, which makes access to their regular WiFi connections simpler. It’s a built-in feature that lets you create history by using the network name, duration of the sessions, timings, etc. With this feature, you will also need to know about the details of the usage, and you will want to keep tabs on the devices used and how many times it was used, and where it was connected.
Windows 11/10 provides details of its hardware and software functions and also helps in managing the wireless connections of the system. The Wi-Fi Network Adapter Report is one of the Windows 11/10 operating system features that provide step-by-step detailed information about the functioning of the wireless device connected to the computer. One of the most common wireless networks used in our systems is Wi-Fi, therefore today we will elaborate on the process of creating a Wi-Fi network adapter report on Windows 11/10.
A network adapter report is useful in many cases like troubleshooting by determining errors, duration of sessions, and output from of the commands given in the command prompt. The report also provides details regarding network adapters used for wireless processing by the computer system. In this article, we will see how to create a Wi-Fi network adapter report on Windows 10. So, moving on to the next section, let’s take a look at it.
Create a WLAN Report or Wi-Fi Network Adapter Report in Windows 11/10
Network adapter reports are commonly used for correcting errors in internet connectivity. It helps the user in determining the errors occurred in the system due to which the adapter is unable to send a command to connect to the internet. The error sometimes may also be occurred due to wrong input in the command prompt window which may corrupt the function adapter. In this scenario, you may want to troubleshoot the wireless network issue to an access point.
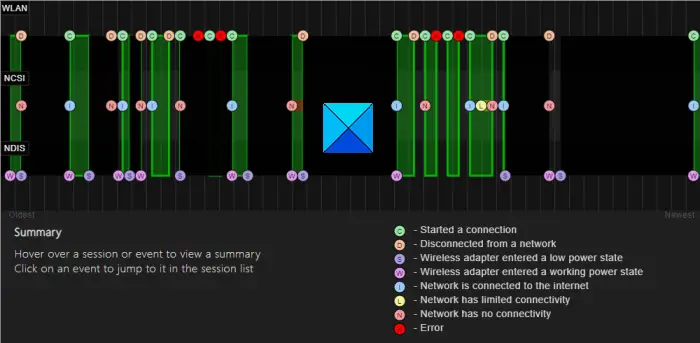
To create a WiFi History Report in Windows 11/0, you need to run a command-line tool. This tool will then save the report as an HTML file on your Windows 10. The HTML will consist of the connectivity history for the last three days. For that, you will need, the name of the network with which the PC was connected, the time when the session in question began, the time when it ended, the duration of the session, and any record of errors that might have occurred. The main feature of this report is the WiFi summary chart, which shows the WiFi connection session, though it isn’t limited to the same. The report presents almost every single detail that you might need for analyzing your system’s network performance.
Follow these steps to create a Wi-Fi network adapter or WLAN Report with detailed information:
- Open an elevated Command Prompt.
- Type the following –
netsh wlan show wlanreport - Press Enter to create a Wireless adapter report.
- Now, visit the \WlanReport\ folder
- Open the wlan-report-latest.html file.
That’s it. However, if you want to learn the above steps in detail, here they are.
You can access the Network adapter reports by running a simple command line in the command prompt of the computer system. Therefore, you first need to open an elevated Command Prompt and run the associated command line. Let’s take a look at the detailed description of the process involved in the above methods!
To get it started, press the Windows+R keyboard shortcut to open the Run dialog box, you can also open it using the WinX menu. Once it opens, type cmd in the input field and press Ctrl+Shift+Enter keys to run the command prompt with admin privileges.
If User Account Control (UAC) prompts on the screen and asks for your permission then click on the Yes button to continue.
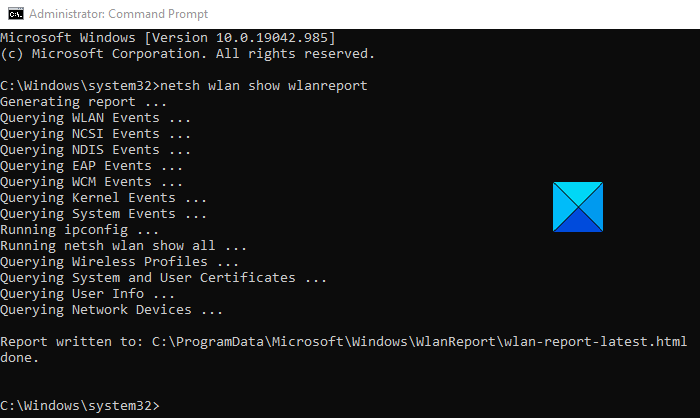
Once the command prompt window appears on your screen, type the below command and press Enter to create a wireless adapter report:
netsh wlan show wlanreport

Now, to view the created wireless adapter report, type the below command and again hit Enter:
C:\ProgramData\Microsoft\Windows\WlanReport\wlan-report-latest.html

The ProgramData folder is a hidden folder, and if you want to access it, you will have to click on the ‘View’ tab and click to tick mark on “Hidden items“.
Clicking on the HTML report file will make it open in your browser.
Once the action is completed, the report will open with the default web browser, showing all the details like the status of connectivity, time of connection, an error occurred, details about the network adapters, and the session success & failure status. It will be a very detailed report and a graph to help the user reach every point of Wi-Fi functioning. Thus you can create a Wi-Fi network adapter report on your Windows device.
You can now see the connectivity details of your WiFi usage. The red circle indicates an error. Selecting it gives you more info about the error. It is an interactive report and moving the mouse cursor will give you more information about the item.
The main feature of this report is the WiFi summary chart, which shows the Wifi connection sessions. Apart from that, you can see the User information, details of the Network Adapters, Script Outputs, Session Durations, Wireless Sessions, and more.
TIP: If netsh wlan show wlan report fails with an error 0x3A98, 0x2 or 0x5, you could try and refresh your Modem and see if that helps.
Related:
Hi, thank you for this information. Is it possible to get a report older than 3 days ?