
Meta Muse comes with an in-built browser that not only helps you browse the internet but also uses the same browser to perform all browsing-related tasks. On the other hand, Meta Muse comes with several “Connectors”, or apps you can connect so it can fetch data and act as a better agent for you. Here is how you can use the Meta Muse browser and Connectors on your Windows PCs.
What does Meta Muse Browser do?
Meta Muse Browser helps Meta Muse to access websites, compare listings, and give you a list when needed. In Copilot, ChatGPT, etc., they use an external browser like Microsoft Edge, Google Chrome, etc., to open a third-party link. However, Meta Muse does all those things within the same window instead of opening a third-party browser.
That said, let’s say you want Meta Muse to open the Amazon website, find the best study lamps within a particular budget, compare features, and find the best deal.
Meta Muse will do all of that in the same browser window, using its built-in browser.
The advantage of having a built-in browser is that you don’t have to rely on Chrome or Edge entirely. Also, if you have some extensions installed on your browser, you can bypass those restrictions.
How to use Meta Muse Browser in Windows 11?
Unlike other Connectors, you do not have to install anything or connect anything to use the browser inside Meta Muse. Meta Muse already includes it.
All you need to do is set things up as per your requirements and start using it. First, open the Meta Muse website and click on the hamburger menu visible in the bottom-left corner. Select Settings. Alternatively, you can press Ctrl+Comma.
Then, go to the Connectors tab and switch to the Connected section.
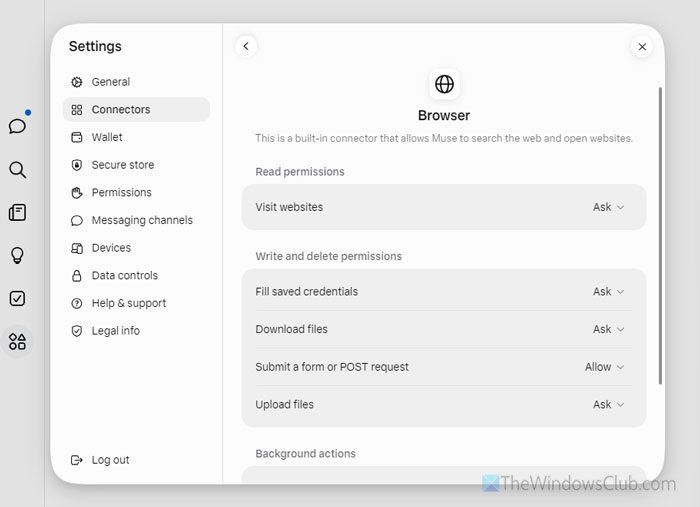
Here you can find Browser. Click on the corresponding View button. Next, you will see these options:
- Visit websites: Set it to Ask so that it asks for your permission to open a website.
- Fill saved credentials
- Download files
- Submit a form or POST request
- Upload files
- Background sync
After setup, open a Meta Muse prompt and ask it to open a website and perform a task. It will show the browser prompt on your screen. As you have selected the Ask option, it will ask for permission to open the website in the browser.
Once the browser window opens, you’ll see an additional section on the right-hand side of your screen. You can find this section in the browser. Even on a Windows 11 computer, the browser interface looks like a Linux browser.
To use your mouse or type something, click on the Take control of the browser option.
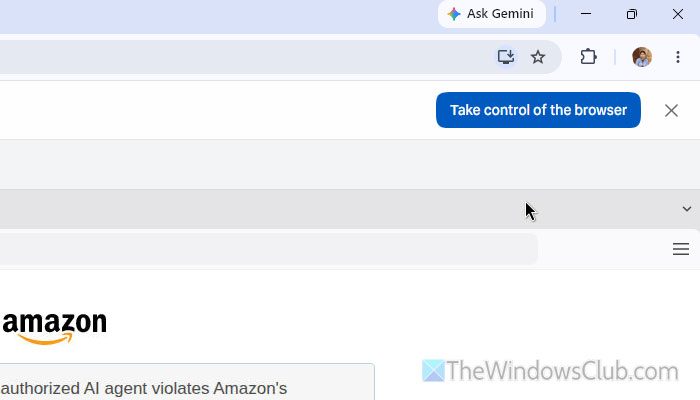
Once the browsing session is done, click on the Done/Stop button. As Meta Muse uses a virtual computer to store the data, it requires additional permission to access the remote browser.
What are Connectors in Meta Muse? What can you do with Connectors?
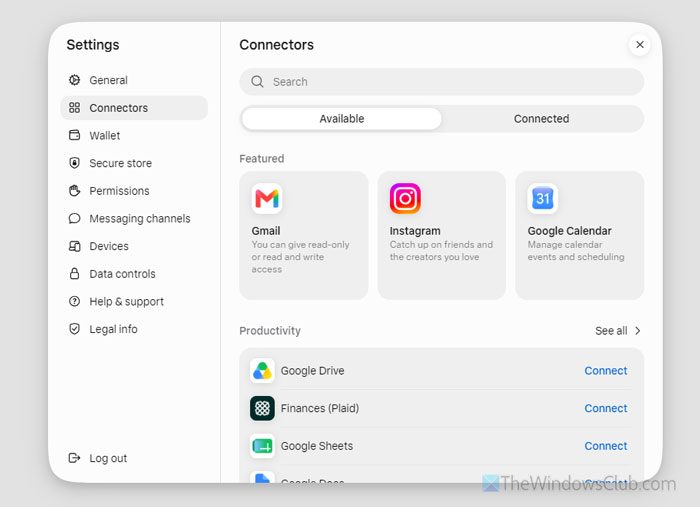
Connectors in Meta Muse are third-party apps such as Facebook, Instagram, WhatsApp, Google Drive, Google Contacts, etc.
As you might already know, Meta Muse can do more than just show you some results fetched from the internet. For example, if can create an entry in Google Calendar, open Facebook and reply someone via comment or message, upload a file to Google Drive, and many more.
However, it can do all those things only when you give it access to your accounts. For example, if you want to let Meta Muse create an entry in Google Calendar, you have to connect this AI to that application or service.
Available Connectors
As of now, these Connectors are available in Meta Muse:
Gmail, Google Drive, Google Calendar, Google Sheets/Docs/Slides, Outlook Mail/Calendar/Contacts, Google Contacts, Google Tasks, Notion, Google Forms, Todoist, Readwise, Runway, Facebook, Messenger, Instagram, Spotify, Healthfix, Peloton, Withings, Function Health, GitHub, Dropbox, Zoom, Canva, etc.
Hopefully, you will find more in the upcoming days.
How to connect Apps or Connectors to Meta Muse AI?
So far, the process is pretty straightforward. Although different apps require different steps to complete the entire process, these three steps are common:
- First, log in to your Meta Muse account and find the Connector.
- Sign in to your Connector’s account.
- Allow Meta Muse to access the Connector account.
If you want more detail, follow these steps.
First, open the Meta Muse account and go to Settings > Connectors. Here you can find all the Connectors or apps. Choose one and click on the Connect button.
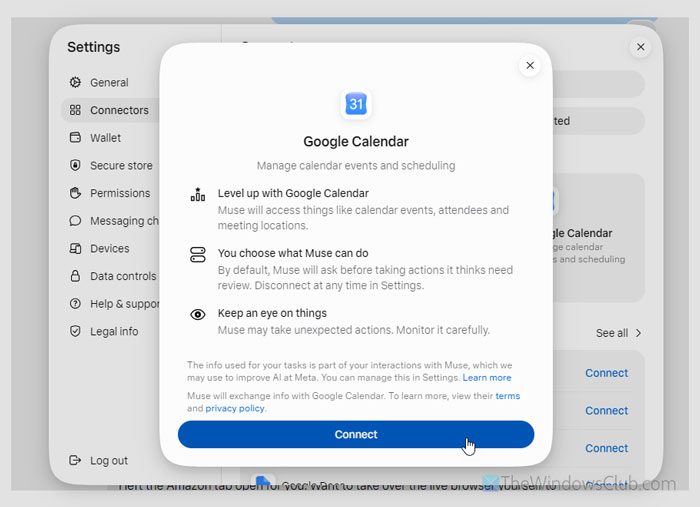
It will redirect you to a prompt where you need to sign in to your Connector account. Following that, it will ask for permission to access your account.
Note: To access all available options, you cannot deny any permission or grant partial access. You must provide full access to Meta Muse.
Once done, you can find the app in the Connected tab.
How to revoke Connector access?
If you no longer want to use a particular Connector, you can revoke access or disconnect it. For that, go to the Connected tab, and click on the View button.
Then, click the Disconnect option twice to confirm.
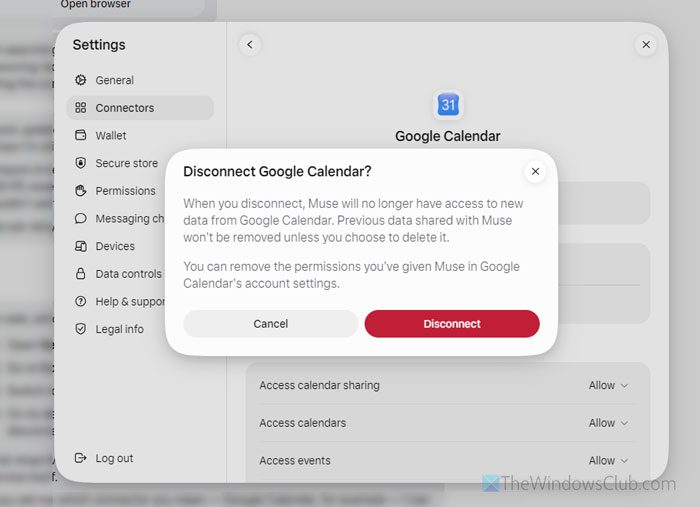
However, if you use a Google service, we suggest using this article to revoke third-party app access.
Is it safe to give permissions?
During testing, we connected multiple apps, such as Google Contacts, Google Calendar, GitHub, Dropbox, etc. So far, we haven’t found any problems. It hasn’t created any unnecessary entries, uploaded files to any cloud storage, or done anything like that.
As long as you use it for personal use, we hope it will be fine. However, since Meta has had some data leak-related cases in the past, we suggest creating a separate environment and accounts just for Meta Muse. If you find it handy and secure, you can deploy it on your primary accounts.
