We noticed a very peculiar issue where even after changing the Boot order in BIOS, we were not able to boot from the other boot device; instead, it defaulted to booting from the Windows Boot Manager. This issue is usually due to firmware limitations, hardware conflicts, or software restrictions. In this post, we are going to see what you can do if you are unable to change the boot order in BIOS in Windows 11/10.

Cannot change boot order in BIOS in Windows 11/10
If you are unable to change the boot order in BIOS, you can follow the solutions mentioned below.
- Disable Fast Startup
- Reset BIOS/UEFI Settings to Defaults
- Check and Configure Secure Boot
- Use the One-Time Boot Menu
- Prevent Windows from rewriting Boot Order via Command Prompt
Let us talk about them in detail.
1] Disable Fast Startup
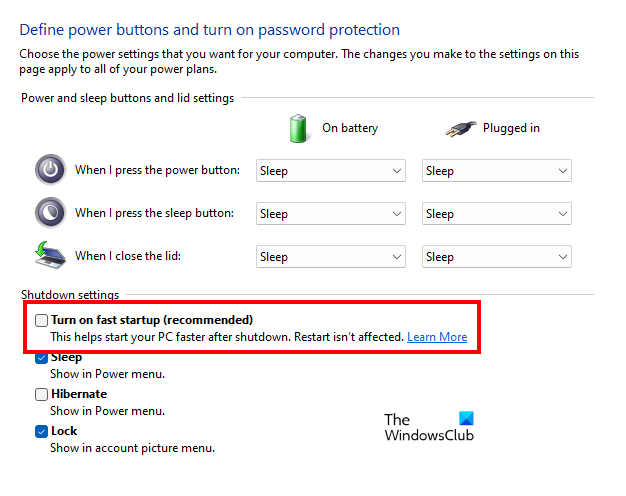
Fast Startup is a hybrid hibernation state that allows Windows to boot faster. However, it can prevent the system from fully shutting down, which can lock BIOS settings and prevent changes to the boot order from being saved correctly. Disabling it forces a complete shutdown, releasing control back to the firmware. To disable Fast Startup, you need to follow the steps mentioned below.
- Open Control Panel.
- Change the View by to Large icons and click on Power Options.
- Click on Choose what the power buttons do.
- Now, click on Change settings that are currently unavailable.
- Disable Turn on fast startup (recommended) and click on Save changes.
Finally, check if the issue is resolved.
2] Reset BIOS/UEFI Settings to Defaults
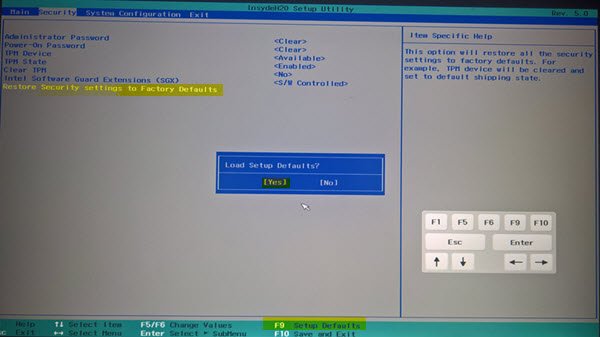
A corrupted or misconfigured BIOS setting, perhaps from a previous failed update or change, can cause the firmware to ignore new boot order commands. Resetting clears all custom settings, including any underlying conflicts, and restores a stable default state. You need to go ahead and reset BIOS/UEFI Settings to the default. Hopefully, this will do the job for you.
3] Check and Configure Secure Boot
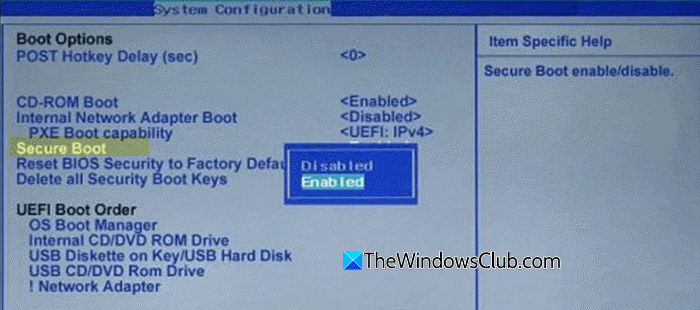
Secure Boot is a security protocol designed to ensure that only trusted and signed software can boot the operating system. Suppose you’re attempting to boot from an older device or one that lacks a proper digital signature (such as a legacy Linux installer). In that case, Secure Boot may prevent the process from occurring, disregarding any changes you made to the boot order. Disabling Secure Boot allows unsigned bootloaders to function properly. You need to follow the steps mentioned below to do the same.
- First of all, boot into BIOS.
- Navigate to the Boot or Security tab.
- Find the Secure Boot option and set it to Disabled.
You may also need to change the Boot Mode from UEFI to CSM (Compatibility Support Module) or Legacy for very old boot devices. However, prefer UEFI mode if your device supports it. Finally, save and exit from the BIOS.
4] Use the One-Time Boot Menu
This isn’t a permanent fix for the boot order, but it’s a critical workaround. The Boot Menu is a separate firmware function that bypasses the saved boot order entirely. It allows you to select which device to boot from just for that one session, which is perfect for installing a new OS or running a live USB without fighting the BIOS.

- Shutdown your system.
- Power it on and immediately press the key to open the Boot Menu. This is often F12, F11, F9, or Esc (the correct key is usually displayed on the manufacturer’s splash screen).
- Use the arrow keys to select your desired boot device (e.g., USB drive, DVD) from the list and press Enter.
Let the computer boot from the selected booting device.
5] Update Your Motherboard’s BIOS/UEFI Firmware

The issue could be a known bug in your current firmware version that affects boot management. Motherboard manufacturers regularly release updates that fix hardware compatibility issues, bugs, and improve system stability. Flashing an updated BIOS can resolve underlying firmware glitches preventing boot order changes. You need to go ahead and update the BIOS firmware. Finally, check if the issue is resolved.
Read: How to change Boot order in Windows 11
6] Prevent Windows from rewriting Boot Order via Command Prompt
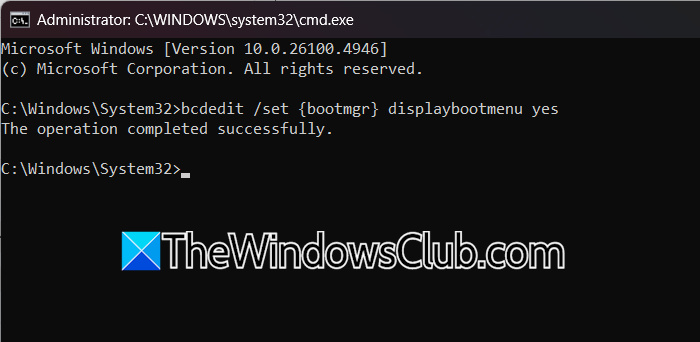
In some dual-boot scenarios, Windows may automatically rewrite the UEFI boot order to prioritize itself during updates or startup, overriding user-configured settings. This occurs due to Windows Boot Manager’s inherent behavior to maintain control. Using the Command Prompt to modify bootloader settings can forcibly prevent Windows from reclaiming boot priority.
Open Command Prompt as an administrator and run the following commands.
Disable Windows Boot Manager’s reconfiguration behavior by running.
bcdedit /set {bootmgr} displaybootmenu yes
This ensures the boot menu appears consistently, reducing silent overrides.
For dual-boot systems, explicitly set the desired boot device as the default.
bcdedit /set {bootmgr} default {identifier_of_other_OS}
Replace {identifier_of_other_OS} with the actual GUID of the non-Windows boot entry, found via bcdedit /enum.
Finally, reboot your computer and check if the issue is resolved.
That’s it!
Read: Boot failure detected in Windows 11
How to change boot sequence in BIOS Windows 11?
To access the BIOS menu, first shut down your computer. Turn it back on and immediately start pressing a key, usually Delete, F2, or F10, which appears briefly on the screen. Once in the BIOS, use the arrow keys to navigate to the Boot or Boot Order tab. Here, you’ll see a list of devices your computer can boot from. Locate the device you want to prioritize (like a USB drive) and move it to the top of the list using the indicated keys (often + and – or F5 and F6). Finally, press F10 to save your changes. When prompted to confirm, select “Yes,” and your computer will restart, trying to boot from the selected device.
Read: How to use BIOS settings on Windows 11 computers
How to unlock advanced BIOS settings in Windows 11?
To unlock advanced BIOS settings in Windows 11, you must first access your computer’s BIOS/UEFI firmware interface by completely shutting down your PC and then pressing a specific key (commonly F2, Delete, or F10) repeatedly during startup as the manufacturer’s logo appears. Once inside the BIOS, look for a main menu or security tab that may contain an option to enter an “Advanced Mode,” which is often unlocked by pressing a key like F7; some systems also protect these settings with an administrator password that you may need to set or enter first.
Also Read: Windows computer won’t boot to BIOS.