This guide covers different workarounds you can try if the GIGABYTE App Center utility throws a “This Driver can’t release to failure” error. If your Windows PC features GIGABYTE motherboards, you have likely encountered the error mentioned above at least once. The worst thing about this error message is that it doesn’t specify which driver is the main culprit. But, as reported by users, the error mainly occurs on systems with GIGABYTE motherboards that don’t support wireless capabilities. If you are also seeing the same error message, continue with this troubleshooting guide to resolve the issue.

What causes the GIGABYTE error message?
As mentioned, the problem primarily stems from a system that uses GIGABYTE motherboards without wireless capabilities. As it turns out, GIGABYTE App Centre Utility requires access to onboard Wi-Fi. But in case it doesn’t find it installed on the system, the component fails and throws the mentioned error. By “components,” we mean Cloud Service station, Remote OC, and GIGABYTE Remote.
So, now that you have prior knowledge of what causes the “This Driver can’t release to failure” error, let’s check out different workarounds you can try to resolve the issue.
Fix The Driver can’t release to failure GIGABYTE error
Here are different solutions to fix the “The Driver can’t release to failure” GIGABYTE error.
- Turn Off Cloud Service station, Remote OC, and GIGABYTE Remote
- Download the latest GIGABYTE App Centre update
- Reinstall GIGABYTE using Command Prompt
- Uninstall the GIGABYTE App
Now, let’s take out all these solutions in detail.
1] Turn Off Cloud Service station, Remote OC, and GIGABYTE Remote
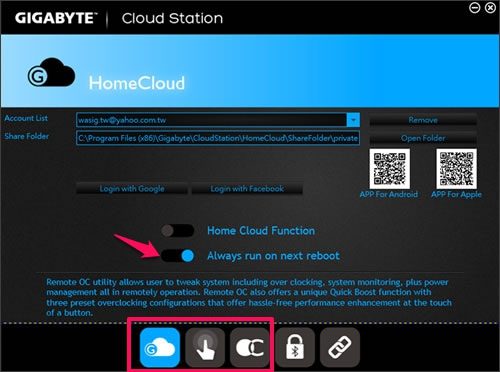
Here’s how to turn off Cloud Service station, Remote OC, and Gigabyte Remote in the GIGABYTE App Centre Utility.
- Launch the GIGABYTE App Centre Utility on your system.
- Click on the Cloud Service station present at the bottom of the screen.
- In the following window, toggle off the Always run on next reboot option.
- Return to the home window, then turn off the Remote OC and GIGABYTE Remote in the same way.
That’s it. Now you start your PC, and check if the problem is fixed or not.
Read: Chipsets and Motherboards that support Windows 11 operating system
2] Download the latest GIGABYTE App Centre update
If you haven’t downloaded the latest GIGABYTE app center update for a long time, then you are also prone to face the mentioned error code. As it turns out, many users have reported that the GIGABYTE App Centre is not compatible with the latest Windows 10 patch update. Thus, update the utility app by visiting the GIGABYTE official download page to get rid of the issue.

Once you have downloaded the latest update for the app, install it on your system. Check whether the problem is fixed.
3] Reinstall GIGABYTE using Command Prompt
If you are still experiencing the problem even after downloading the latest update, the next thing you can try is reinstalling the GIGABYTE services via Command Prompt or Windows PowerShell. To do so, follow the below steps.
To begin with, press the Windows key to open the start menu.
In the search bar, type Command Prompt and from the results choose, the Run as administrator option.
Now, copy and paste the commands below one after the other, then press Enter.
sc delete gdrv
sc create gdrv binPath= "C:\Windows\gdrv.sys" type= "kernel" DisplayName= "gdrv"
The first command line will uninstall the GIGABYTE services from your Windows PC. The second line of code will automatically reinstall the services again.
Once the command prompt has executed the code, restart your system and check if the problem is fixed or not. If not, continue with the following workaround.
4] Uninstall the GIGABYTE App
The Cloud Station servers of the GIGABYTE app run in the background by the name ubssrv. This software offers advanced functionality in the GIGABYTE app, but it can also cause the issue mentioned above. So, uninstalling the app is the bet you can go for. To do so, follow the below steps.
- Press the Windows + I shortcut key to open the Settings menu.
- Click on the Apps option present at the left panel of the screen.
- Choose Apps & features from the following window.
- Here you will find all the installed applications on your system.
- Locate the GIGABYTE app and click on the three-dots present next to the name.
- Choose Uninstall from the context menu.
- In the GIGABYTE uninstallation page, checkmark only the Cloud Station Server option.
- Click on Uninstall to begin the uninstallation process.
That’s it. Now restart your system and check if the problem is fixed or not.
Read: How to download & install MSI Motherboard drivers for Windows 11
What is GIGABYTE app?
The GIGABYTE app center is a one-place destination for a long list of GIGABYTE apps. These apps bring you closer to the wealth of the installed GIGABYTE motherboard. The app is also the place to check for the latest driver and BIOS update.
How do I check my motherboard drivers?
It’s very easy to remove the app center from the computer. Just visit the control panel, and navigate to Programs > Uninstall a program. From the list of installed applications, right-click the app center and choose Uninstall. Follow the on-screen instructions to complete the uninstallation process.
Read Next: What is Windows WHQL setting in the BIOS?