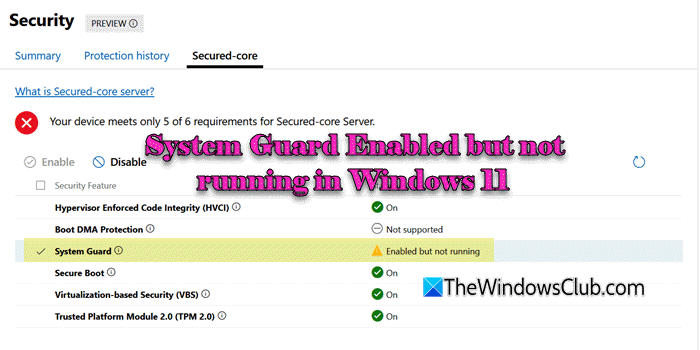
If System Guard is enabled but not running on your Windows 11/10 PC, this post will help you resolve the issue.

System Guard is a Windows security feature that protects the system’s integrity from the start of the boot process by using hardware-rooted technologies like Secure Boot, TPM 2.0, and Virtualization-Based Security (VBS). While it is supported on server editions, some users, particularly those running Windows Server 2022 Core (v21H2) on Dell PowerEdge 360 or similar hardware, have reported that after enabling System Guard in Secured-core, the System Guard status displays “Enabled but not running“, even though all necessary configurations appear to be properly configured.
Fix System Guard Enabled but not running in Windows 11/10
To fix the System Guard if it is enabled but not running in Windows 11/10, use these solutions:
- Check hardware requirements
- Ensure System Guard is correctly configured
- Ensure Virtualization-Based Security (VBS) is enabled
- Use BCDEdit to enable the Hypervisor
- Enable Required BIOS/UEFI Features
Let us see this in detail.
1] Check hardware requirements
First, ensure that your server meets the hardware requirements for Secured Core. To support Secured-core features like System Guard, your CPU must be from any one of these supported families:
- Intel: vPro processors starting from Coffee Lake (8th gen) or Whiskey Lake or newer
- AMD: Processors starting with Zen 2 or newer (e.g., Ryzen 3000 series, EPYC 7002 series)
- Qualcomm: Snapdragon processors starting from SD850 and newer
Beyond the CPU generation, your system must also support:
- UEFI with Secure Boot enabled
- TPM 2.0
- Hardware virtualization support (Intel VT-x or AMD-V must be enabled in BIOS)
For more information, consult Microsoft’s official documentation here.
2] Ensure System Guard is correctly configured

Next, ensure System Guard is enabled at the system configuration level.
Press Win + R, type regedit, and press Enter to open the Registry Editor.
Navigate to the following path:
HKEY_LOCAL_MACHINE\SYSTEM\CurrentControlSet\Control\DeviceGuard\Scenarios\SystemGuard
In the right-hand pane, look for a DWORD value named Enabled. Confirm that the value of Enabled is set to 1. If the SystemGuard key and the Enabled DWORD do not exist in the registry, you can manually create them to configure System Guard.
Read: Enable System Guard Secure Launch for Firmware Protection
3] Ensure Virtualization-Based Security (VBS) is enabled

VBS creates an isolated, virtualized environment using Hyper-V to protect parts of the OS from exploits, such as kernel-mode malware. System Guard relies on VBS, so if VBS is disabled, System Guard may not run, even if it is enabled.
Press Win + R, type gpedit.msc, and press Enter. This will open the Local Group Policy Editor.
Navigate to:
Computer Configuration > Administrative Templates > System > Device Guard > Turn On Virtualization Based Security
Double-click on Turn On Virtualization Based Security. In the window that opens, select the following:
- Enabled
- Under Select Platform Security Level, select Secure Boot
- Under Credential Guard Configuration, select Enabled with UEFI lock
Click Apply, then OK. Restart the system to apply the changes.
4] Use BCDEdit to enable the Hypervisor

System Guard and other advanced security features, even if enabled, cannot operate unless the Hyper-V hypervisor (a low-level software layer that enables virtualization by running directly on hardware) is active.
To ensure the hypervisor launches at boot, run the following command in an elevated Command Prompt (Run as administrator):
bcdedit /set hypervisorlaunchtype auto
The above command configures Windows to load the Hyper-V hypervisor during system startup. Reboot the server to apply the changes.
Note: BCDEdit (Boot Configuration Data Editor) is a built-in command-line tool in Windows that allows you to view and modify the boot configuration of your system. It controls how the system boots and which components are loaded.
5] Enable Required BIOS/UEFI Features

Some key security features must be turned on in the firmware to support System Guard Secure Launch.
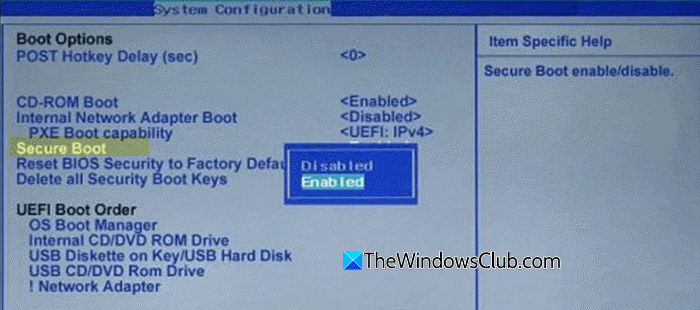
Enter your BIOS/UEFI setup and make sure the following are enabled:
- UEFI Boot Mode (not Legacy/CSM)
- Secure Boot
- TPM 2.0 (Firmware TPM or discrete TPM)
- Intel VT-x / AMD-V (Hardware virtualization)
- Kernel DMA Protection (if available)
Save changes and restart after making BIOS changes.
Note: On some systems (especially older PCs or servers), System Guard may be marked as “Enabled” but won’t run due to missing DRTM (Dynamic Root of Trust for Measurement) or OEM firmware limitations.
I hope this helps.
Read: Credential Guard Service not running but Enabled in Windows
How do I disable System Guard in Windows 11?
To disable System Guard in Windows 11, you need to turn off Virtualization-Based Security (VBS) features. Press Win + R, type gpedit.msc, and press Enter. Navigate to Computer Configuration > Administrative Templates > System > Device Guard. Double-click Turn On Virtualization Based Security and set it to Disabled. Click OK and restart your PC.
How do I know if my Credential Guard is running?
To check if Credential Guard is running on a Windows Server or PC, you may use the System Information tool. Press Win + R, type msinfo32, and press Enter. Click System Summary in the left navigation panel. In the right panel, scroll down to Virtualization-based Security Services Running. If Credential Guard is enabled, it will be listed in the Value field.