The Microphone is one of the most useful input devices that allow the user to attend online meetings, talk to family or friends over Skype or Zoom, and even dictate with speech recognition. Using a microphone can have multiple purposes. Surprisingly, it works on a simple logic, i.e., it takes the user’s voice as input and then allows the receiver to hear that voice as output through speakers or headphones.
However, sometimes users plug in their microphones and do not understand how to configure them. That is not all; people often fail to determine if the microphone on Windows 11/10 is even working. If you are struggling with similar issues, then read on to learn how to set up and test the microphone on Windows 11/10.
Set up and Test a Microphone on Windows 11
Before you start testing your microphone, setting up it correctly is important. This is because if you set up your microphone incorrectly, it will not work. Sometimes, users think that their microphone has malfunctioned but after investigating the cause of the issue, they come to know that the issue was occurring due to the incorrect set up of the microphone. That’s why first, we will explain the set up process of a microphone, then we will proceed towards its testing method.
Setting up a new microphone on Windows 11
When you connect your microphone for the first time, you may have to wait for a few seconds because Windows 11 searches and installs the latest driver whenever a new device is connected to it. After the driver installation process is complete, you will see your microphone in Settings, where you can configure it.

To set up a new microphone on Windows 11, follow the steps below:
- Right-click on the Windows 11 Start menu and select Settings.
- Select System from the left pane.
- Click Sound on the right pane.
- On the right side, you will see three sections, Output, Input, and Advanced. In the Input section, expand the Choose a device for speaking or recording tab by clicking on it. It will show you all the microphones connected to your system.
- Select your microphone from the list by clicking on the respective radio button.
- Now, click on the arrow next to your selected microphone.
- In the Input Settings, you can select the Format for your microphone. If your microphone is too loud or too quiet, you can fix this by adjusting the Input volume slider.
Testing a microphone on Windows 11
To test your microphone, first, connect it to your system. Now, repeat the first six steps listed above. After this, you will see the Test your microphone option in the Input section.

Now, click on the Start test button next to the Test your microphone option and speak into the microphone. When you start speaking, you will see the input pulse on the Input volume slider. This input pulse defines the intensity of the input sound. If you do not see this input pulse on the slider, your microphone is not working well.
You can stop testing anytime by clicking on the Stop test button. After completing the test, you will see the result as a percentage of the total input volume detected by your system.
Set up and Test a Microphone on Windows 10
We shall touch on how to set up the microphone on your Windows 10 system. Once the microphone is set up, we will learn how to test the same. Keep reading:

Setting up a new microphone
Firstly, to set up the microphone we need to ensure that the microphone is plugged in or connected via Bluetooth. Please ensure that you have all the necessary drivers for your microphone installed. In most cases, Windows automatically searches for and installs the drivers required on the system. If this doesn’t work, you may need to check the manufacturer’s website for the specific drivers and install them.
You can set-up a new microphone, following these steps:
- Make sure your microphone is connected to your system.
- Click on Start and go the Settings.
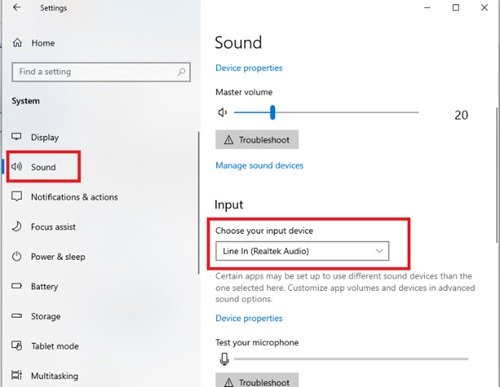
- Select System option, and click the Sound tab from the options appearing on the left-side panel.
- In the Sound settings windows, go to the Input section.
- Under Choose your input device, select the microphone or recording device you intend to use.
Your microphone is now set up and ready for use.
Read: How to Increase Microphone Volume in Windows.
Testing the microphone on Windows 10

To test the microphone that has already been installed on your Windows 10 PC, you will need to perform the following steps:
First, make sure your microphone is connected to your system.
- Click on Start and go the Settings.
- Now, select System option, and click Sound from the options appearing on the left-side panel.
- In the Sound settings page, go to Input.
- Under the Input options, you will see the Test your microphone option.
- Here, look for the blue color bar that rises and falls as you speak into your microphone.
If you see the bar moving, you can be sure that your microphone is working properly. However, if it doesn’t, select the Troubleshoot option to fix your microphone.
This method will only tell you if Windows is detecting your microphone; it doesn’t tell you how you actually sound.
Read: How to set up Preferred Speaker & Microphone for different Apps.
Using Voice Recorder to test your microphone
Another quick way of testing on Windows is with the pre-installed app i.e. Voice Recorder.
Voice Recorder is an in-built Windows application that can be used for recording lectures, conversations, and other sounds. Earlier this application was called Sound Recorder. To use the voice recorder, use these steps:
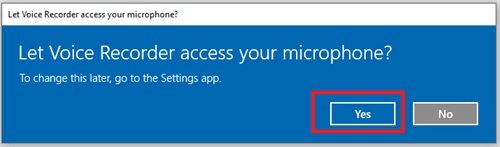
1] Open the Voice Recorder from the Start Menu. You can search with the exact term and hit the top result.
2] Once the application opens, allow the app to access your microphone by hitting Yes.
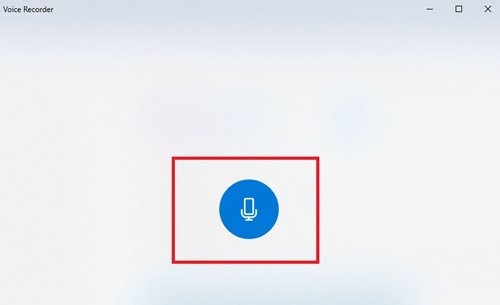
3] Now hit the big Record button appearing in front of you to start recording.
4] Hit the Stop icon to finish recording.
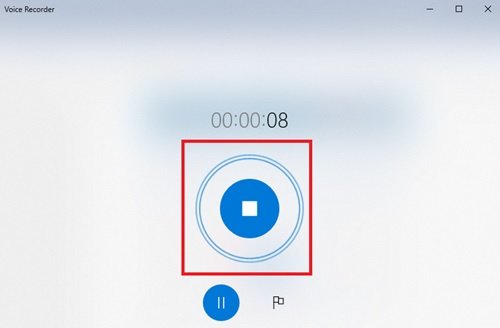
5] You can now view all your recordings on the left pane of the application.
6] Click on the recording to hear how your recording sounded using the selected microphone.
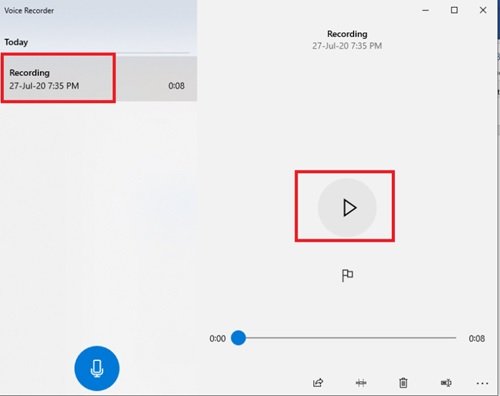
This way, Voice Recorder allows you to test your microphone. You can speak and instantly listen to your recording. Along with testing whether your microphone is working, this application also allows you to perform immediate quality checks on the recordings.
We hope these tips helped you easily and quickly test the microphone on Windows 11/10.
How do I set up a microphone on Windows 11?
To set up a microphone on Windows 11, first, connect it to your computer. Make sure that the batteries of your microphone are not dead. Wait till Windows 11 installs the latest driver of your microphone. After that, launch the Windows 11 Settings app and configure your microphone. We have explained the entire process for setting up a microphone in Windows 11 in this article above.
How do I get my computer to recognize a new microphone?
Usually, Windows OS automatically detects the devices connected to it. If your microphone does not work after you connect it to your computer, one of the following conditions may be true:
- Your microphone’s battery may be dead.
- The driver may be corrupted.
- Your microphone has malfunctioned.
You can run a test for your microphone on a Windows 11/10 computer.