
Are you also unable to connect to another PC, as the session fails to start or suddenly disconnects due to error code 0x3000008? If so, you are not alone; many users have similar complaints about the connection blocker, which is preventing them from accessing remote PCs. In this article, we will see what you can do if the Remote Desktop Connection gives error code 0x3000008.
What is error code 0x3000008 on Remote Desktop?
Error code 0x3000008 on Remote Desktop is a connection authentication failure where the RDP client cannot establish a secure session with the host. It often appears with the error message “There was a problem connecting to the remote service. Ask your network administrator for help.”It typically happens during the SSL/TLS handshake or credential verification phase. In short, it signals that Remote Desktop failed to start or maintain a stable session. To find out how to fix this, proceed to the next section.
Fix Remote Desktop Connection error code 0x3000008
If you keep encountering the Remote Desktop connection error code 0x3000008, execute the solutions mentioned below.
- Restart Remote Desktop services and reset the RDP certificate
- Update CredSSP Configuration
- Disable SSL/ TLS 1.0 on Host
- Clear the RDP cache
- Reset Network and DNS settings
- Disable UDP for RDP
Let’s get started with the troubleshooting guide.
1] Restart Remote Desktop services and reset the RDP certificate

More often than not, the Remote Desktop connection fails because of stuck RDP services or a corrupted RDP security certificate. In this situation, it is recommended to restart the service and regenerate the certificate. Here’s how to do the same.
- On the target PC, click Win + R to open the Run dialogue box, type services.msc, and press Enter.
- Find Remote Desktop services, Remote Desktop Configuration, and Remote Desktop Session Host, right-click on them, and select the Restart option.
- Next, open Registry Editor, create a backup, and navigate to the following location:
HKEY_LOCAL_MACHINE\SYSTEM\CurrentControlSet\Control\Terminal Server\WinStations\RDP-Tcp
- Find and delete the value SSLCertificateSHA1Hash, and reboot the device.
Windows will automatically generate a new RDP certificate once the device restarts. Move on to the next solution if the issue persists.
2] Add the RDGClientTransport Registry Key
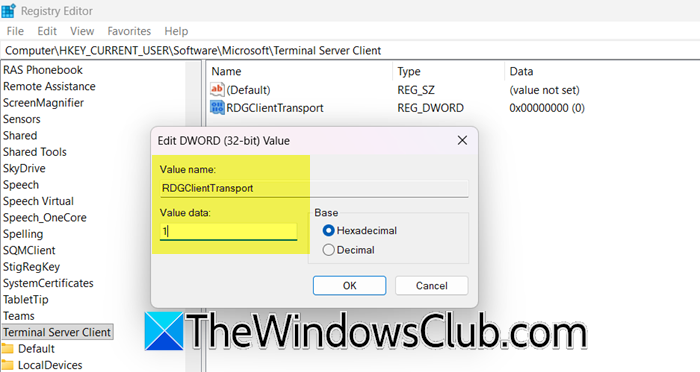
In this solution, we are going to force the RDP client to use a more reliable TCP-based transport protocol instead of potentially unstable UDP when communicating with the Remote Desktop Gateway. The RDGClientTransport registry value essentially tells the client to bypass problematic UDP connections that can cause the handshake failures and timeouts associated with error code 0x3000008, ensuring a more stable connection through TCP.
On the RDP Client PC, open the Registry Editor and navigate to the location mentioned below.
HKEY_CURRENT_USER\Software\Microsoft\Terminal Server Client
Now, right-click on the right empty pane, and select New > DWORD (32-bit) value. Name the new value RDGClientTransport.
Double-click on it, set its Value data to 1 (Hexadecimal), and click Ok.
Try connecting and see if it works.
3] Disable SSL/TLS 1.0 on Host
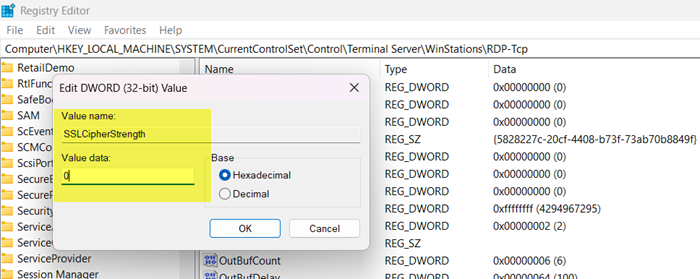
If RDP is using outdated SSL/TLS 1.0 protocols that are now blocked by security updates, handshake failures can occur during connection initiation. It’s necessary to disable them to force the system to use modern encryption methods.
- Open Registry Editor as admin, and then navigate to the following location:
Computer\HKEY_LOCAL_MACHINE\SYSTEM\CurrentControlSet\Control\Terminal Server\WinStations\RDP-Tcp
- Click on the RDP-Tcp, right-click on the right space, and select New.
- Select the DWORD (32-bit) value and name the new value SSLCipherStrength.
- Double-click the newly created value, set it to 0 in the Value data field, and ensure Base is set to Hexadecimal.
- Click OK, and if the value already exists, double-click the SSLCipherStrength, change the Value data to 0, and click OK.
Once done, restart the Terminal Services and the device. Once the device restarts, test the Remote Desktop connection and proceed to the next solution if it fails.
4] Clear the RDP cache

Corrupted client-side cache files often contain outdated connection data, certificates, and session information. This can conflict with the current authentication requirements, so to prevent this, we need to clear them. Before starting the process, ensure that all Remote Desktop connections are closed.
- Click Win + R to open the Run dialogue box, and execute the following command to go to the RDP Cache location:
%localappdata%\Microsoft\Terminal Server Client\Cache
- In the folder that opens, click Ctrl + A to select all the files, and press Delete.
- To clear the additional cache locations, open the Run dialogue box and execute the following command:
%appdata%\Microsoft\Terminal Server Client
- Delete any cache files or folders in this location.
Restart the computer and test the connection. Proceed to the next solution if the issue remains.
5] Reset Network and DNS Settings
Network stack corruption, DNS Cache issues, or Winsock catalogue damage can prevent proper communication between the RDP client and host. In this solution, we will be clearing them out to ensure clean communication channels for authentication and data transmission.
- Go to the search bar, type cmd, and select Run as administrator option.
- Run the following commands one by one and hit Enter:
ipconfig /flushdns

ipconfig /release

ipconfig /renew

netsh winsock reset

netsh int ip reset
- Close the command prompt, and restart the computer completely.
Log back in and verify the RDP Connection. Proceed to the next solution if the problem persists.
Read: Remote Desktop can’t find the computer in Windows 11
6] Disable UDP for RDP

An unstable UDP connection can cause an unreliable RDP handshake and frequent timeouts. We are going to disable it to force RDP to use a more stable TCP-only connection.
- Click Win + S, type Registry Editor, and select the Run as administrator option to open it with admin rights.
- Navigate to this path.
HKEY_LOCAL_MACHINE\SOFTWARE\Policies\Microsoft\Windows NT\Terminal Services\Client
- If the Client is not available, right-click on Terminal Services, select New, then click Key, and name it Client.
- Next, click on the Client folder to select it, and right-click on the space and select New > DWORD (32-Bit) Value.
- Name the new value fClientDisableUDP, and then double-click on it to set its Value data to 1, and its base to Hexadecimal, and click OK.
After completing the process, restart the Remote Desktop Services and test the RDP connection. Hopefully, you won’t have any issues anymore.
That’s it!
Read: The logon attempt failed error while connecting Remote Desktop
How to fix the Remote Desktop Connection error?
To fix a Remote Desktop Connection error, restart the Remote Desktop service, update the network and display drivers, and reset network settings. Additionally, users can also check the firewall permissions and reconfigure RDP settings. To learn more, see the above detailed article.
Also Read: Remote desktop can’t connect to the remote computer on Windows 11.
