
Microsoft Store offers a Scan app which you can use to scan documents and pictures in Windows 11/10 quickly. The app is useful when you are scanning a single photo or multiple pages. In this post, we will guide you on how to open the Scan App on a Windows computer and use it to scan documents properly.
How to open Scan App in Windows 11/10
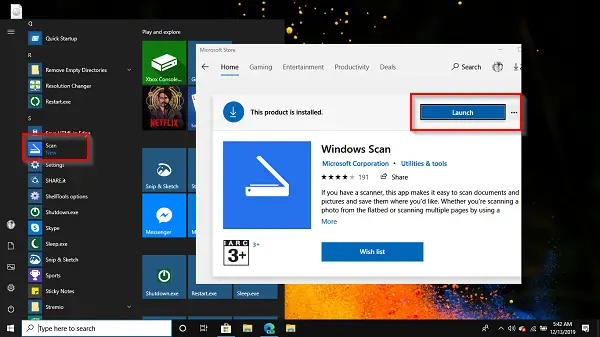
Before we start with the Scan App, the scanner’s OEM may have its own scanner software, which can assist you with scanning documents. I would suggest you have a look at it as well as it can offer some extra features compared to the Windows Scan App.
- Open Microsoft Store
- Type Windows Scan in the search box.
- Once it appears, click on the Get button to install it on the computer or open this link.
- Post-installation, Windows Scan will be available in the Start menu as the “SCAN” app.
- Click on it to open the Scan App on a Windows computer.
If you just connected the Scanner, make sure to install the driver. Windows 11/10 typically finds it and lists it under Settings > Devices > Printers and Scanners. Make sure its status is online; else, you will not be able to use it.
Before launching the scanner app, ensure the scanner is physically plugged into a power source and connected to the computer via the USB port. Launch the scanner app, and it will automatically detect the scanner and list it. If you have multiple scanners, you can always select one of them.
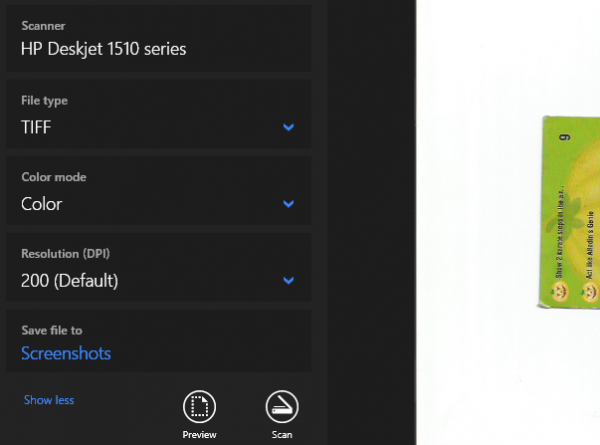
When the app launches, it only shows Scanner Name and File type in which the scan would be saved. Right under the file type option, click on Show more link top reveal the complete set of options which includes:
- File Type: Choose between TIFF, JPEG, PDF, XPS, BMP, and OpenXPS
- Color Mode: Here, you can choose between Color, Black & White, and Greyscale.
- Resolution: The higher the value, the better the quality of the print, saved document, and, of course, the size. Depending on where and how you plan to use it, choose wisely.
- Save File to: Make sure to choose this option, and I would say save it to the cloud. Not only can you instantly share with someone, but you also will not lose it. When you switch computers, you can still access them if they are stored on Dropbox or OneDrive.
Related: General Scanner Troubleshooting tips
How to scan a document in Windows 11/10
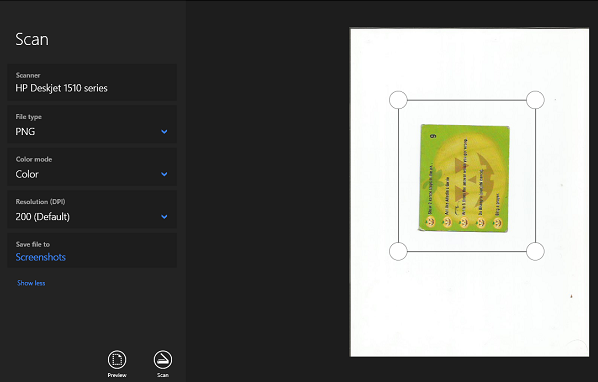
Now that you know all the features of the scan app let’s learn how to scan a document or image using this app.
- Place a document on the scanner bed, and put down the lid.
- Switch to the Scan app, and configure the options
- Click on the Preview button. Make sure to do it every time to see what the output of the scan will look like.
- Once the preview shows up, you can use the selection or circle markers to decide the area to scan. If the preview is not as you expected, then:
- Change the color mode and DPI
- Make sure the scanner lid is put down
- Accurately mark the area to scan using circle markers
- If you plan to edit the image later, save it in an IMAGE format.
- Click on the Scan button to perform a final scan. You should see Scanning instead of Previewing this time. Once complete, a message would show up on top of the app.
That’s it. It is how you scan a document or image in Windows 11/10. While the Scan app is basic, it offers enough features to scan almost anything.
However, software from OEM would do a much better job as it can offer extra features, the option to save at multiple places, and so on. For example, I can save multiple scans into a single PDF file, which is particularly useful when scanning a document with numerous pages. Make sure to install the scanner app from the OEM and try it out as well.
How do I Scan to PDF from app?
If you want to scan a document to PDF using Windows Scan app, then set the File type to PDF, and press the Scan button to get the output. Or else, if you are using another scanner app then first scan your document and when the scanned pages are added on the app interface, use the Print option in the File menu. When the Print box is opened, select Microsoft Print to PDF option as your printer, adjust the print settings, and hit the Print button. This will let you save the scanned pages as a PDF document to your PC.
Why does my scanner not work with Windows 11/10?
If the scanner is not working on your Windows 11 or 10 system, check the compatibility mode for the scanner. Also, make sure the WIA (Windows Image Acquisition) service is running and its Startup type is selected as Automatic. If these options don’t help, then update the drivers for your scanner, and run the Hardware and Devices troubleshooter of Windows PC to fix this issue.
Read next: How to use Windows Fax and Scan Tool.
