Nearby Sharing in Windows 11 lets users quickly send files between two PCs without cables or cloud uploads. However, if the transfer is crawling along at a few hundred KB per second, then this feature becomes frustrating to use. In this guide, we will see what to do if the Nearby Sharing file transfer is slow.
Why is my file transfer slow in Windows 11?
It’s frustrating when file transfers drag on. Usually, it’s background apps hogging resources, a weak Wi-Fi signal, or an older hard drive struggling. Sometimes, antivirus scans or a USB 2.0 port are also to blame. If you are experiencing the same issue, proceed to the next section to fix it.
Nearby Sharing file transfer is slow in Windows 11
If you are experiencing slow file transfers in Nearby Sharing on Windows 11, execute the solutions given below.
- Change the network profile to Private and disable metered connection
- Compress small files into a single ZIP file
- Force Nearby Sharing to use only Wi-Fi
- Switch both PCs to a 5 GHz Wi-fi network
- Disable MIMO Power Save Mode in Wi-Fi adapter settings
- Reset the Wi-Fi Direct Virtual adapter and Nearby Sharing configuration
Let’s get started with the troubleshooting guide.
1] Change the network profile to Private and disable metered connection

Windows imposes strict limitations on peer-to-peer traffic if the Wi-Fi network is set to Public or marked as a Metered Connection. Public mode blocks device discovery and throttles background data for security, while metered mode assumes that users want to save bandwidth. Changing the profile to Private removes discovery restrictions, and disabling the metered setting lifts artificial bandwidth caps. This allows Nearby Sharing to negotiate a high-speed, uninterrupted link.
- Click Win + I, go to Network & internet and select Wi-Fi.
- Click on the name of the connected Wi-Fi network, and select Private under Network Profile type.
- Scroll down to the Metered Connection section, turn off the Set as metered connection toggle key.
- Repeat the same process on the other PC, and then disconnect and reconnect to the Wi-Fi network on both computers to apply the changes.
Test Nearby Sharing again. Go to the next solution if this doesn’t resolve the issue.
2] Compress small files into a single ZIP file
Nearby Sharing initiates a separate handshake and encryption negotiation, and a write confirmation, when users try to transfer a folder containing hundreds or thousands of tiny files. This overhead can multiply the total transfer time by a factor of ten or more compared to sending one large file of the same total size. Zipping the files into a single archive reduces all that overhead to a single operation.
- On the source PC, select all the files or the folder you want to transfer, right-click the selection, and click the Send to option.
- Select the Compressed (zipped) folder, and provide the ZIP file a descriptive name. Now use Nearby Sharing to send the single ZIP file to the other PC.
- On the destination PC, right-click the ZIP file and select Extract All.
- Now, choose a destination folder, click Extract to restore the original files and compare the transfer time with sending files individually.
Proceed to the next solution if the process is still taking time.
3] Force Nearby Sharing to use only Wi-Fi
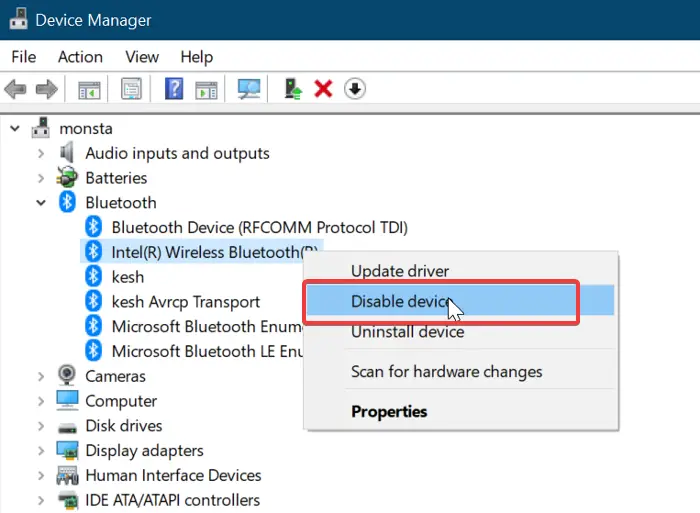
Windows, by default, falls back to Bluetooth for data transfer when the Wi-Fi Direct link is unstable. We need to disable the Bluetooth adapter so that Nearby Sharing relies on Wi-Fi Direct to achieve the fastest possible negotiated link speed. Steps are given below to do the same.
- Click Win + X to open the Quick Link Menu, and select Device Manager.
- Expand the Bluetooth section, and right-click the Bluetooth adapter.
- Select the Disable device option from the context menu, and confirm any warning prompt.
Perform the file transfer using Nearby Sharing and check if the issue is resolved. If not, re-enable Bluetooth by right-clicking the same adapter, selecting Enable device and moving to the next step.
4] Switch both PCs to a 5GHz Wi-Fi network
The 5 GHz band offers a much cleaner and wider communication channel than the 2.4 GHz band. It allows Nearby Sharing’s underlying Wi-Fi Direct technology to negotiate at a higher bandwidth. Due to this, it is recommended to switch both PCs to a 5 GHz Wi-Fi network for faster file transfers with fewer interruptions.
- On both devices, click the network icon in the system tray, and verify if the device is connected to a 5 GHz SSID.
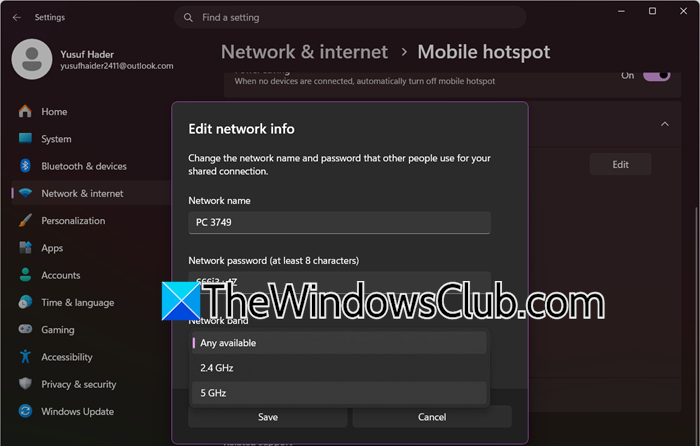
- If not, go to Settings, click on Network and Internet options, and select Mobile Hotspot.
- Turn on Mobile hotspot and click Edit to set the network band to 5 GHz, and then connect the second PC to this newly created 5 GHz hotspot.
See if the Nearby Share transfer reaches normal Wi-Fi Direct levels. If it is still slow, see the next solution.
5] Disable MIMO Power Save Mode in Wi-Fi adapter settings

Windows power-saving features can put the Wi-Fi adapter into a low-power sleep state. This causes the adapter to repeatedly wake up and slow down, and results in erratic speeds and packet loss. To stay fully active during transfers, we are going to disable MIMO Power Save mode.
- Click Win + X to open the Quick Link Menu, select Device Manager, and expand Network adapters.
- Right-click the primary Wi-Fi adapter and choose Properties.
- Navigate to the Advanced tab, and locate MIMO Power Save Mode in the Property list.
Note: It can also be called Power Save Mode, Minimum Power Consumption, depending on the adapter.
- Change the value to No SMPS, click OK, and then navigate to the Power Management tab.
- Uncheck the Allow the computer to turn off this device to save power box, and restart both PCs.
If this doesn’t resolve the issue, see the next solution.
6] Reset the Wi-Fi Direct Virtual adapter and Nearby Sharing configuration
Windows accumulates corrupted and old configurations for the Microsoft Wi-Fi Direct Virtual Adapter. It is a hidden network device that handles peer-to-peer links. So uninstalling the virtual adapters and clearing the scratch eliminates any hidden configuration errors.
- On both PCs, go to Settings, click on System, and select Nearby Sharing.
- Toggle off the feature, and close any open File Explorer windows.
- Next, click Win + X, select and open Device Manager, and expand Network Adapters.
- Locate the Microsoft Wi-Fi Direct Virtual Adapter entry, right-click each one, and select the Uninstall Device option.
- If prompted, check Delete the driver software for this device, and click Uninstall. Then open the Run dialogue box, and paste the following to open the Windows Spotlight Assets folders:
%LOCALAPPDATA%\Packages\Microsoft.Windows.PeopleExperienceHost_cw5n1h2txyewy\LocalState
- In the folder that opens, delete the NearbyShare subfolder if it exists, and restart both devices.
- After reboot, go back to Settings > System > Nearby Sharing, and turn it on on both devices.
Wait for one minute for Windows to recreate the virtual adapters, and then test a new file transfer. Hopefully, there will be no more issues in sharing files.
Read: Nearby sharing not working in Windows 11
Why is Nearby Sharing not working on Windows 11?
If Nearby Sharing fails on Windows 11, there are various common causes. One should check common issues such as Bluetooth and Wi-Fi being disabled, the feature not being enabled on both devices, or the devices not being on the same private Wi-Fi.
Also Read: Change default Save Location for Nearby Sharing in Windows 11.