
Users unable to rename a network adapter in Windows Server usually indicate that Windows is unable to apply the new name due to various reasons, such as hidden adapter conflicts, a policy restriction, and so on. In this article, we will walk through the most effective ways to see what can be done if Windows Server cannot rename a network adapter.
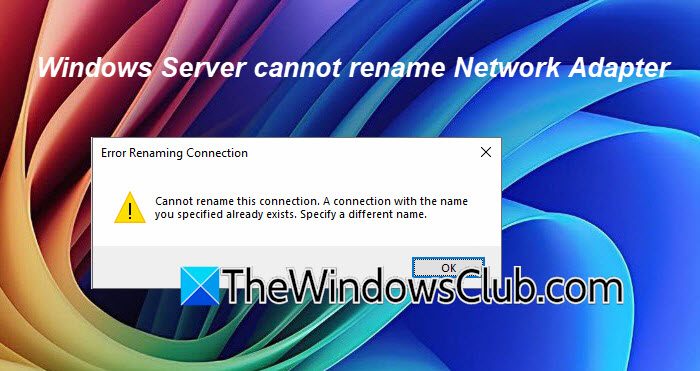
Error Renaming Connection
Cannot rename this connection. A connection with the name you specified already exists. Specify a different name.
How do I rename a Network Adapter?
To rename a Network Adapter, open ncpa.cpl, right-click the adapter, and select the Rename button. Alternatively, users can also use the toolbar button. However, if you are unable to do so, check out the next section.
Windows Server cannot rename Network Adapter
If you select the Rename option to rename a Network Adapter in Windows Server but the operation does nothing, produces an error message, or reverts to its original value after a reboot, follow the solutions below.
- Check the Menu bar button
- Rename the Network Adapter using PowerShell
- Remove hidden (ghost) Network Adapters
- Registry Cleanup
- Rename using Netsh
- Reinstall the Network Adapter
- Check Group Policy settings
Let’s get started with the troubleshooting guide.
1] Check the Menu bar button
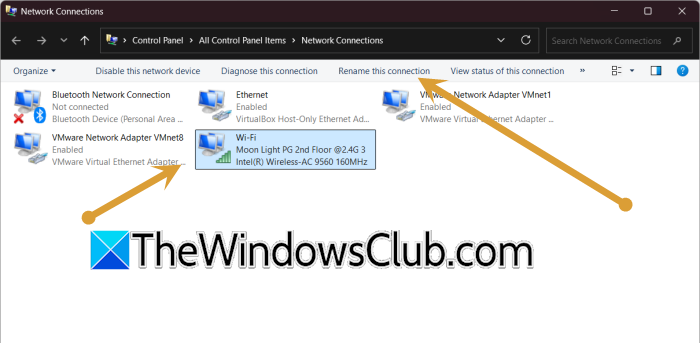
In some Windows Server versions, nothing happens when users click Rename from the right-click menu because the issue is caused by a known user interface bug. To bypass the faulty context menu and let Windows process the rename request correctly, we are going to use the toolbar Rename this connection button.
- Click Win + R to open the Run dialogue box, type ncpa.cpl, and press Enter to open the Network Connections window.
- Left-click once on the network adapter you wish to rename to select it, and click the Rename this connection button.
- Type the desired new name, press Enter, then refresh the window and confirm the name has persisted.
If the adapter still cannot be renamed, continue with the next solution.
2] Rename the Network Adapter using PowerShell
PowerShell provides Microsoft’s recommended method for renaming network adapters if the graphical interface is not working correctly. This command directly communicates with Windows networking components and bypasses any issues with the Network Connections interface.
- Right-click the Start Menu, and select Windows PowerShell (Admin) or Terminal (Admin).
- Type Get-NetAdapter, press Enter, and locate the exact current name of the adapter listed under the Name column.
- Next, execute the following command to rename it:
Rename-NetAdapter -Name "Current-Adapter-Name" -NewName "Your-New-Name"
- If the command succeeds, there will be no error message. To verify the updated name, open ncpa.cpl and press F5.
Verify if the issue is resolved or not. If it continues, proceed to the next solution.
3] Remove hidden (ghost) Network Adapters
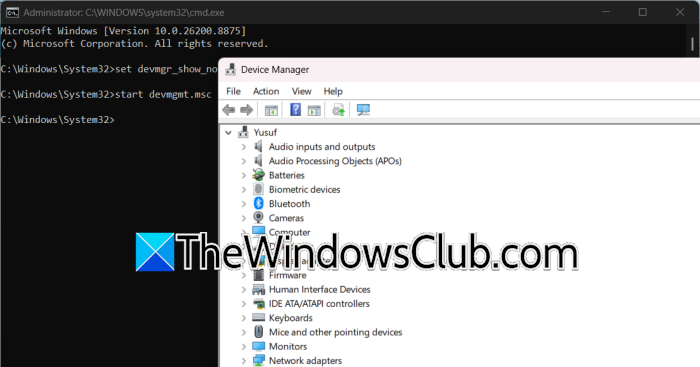
Windows sometimes keeps records of network adapters that are no longer connected or installed. These hidden devices can continue reserving old adapter names and cause rename operations to fail with duplicate-name errors. It is recommended to remove these ghost adapters to allow Windows to assign the desired name to the active adapter.
- Open Command Prompt with administrative rights, and run the two commands consecutively:
set devmgr_show_nonpresent_devices=1
start devmgmt.msc
- In the Device Manager window, click the View menu, and select Show hidden devices.
- Expand the Network adapters section, and right-click faded or semi-transparent ghost adapters.
- Select the Uninstall device option, close Device Manager, and restart the server to fully purge the registry references.
If the issue persists, continue to the next solution.
4] Registry Cleanup
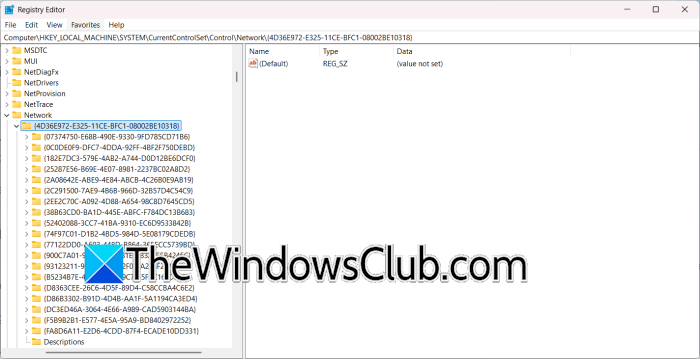
Sometimes ghost adapters don’t appear even in Device Manager. If removing hidden adapters doesn’t work, clearing the active connection registry key will release the stuck name. To do so, open Registry Editor and take a backup of your registry.
Now, navigate to HKEY_LOCAL_MACHINE\SYSTEM\CurrentControlSet\Control\Network\{4D36E972-E325-11CE-BFC1-08002BE10318}.
Look through the GUID subkeys under \Connection to find the one matching the conflicting name (e.g., “First Ethernet”) and delete that registry key, then restart.
5] Rename using Netsh
The Netsh command-line utility provides another reliable way to rename Network Adapters. It modifies the interface name directly from Command Prompt and is supported across multiple Windows Server versions.
To use it, open Command Prompt as Administrator, and view the current interfaces by executing the netsh interface show interface command.
Note the exact name as it appears under the Name column, and execute the rename using the exact current name: netsh interface set interface Name=”Current-Adapter-Name” NewName=”Your-New-Name”.
If the netsh command returns an interface not found error even when the exact name is used, go to the next solution.
6] Reinstall the Network Adapter
A damaged or corrupted network adapter configuration can prevent Windows from saving changes, including a new Adapter name. Reinstalling the adapter removes the existing configuration and allows Windows to create a fresh network profile that helps resolve the rename issues.
- Launch Device Manager, and expand the Network adapters section.
- Right-click the specific network adapter, and select the Uninstall device option.
- In the confirmation dialog, do not check the Delete the driver software for this device box to prevent driver loss.
- Click the Uninstall button, wait for the process to complete and then restart the server immediately. After Windows boots, automatically reinstall the adapter, open ncpa.cpl and attempt the rename operation once more.
Check the condition and proceed accordingly.
7] Check Group Policy settings
In domain-managed environments, administrators can use Group Policy to prevent users from renaming network connections. Windows may ignore rename attempts or disable the option entirely if this policy is enabled, so we need to ensure that the operating system is not blocking the change.
- Click Win + R, type gpedit.msc, and press Enter to open the Local Group Policy Editor.
- Navigate to the following location and locate the Ability to rename LAN connections policy.
- Double-click on it, select the Not configured or Disabled option, and click the Apply and OK buttons.
- Open Command Prompt with Administrative rights, and run gpudate /force to immediately apply the change.
Once done, sign out and then sign back in to refresh the user registry hive and then reattempt the name change. Hopefully, the name will stay the same.
That’s it!
Read: How to check Wi-Fi Network Adapter settings on Windows 11
What does the Rename-VMNetworkAdapter do?
Rename-VMNetworkAdapter is a PowerShell cmdlet for Hyper-V that changes the display name of a virtual Network adapter on a virtual machine or on the management operating system. It requires the VM name and the new name. The new name is visible in the VM’s settings and helps with organization and searching.
Also Read: Network Adapter missing or not showing in Windows 11.
