Memory Integrity helps protect your system from malicious code and drivers by isolating critical parts of the operating system. Users can enable or disable Memory Integrity as they wish on Windows. However, some users have noticed a peculiar issue where Memory Integrity turns on automatically after a restart in Windows 11 even after they had disabled it. In this guide, we show you what you can do in such a case and also what you can do if Memory Integrity remains off after a restart.

Fix Memory Integrity turns on after restart in Windows 11
Memory Integrity re-enables itself after a restart because Windows prioritizes security enforcement over user preferences. This is typically triggered by Group Policy settings that you or your organization may have configured, Windows Update overriding configurations after patching security flaws, registry flags set to Enabled, or third-party tools resetting core isolation features without consent. In this guide, we will address all those scenarios and talk about their potential fixes.
If Memory Integrity turns on after a restart, you need to follow the solutions mentioned below to resolve the issue.
- Check the Group Policy
- Check the Registry Editor
- Stop Windows Update from resetting Memory Integrity
- Disable Core Isolation using PowerShell
- Disable BIOS/UEFI Virtualization Settings
- Troubleshoot in Clean Boot.
Let us talk about them in detail.
1] Check the Group Policy

A Group Policy can override any changes you have made to the system as an individual user. That is why, when you try to disable Memory Integrity, Group Policy overrides it, as it might be going against the protocol of your organization. If you are on a standalone machine and have Group Policy Editor on your computer, open it and navigate to the following location.
Computer Configuration > Administrative Templates > System > Device Guard
Now, double-click on Turn On Virtualization Based Security and set it to Disabled. Click on Apply > OK.
Finally, go ahead and disable Memory Integrity and reboot your computer.
2] Check the Registry Editor
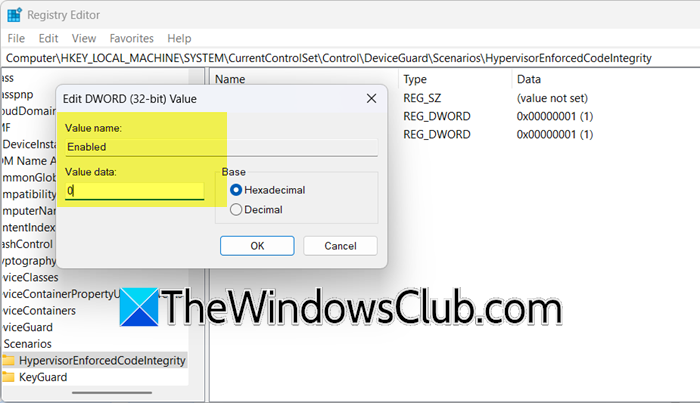
You will not have the Group Policy Editor on a Windows Home edition; therefore, we will be using the Registry Editor to do the same. However, before making any changes, we need to create a backup of the registry. Once done, open the Registry Editor and then go to the following location.
HKEY_LOCAL_MACHINE\SYSTEM\CurrentControlSet\Control\DeviceGuard\Scenarios\HypervisorEnforcedCodeIntegrity
Now, you need to look for the Enabled value, double-click on it and set it to 0. Finally, go ahead and disable Memory Integrity. Hopefully, this time, it will not get enabled upon restart.
3] Stop Windows Update from resetting Memory Integrity
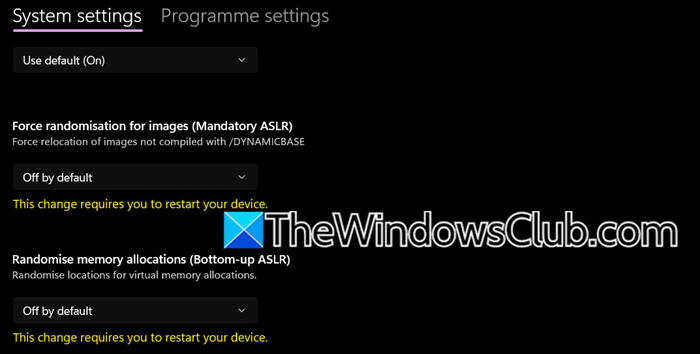
Windows Update sometimes resets security features to the recommended defaults after an update. However, we do have the option to stop it from doing so by configuring the Mandatory ASLR and Block low-integrity images exploitation policy settings. Let us go ahead and see how to do the same.
- Open Windows Security.
- Go to Apps & browser control > Exploit protection > Exploit protection settings.
- Look for Force randomisation for images (Mandatory ASLR) and set it to Off by default.
- Then disable Randomise memory allocation (Bottom-up ASLR).
- Reboot your computer.
- Now, go ahead and enable Memory Integrity.
This should do the job for you.
4] Disable Core Isolation using PowerShell
With the help of the PowerShell command, we can modify Windows Defender’s configuration at the system level to bypass potential GUI glitches or group policy restrictions. To do so, you need to open PowerShell as an administrator and then run the following command.
Set-MpPreference -EnableMemoryIntegrity $false
The command writes to HKLM\SOFTWARE\Microsoft\Windows Defender registry and notifies the WinDefend service via RPC call.
Once done, your Memory Integrity will be disabled.
5] Disable BIOS/UEFI Virtualization Settings
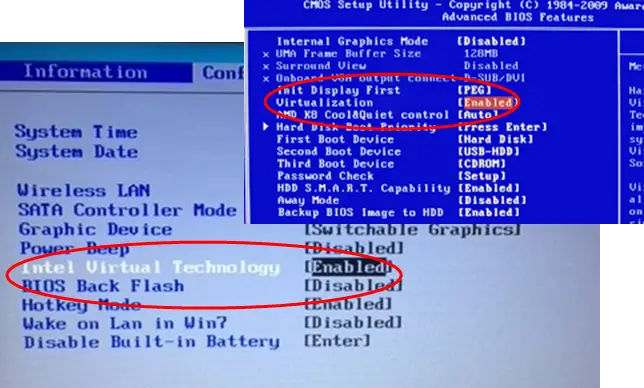
If you are familiar with the world of computer programming, you must know the team “hardcoding”. That’s exactly what we are going to do in this workaround. Memory Integrity requires specific hardware-level virtualization features to function. By disabling these in BIOS/UEFI, you remove the foundational components Windows needs to enable HVCI (Hypervisor-Protected Code Integrity), forcing Memory Integrity to remain off.
So, go ahead and disable Hardware Virtualization from the BIOS, and you will not have to worry about Memory Integrity. However, since it also prevents you from accessing other programs or features that require virtualization, we recommend keeping this as a last resort.
Read: Memory Integrity turns off due to incompatible driver in Windows 11
6] Troubleshoot in Clean Boot
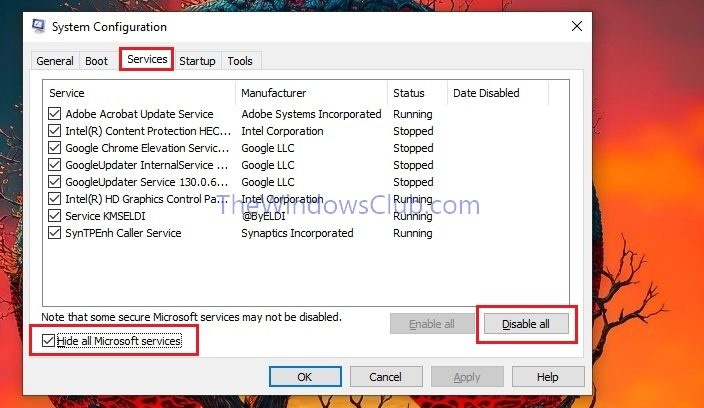
As mentioned earlier, one of the reasons why Memory Integrity turns on all the time is that third-party tools reset core isolation features without consent. If you know what this tool is, go ahead and uninstall it. But since most of us are oblivious to these tools, we recommend you perform a Clean Boot and then disable Memory Integrity. If it stays disabled, enable third-party services manually (that we disabled in Clean Boot) to figure out the culprit.
That’s it!
Read: Memory Integrity greyed out or won’t turn On/Off
Why does my memory integrity keep turning off?
Memory Integrity keeps turning off primarily due to incompatible, outdated, or corrupted drivers that Windows detects during startup, as these drivers fail security checks required for Hypervisor-protected code integrity (HVCI) and force Windows to automatically disable the feature to prevent system instability or crashes. We recommend you check our guide to know what to do if Memory Integrity keeps turning off due to an incompatible driver.
Read: Turn off Memory Integrity setting if Windows cannot load a driver
Is Memory Integrity enabled by default?
Yes, Memory Integrity is enabled by default. However, you can disable Memory Integrity from the Windows Security app. If Memory Integrity was disabled by default, it’s most probably a security policy issued by your organization’s IT admin.
Also Read: Turn off Memory Integrity protection to continue to update Windows.